CelebriDIY Inspiration: Embellished Ankle Straps

So I’ve noticed how celebrities have been opting for minimal traditional jewelry (ie: earrings, necklaces, etc…) and choosing to accessorise their… ankles! That’s right the ankles are making big come back on red carpets all across the world. As if that sexy ankle ever went out of style!
 Imagine my DIY delight when I was sitting front row at Nina Ricci and I got an up close an personal look at these blinged out ankle embellished pumps (and by sitting front row I mean scanning the collection on Style.com). My mind was in creative overdrive…
 Although my bright blue Aldo wedges are pretty amazing as is, I thought they could use a little embellishment
 I ran to my jewelry box an pulled out ever bling out brooch, button and earring I could find. I love the Nina Ricci inspired look, but don’t be afraid to add feather, bows, flowers, studs or chains to your ankle straps. There’s no material a lil E6000 can’t hold!
 DIYers Tip: If you use brooches you can simply slip them over the straps. Then there’s no need for glue. You can wear your shoes with or without the embellishments. Who doesn’t love options?!?
[MY DIY] DOUBLE CUFFS

 I posted about my obsession for Double Cuffs last week, and while walking through the baking section (an area of the store I rarely frequent) I spotted these cookie cutters. At $2 a pack, I grabbed two and headed home to start DIYing. I must say, I love that ah-ha moment when I find the perfect supplies to recreate a look I've been lusting after for a fraction of the price. For more DIYs using kitchen supplies watch my segment on Rachael Ray!
 :
: 

1. First, cut an inch of metal out of the small circular cookie cutter.
More steps after the break...

2. Cut a the same from a second circle

3. Place superglue on one of the cookie cutters
 4. And then place the circle with glue inside the other.
5. Hold until the superglue dries.

6. Last minute addition: wrap electrical tape around the ends (they can be a bit jagged from cutting)
Repeat with the cookie cutter a size up, but cut 2.5 inches out in the first step so cuffs are equal size.


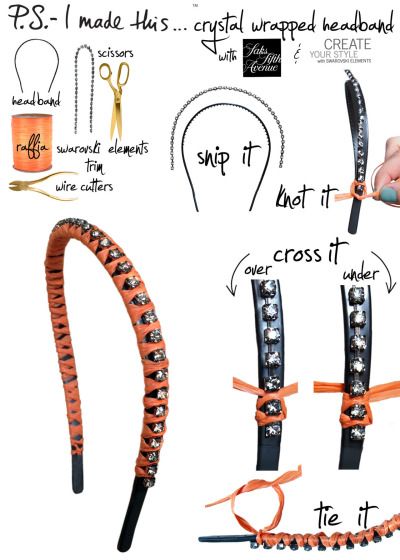
Spring fever is in full effect. Follow your heart with a headband as you step into the season with some extra sparkle and shine. Mix luminous and rich materials with earthy textures for a match made in heaven. Get inspired by crazy cool crystals from SWAROVSKI ELEMENTS and springtime hues for a haute headband thats to DIY for!
To create: Measure and cut SWAROVSKI ELEMENTS CUPCHAIN TRIM to fit the top of the headband. Chain should cover all but the bottom inch of the headband. Cut 4 feet of colored raffia and fold in half. Secure chain to the headband by knotting raffia onto the end of the cupchain trim. Begin wrapping from the bottom and continue all the way around securing chain. Use the cross-over method going over and under each crystal you wrap. Knot off once you reach the end and snip off any remaining raffia.
P.S.- You’re invited to dive into DIY this week with Erica Domesek where she will be at Saks Fifth Avenue in Atlanta, New York City & Palm Beach Gardens. Join Erica and create headbands, necklaces, bracelets and other j’amazing accessories with SWAROVSKI ELEMENTS. Click herefor details…See ya there!
Комментариев нет:
Отправить комментарий