APR 01
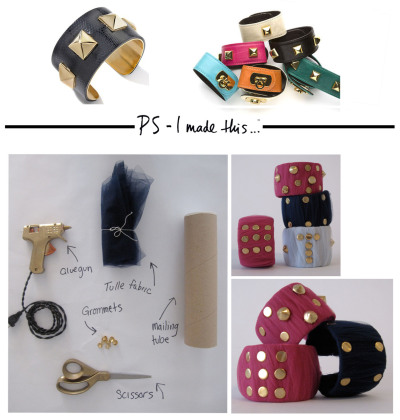
PS- I made this cuff bracelet…
Who doesn’t love a cuff?! This is a really sweet take on a punk cuff with feminine tulle! Its like prima ballerina meets Joan Jett! Tulle is making a big come back- get on board!
Materials will cost you under $10! Tulle is approx. $3/yard at your local fabric store (just need one yard). Hit up a Kinkos or any shipping supply store for a basic mailing tube, grab some grommets your fav craft store, www.mjtrim.com is one of mine, & you’re in business!
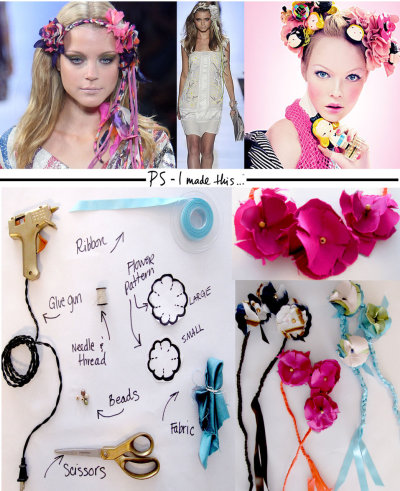
I’m borderline obsessed with these j’amazing bohemian floral headpieces. I can’t get enough of this delicious look spotted on DVF’s Spring 09 runway.
Round up some fun colored fabric, cut into Large and Small flowers (*see pattern & be sure to cut 1/2 inch slits for flowers to flutter), braid 3 pieces of satin ribbon (approx. 1 yd each), find a bead or button for the flowers center. Use tools listed above, and with a few stitches, dabs of glue, you have the essential Spring accessory!
Click here to watch me make a Floral Headpiece
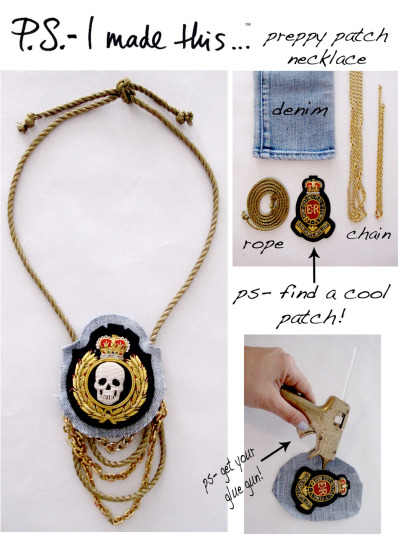
Confession! I’ve always been fascinated (and slightly jealous) of those stuffy private schools who got to sport super cute prep school uniforms. I think enforcing fashion is a fabulous policy! I’ve decided to live vicariously through private school peeps and re-create an accessory that brings out my inner prep; with a little edge. A few snips, a dabs of glue, some shiny ropes and chain is all it takes to turn posh inspired school fashion into an amazing accessory.
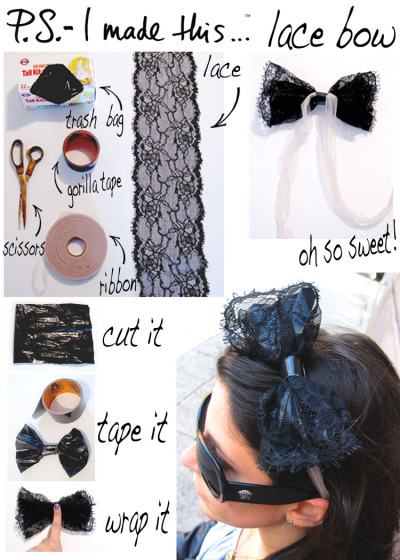
Every little girl at one point in her life went through the BIG bow phase, me included! If you’ve taken notice of the catwalks or scanned the fashion magazines you will see that bows are back in a BIG way! Our style stars have been spotted adorning all sorts of delicate and whimsical, over-sized head wear all over the place. From the Louis Vuitton bunny/bow ears to Marc Jacobs, Milly, and Sportmax runways, this trend is full on and taking over- you should too!
To make your beautiful bow, cut a trash bag (4”x6” approx.), gather it, tape it, wrap it in pretty french lace (or another fabric of your choice), add a ribbon and tape again. I love Gorilla Tape- its super strong and its shiny black finish looks just like leather- Trust! Available at most hardware stores.
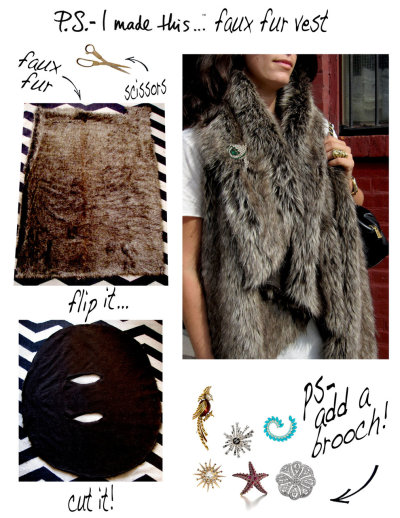
Fur-get about authentic pelts! Fakes are Faux-real! Everyone should have a furry luxe vest in their wardrobe, no ifs ands or buts about it. With a trip to your local fabric store and your trusty scissors, you will have chic traffic-stopping outerwear in minutes!
Get approx 1-2 yards of faux fur fabric, lay out on a flat surface. Cut a large circle. Measure the width of your shoulders and make two narrow openings in the center.

Welcome to Mixed Media 101. I’m totally roped into RHINESTONES and ROPE! This unexpected combo makes for a fun and chic dynamic duo. Combine hard and soft textures, dull and sparkly accents, layering materials in sporadic and whimsy swirls.
Swirl and glue your rope, Knot and snip ends, dazzle with rhinestones, slip on your earring wire, and you have a phenomenal pair of earrings! (PS- try www.mjtrim.com for lots of decorative metallic rope options).
Expect the unexpected, and you will be pleasantly pleased! After all, fashion should be fun! Throw out the rules, mix and match till your little heart desires.
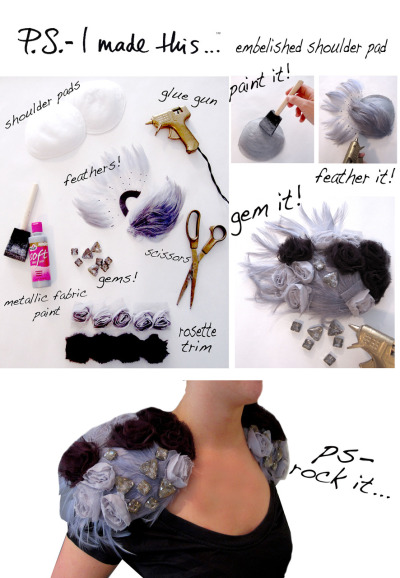
There’s a gray bird on my shoulder, its the truth, its actual, everything is satisfactual! Zippadedoodaa…
Yes, the bold shoulder is in full effect. Try your own take on this dramatic “Dynasty” style by updating and embellishing with delicate feathers and edgy gems. Nothing says decadence like a little splash of a statement shoulder!
Secure to blazers, tee shirts or dresses by adding safety pins, or velcro. Get creative with color combinations and sparkly gems! Hit up www.mjtrim.com for all your razzle dazzle shoulder needz.
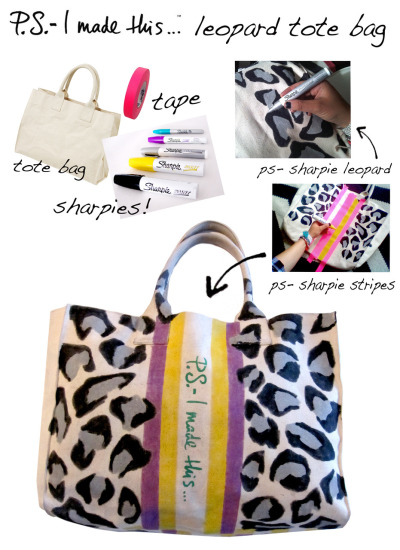
Lions and Tigers and Leopards… Oh MY! This Fall, Leopard has proven to be one of the hottest trends were following from runway to reality. With no time to spare and a desperate need for a fabulous tote bag, I rushed to Muji (one of the greatest Japanese stores) for an inexpensive bag, snagged some fun colored Sharpie paint pens, and tape. This chic design and Sharpie paint pens transformed my canvas bag into a chic personalized bag in minutes. I of course looked to Louis Vuitton and Goyard for the racing stripe inspiration!
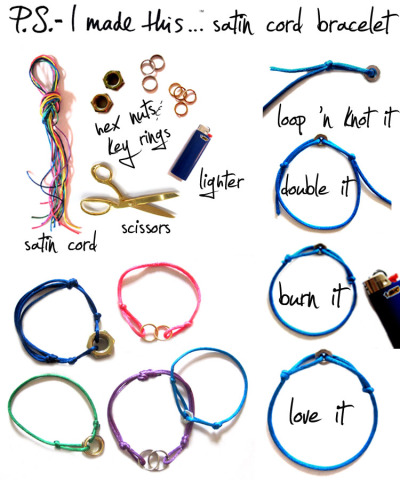
What’s not to love about Cartier’s Charity Love bracelets? In 2006, Cartier partnered with 24 high-profile and big-hearted Celebs including the likes of Eva Mendes, Scarlett Johansson, Salma Hayek, and more! Each satin cord signature bracelet has a dedicated Charity partner in a corresponding color, where the proceeds will benefit.
My version of the delicate bracelet inspired by this wonderfully chic and charitable initiative just so happens to be in Sarah Jessica Parker’s hue in blue which has partnered with UNICEF. Hit up your local hardware store for small key rings and hex nuts for your version. Be sure to singe the satin cord knots with a very quick burn using a lighter- but be careful! Safety first!
FEB 10

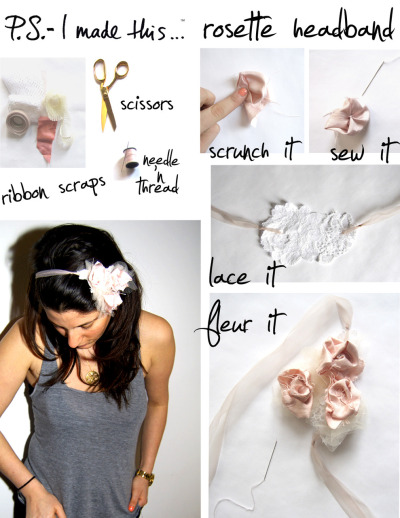
Confession: I’ve recently fallen madly in love. Who’s my new lover you ask? Ohhhh, It’s Chanel’s Spring Couture collection. My eyes were locked on these delicate tulle and lace frocks that were topped off with sweet and chic headpieces that made my heart go pitter-patter! Between Uncle Karl’s new collection, Victor & Rolf, and Marchesa’s delicate drama, massive amounts of tulle and rosette details make me do pirouettes and pas de bourrée like a Prima Ballerina!
This Valentine’s Day, fall in love a little harder with a headpiece. All you need for this whimsy accessory is some scrap fabric, ribbon and a needle ‘n thread

Slap on an apron, it’s time to stir up your fashion croc pot for a super chic ‘n classy case. Boxy silhouette bags are making a huge comeback for Fall/Winter 2010. Louis Vuitton is bringing the sexy lady back, while Ralph Lauren continues to knock us out with versions of his famously luxe Ricky bag (yes! Named for RL’s knock-out wifey).
To make a faux croc carryall of your own, purchase or re-purpose a lunchbox. Use tools to punch two holes in each side. Thread chain (test out a desired length before cutting) through one side, and connect with pliers after threading through the other side. Add dome nail headsonto the bottom corners for “feet” by pushing and bending back sharp pronged corners. Finish off with a j’amazing brooch that’s DIYing for a reinvention. P.S.- I love all things wild and animal-eque… a la Kieselstein-Cord!

Summer Solstice is upon us and it’s time to get down with BBQ’s, Braids, and all things Beachy & Boho! I love to sport summer accessories that are easy, breezy, and will help crank up the temperature. In keeping with my everyday modern and tres eclectic ways, I look to the Southern California vibes of the stylish Coachella festival, ROXY surfer chicks, tall teepees, and hints of Stevie Nicks. These sunny free spirits have a fashionable aura that I’m utterly in awe of and make me want to be part of their tribe!
To make your beachy boho headpiece, get some rawhide material, colorful beads, feathers, and neon tape. Braid approx 1.5 yards together, leaving some strands at the end to add beads and feathers. Secure feathers on with Duct or Gaffers tape.
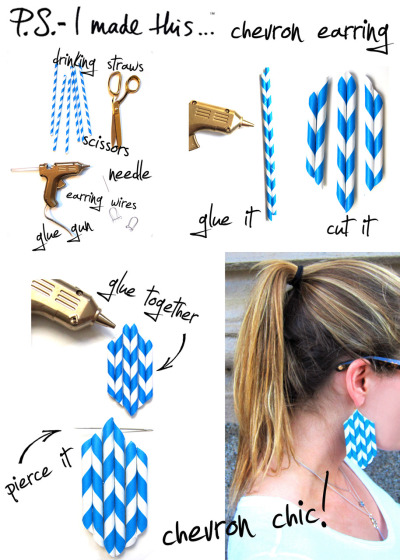
CHEVRON: ˈsh evrən. Noun. A line or stripe in the shape of a V or an inverted V. Use this translation and interpret you own chic representation and prepare for Craft-off! The chevron pattern became popularized by adorning sleeves of uniforms indicating rank or length of service, but more recently have taken over the Fashion and Interior worlds with the bold markings. Givenchy’s SS10 collection is ALL about the Chevron in B/W hues, where as bright dressers were spotted on Design*Sponge, and cool ‘n casual tanks from Club Monaco keep us feelin’ flirty!
Pick up some retro Barbershop-inspired Paper straws. Glue together was a few dabs of hot glue to make your chevron pattern. Trim straws to desired length and shape, glue together (feel free to trim again), and poke a little hole in the top where your earring wire can slide through.
P.S.- Show off your Chevron & your true col
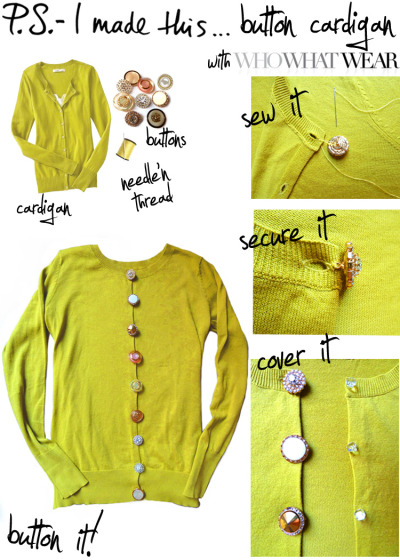
What’s a party without a Cardi? The quintessential cover up got its name from a British military commander, James Brudenell who was the “7th Earl of Cardigan”. Crazy, cool fact-right?! Traditional, classic and sophisticated cardigans have totally transformed and transcended, making their mark as an everyday essential. My j’amazing, fashionable friends, Hillary and Katherine of Who What Wear, and I agreed- we’re all crushin’ on Marc Jacobs FW10 knits. The backwards styling seen on the catwalk made us ooooooh and aaaaaah, and decide to collaborate for this Designer inspired DIY.
Get swept up in the sweater storm and update an existing cardigan with uber chic, sparkly, and ornate buttons… AND WEAR IT BACKWARDS! Old Navy has great cardigans or you can re-purpose one from your closet. Use vintage buttons or purchase some- my gems are from M&J Trim. Make sure to sew buttons on the side where the button holes are, and the original buttons will still go through the existing button hole. P.S.-DO NOT COVER THE BUTTON HOLES! The decorative buttons, will cover the existing ones when buttoned up. Note: Be a style warrior and wear your buttons on the back -if you want to be a front-runner in fashion!
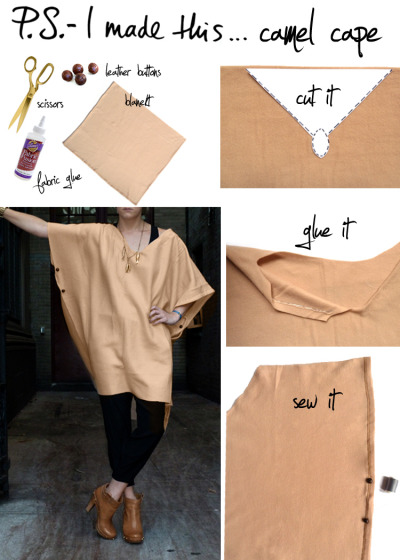
Falling for this seasons top 2 trends are inevitable. The color of CAMEL and the essential CAPE have captivated our hearts. Anyone and everyone knows this sophisticated hue is the preferred palate that will complement your Autumnal look. I’m loving them all… Chloe,McQueen, and Stella McCartney each have a fab version. And don’t forget essentials available at Shopbop and H&M. The curse of Camel is something that we all wish to be cast with.
To create a camel cape of your own, simply find a camel blanket or even a large piece of fabric, in the perfect shade. You can use any type of material… soft cottons, heavy fleeces, or nubby knits. Make a pattern, follow the lines, and cut your neck opening. Glue back the edges, creating a clean, finished, hem. Sew 2 buttons on both sides. This will be your arm hole opening and also a nice detail to add a bit of shape and help it drape.
P.S.- Be a caped crusader… and cruise through the season in camel
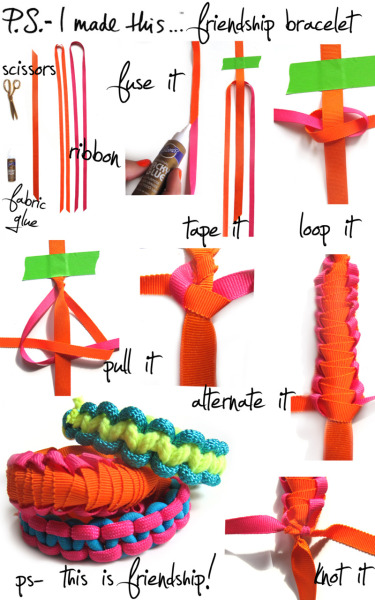
Friends are Flowers you pick for yourself, and I’m lucky to say that I’m blessed with the worlds most amazing bouquet of besties! Actions speak louder than words, so don’t just tell your friends how much they mean to you, show them! My friends at WHO WHAT WEAR and I agree that the demand for colorful and cool friendship bracelets using the COBRA stitch are back in a major way! I’ve been drawn to MARNI’S take on the friendship bangle creation for quite some time. Get inspired and get involved. Create chic BFF bracelets that represent the color your clan brings into your life. Everyone needs that reminder as well as a new accessory from time to time… make a note, and make a bracelet.
To create: Cut 3 pieces of ribbon or colorful rope (12” for base, Ribbon A & B approx 1 yard). Fuse together the ends of the 2 colors of ribbon with a small drop of glue. Do not start using ribbons, until completely dry. Tape down the shorter, center ribbon, to a steady and flat surface. To begin with the Cobra stitch, use Ribbon A, and cross over the center (base ribbon) making a loop. Bring Ribbon B under the tail and through Ribbon A’s loop. Once knotted through, pull Ribbon A & B equally, that will knot around base ribbon. Continue pattern and alternate the lead Ribbon from side to side. PS- If your pattern starts to go Spiral, that means you knotted on the same side and should un-do, and start on the alternate side. Once you have a Cobra pattern that is long enough for a bracelet, double knot ends, trim and tie off for a Chic Cobra Bracelet. Brave your Bestie on your wrist for a bold accessory, but more importantly- a blissful reminder of your BFF. PS- Check out MORE J’amazing versions of friendship bracelets on WHO WHAT WEAR!
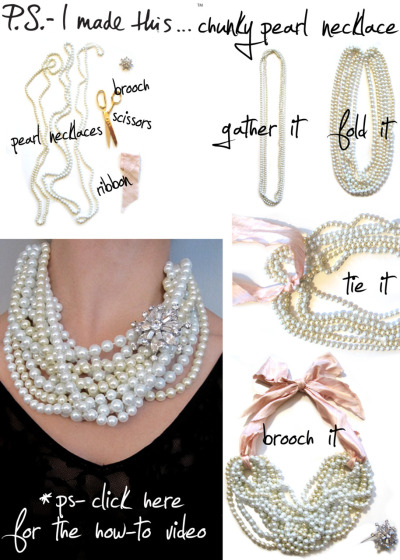
P.S.- LOVE IS IN THE AIR! Whether you heart St.Valentine’s Day or simply steer clear of it, we should always remember to love ourselves day in and day out, (Hallmark holiday aside). I will trade a box ‘o chocolates for jewelry any day of the week, and I’m sure most of you would too! Here is my DIY love life advice: Don’t wait around for your crush to come through with bijoux…. P.S.- MAKE IT YOURSELF! Follow in the footsteps of leading sweethearts Audrey Hepburn and Carrie Bradshaw, who always seemed to be doused in layers of pearls, while looking for their leading man.
To create a stand out, chunky, pearl statement necklace just reach for 3 strands of long pearl or beaded necklaces (experiment with different colored options), wide ribbon, and a decorative brooch. CLICK HERE TO WATCH THE HOW-TO VIDEO with Fashionista.com and get ready to fall head over heels in love with this lovely neck candy! xoxo

New year… new you! It’s time to razzle, dazzle, sparkle, and shine with some eye candy that’s ear candy. I’m always drawn to details that glisten and gleam and the flavors of Morocco and India do just that. The beautiful accents and embellishments originating from these far away lands are swoon-worthy. John Robshaw, my favorite textile and interiors genius pulls his inspiration from abroad, creating decadent designs which are ever-present in my home. Jewelry mainstays Me & Ro have always touched upon the essence of Tibetan elegance, mixing precious stones and luxe metals.
To create a pair of earrings that reflect these unique and rich cultures, reach for rhinestone or mirrored buttons and pipe cleaners. Slip and twist as you go, and join together with a final tight twist, then loop for your earring wires. Don’t tell me, “Sari, I’m not crafty”, because anyone can do this DIY!
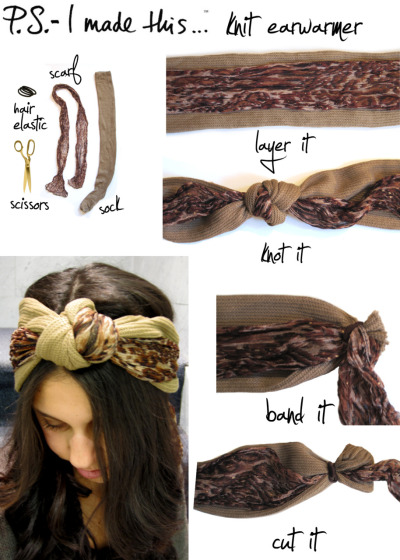
P.S.- you stand out, so why shouldn’t your accessories? This is knot your typical ear warmer. Take a DIY approach on the turban tie-up, add some sweetness, and P.S. your own version. Get excited to craft and capture some street chic vibes.
For the foundation of the ear warmer, reach into your drawers and re-purpose a sock! If you’re like me and have a few “lone solider” socks, this is a great way to re-purpose them. First, layer a thin scarf (or opt for a piece of fabric) on the sock. Make sure the 2nd layered fabric is longer than the sock base. Knot the two together, band the sides, trim with sharp scissors and you are ready to rock it. Secure in the back by tying the ends together.

“L” stands for Long and Luxe. The lovely ladies at Who What Wear and I both fell hardcore forChanel’s dramatic chain earrings, which embody these 2 “L’s”. Chanel’s SS11 runway boasted gold and black decadence that dripped and made jaws drop. Karl Lagerfeld’s sophisticated lady, toyed with her inner rebel- migrated downtown- and showed her wild side. Live long and prosperous, like a Lagerfeld Lady, and….P.S.- create something you’re longing for!
To create a waterfall of wonderful chain inspired by Uncle Karl’s, connect jump rings to long pieces of cut chain using small pliers. Create two long clusters of chain, attaching them together by threading fishing line through a ribbon clamp. This will create a full chain with lots of movement. Triple knot and snip off ends of fishing line. Use a strong adhesive glue to attach earring posts onto the back of the ribbon clamp. Hold in place for a few seconds, and let dry completely before moving. To achieve a bottom of black ombre, lay earrings on flat covered surface and lightly spray from middle down, using matte spray paint. Let dry- flip, and spray another light layer (PS- spray outside!) When earrings are dry, you’re ready to rock em!
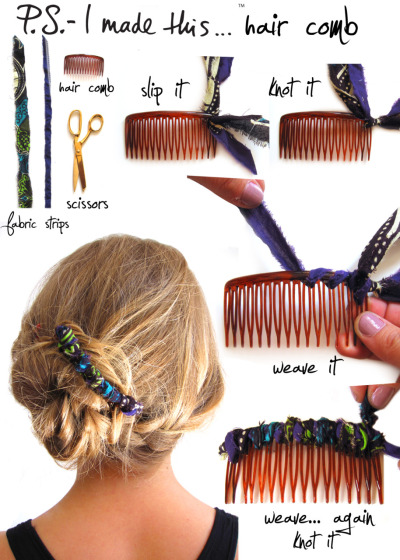
De-tangle for a re-tangle. Take note in women’s hair history and get inspired by styles that have swept us away for centuries. Today’s modern day chick typically opts for the up do for special occasions, however that’s not the case anymore. Time to treat everyday as a special occasion! Thakoon showed intricate hairstyles with woven colored and textured materials up and down his runway. More creative and eye-catching Fall/Winter trends: bold fabric combos. The other “PS” love of our lives, Proenza Schouler gets the gold medal for taking printed fabrics and infusing together in unexpected, j’amazing ways. Get inspired by these two trends and create style of your own, especially since the hair comb is making a comeback!
To create, Pick up hair combs from you local drug or beauty store. I’m a huge Goody fan, personally! Rip pieces of cotton material into 1” strips. Leave a little bit of a frayed edge will give you more texture. If you want a cleaner look, cut your fabric strips with scissors. P.S.- If you cant find fabric, cut up an old tee that may be lying around. Double knot two 12” strips on one end of a tooth. Weave the fabric in and out of the teeth, and repeat with the second piece. Double knot both pieces together on the last tooth, and snip the ends. You’re ready to rock the up do and adorn your hair with the ultimate DIY accessory. Get creative with your hair style using bobby pins, and other styling tools for various looks. P.S.- if you love to rock the high-bun, add a comb to the base of your top knot to top off!
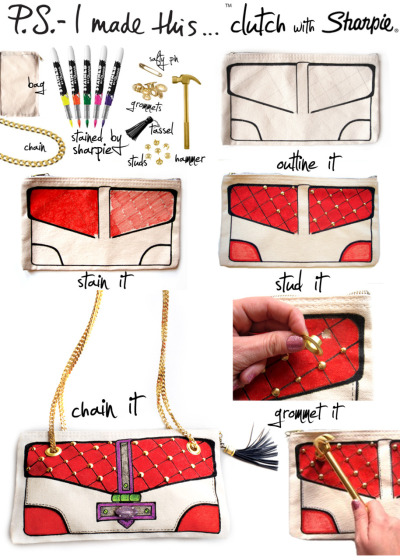
Make your mark in the world… with a marker! Introducing Stained by Sharpie. Sharpie’s first ever fabric marker allows you to scribble, draw, color and stain the day away. My love affair with the iconic brand is no secret. I was honored by being chosen to “start something with Sharpie”, partnering in the exciting launch. A DIY clutch was in order. This season, everyone who’s anyone is joining the clutch craze. It’s timeless, stylish, and wreaks of chic.
P.S.- CHECK OUT THE BEHIND THE SCENES CLUTCH CREATION VIDEO!
To create a clutch using Stained by Sharpie, outline a canvas bag using a ruler for straight lines, and add your own desired details. Begin shading in top flap and continue to fill in using different pressures to create a lighter or darker shade. Use a ruler to measure equal lines and create quilted effect (Approx. 1”). Outline diamond quilting and add stud. Place studs where lines intersect, and add stitching detail with dotted straight lines around the border. Next, cut slit for grommets, aligning on both sides and hammer together. Purchase a grommet kit for this step. Feed chain through all four grommets, using safety pin to join ends of chain (or simply connect with pliers). Add a fun tassel and “stained” faux hardware inspired by the fab clutches seen on the runways this past season. Finally, Glue a gem or bauble on for the finishing touch!
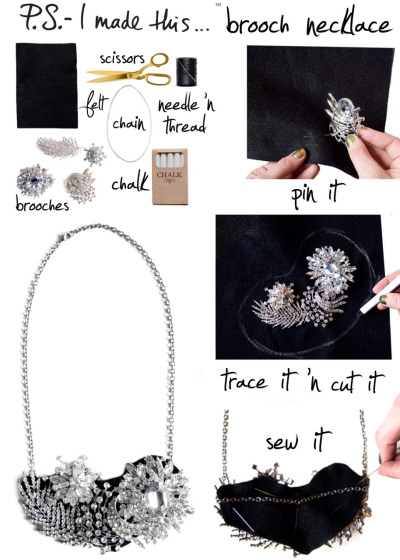
New year = new you! Sparkle and shine for a fete that’s finer then fine this New Year’s Eve. Expect jaws to drop (along with the ball) while you ring in 2012. Get inspired by over-the-top glitz and glam for a decadent DIY stunner. Re-purpose brooches in your jewelry box, or pick up a few at flea markets or on eBay.
To create, pin several brooches, arranged in a bib-like formation onto a piece of felt. Outline the bib shape with chalk and cut out around the brooches. You may need to sew a few stitches on the backside of the felt if brooches are weighing down the fabric, as you want them to lay flat. Flip over necklace base and sew a chain onto the back. Use a new chain or opt for one from an old necklace for an extra special touch.
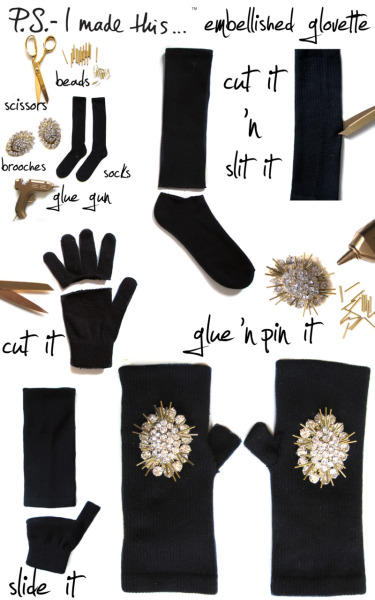
All hail McQueen! Keep your manicure out and about, while your palm stays calm and carries on. Alexander McQueen’s fingerless gloves inspired these delicious DIY glovettes, created with our friends at Who What Wear. To create your own pair, cut the feet off of a pair of socks, which leaves you with a “tube”. Cut all of the fingers off minus the thumb then snip off approximately 1/2” of thumb’s fingertip. Make a 1”-vertical slit on the outside of the tube to create the thumb hole. Slide gloves inside the tube, pulling the thumb through the hole. Find two sparkly brooches or buttons and glue thin tube shaped beads with a hot glue gun or super glue. Once dry, pin or sew to the top of the glove.
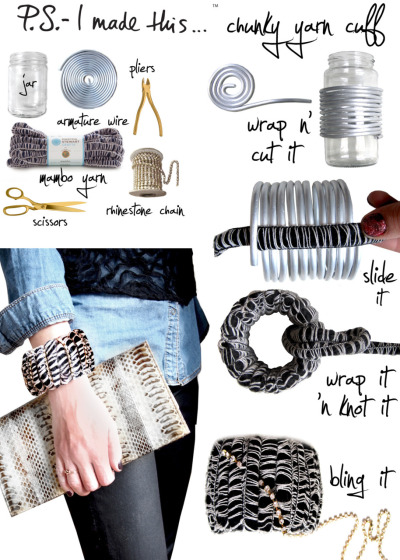
Tiz’ the season for DIY and who says only trees are for decorating!? Keep calm and get your craft on with a bold accessory that boasts this season’s chunky knit trend. Make a statement with a sweet and soft style essential that’s perfect to cozy up to.
To create: Make a bracelet base using armature wire, which is extremely easy to form. Find a cylinder-shaped item that fits your wrist- jars work great. Continue to wrap around until you achieve the desired width. Use wire cutters to snip the end. Wrap Martha Stewart Crafts Lion Brand Mambo Yarn (P.S.- it’s available in several other colors including hot pink!). Slide under one coil, and wrap around until the entire bracelet is covered. Secure the end with a knot and snip on the inside of the cuff. Lastly, add a bit of bling and wrap rhinestone chain on top for a sassy touch.
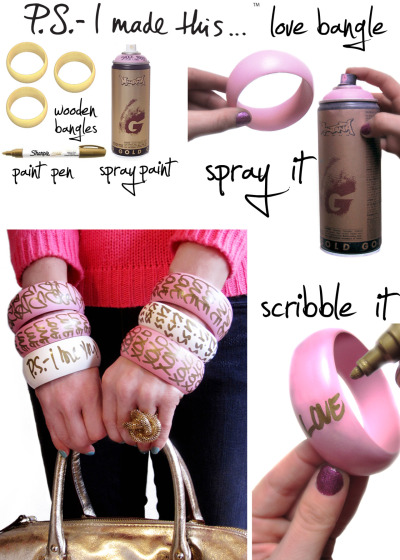
“The greatest love of all is easy to achieve. Learning to love yourself is the greatest love of all”. Whitney said it best… but so did Oscar! Mr. de la Renta’s go-to quotes were etched into resin bangles that boasted his words and beliefs.
This Valentine’s Day, DIY your heart out, literally. It’s time to stop wearing your heart on your sleeve and start sporting it ‘round your wrist… with a touch of repetition. Mark my words, by marking yours with a graffiti style love note accessory. P.S. - Remember more is more, so scribble ‘em, stack ‘em and love ‘em lots!
To create: Apply two smooth coats of spray paint to wooden bangles. Be sure to wait until paint is completely dry before picking up. Use Sharpie Paint pens to scribble your love notes and quotes all around the bracelet. For an extra detail, inscribe the inside as well. Get creative with your color combinations and messages. Create a bevy of bangles for yourself and friends. What better way to say “I will always love you”, than with a wristed development that’s to DIY for!
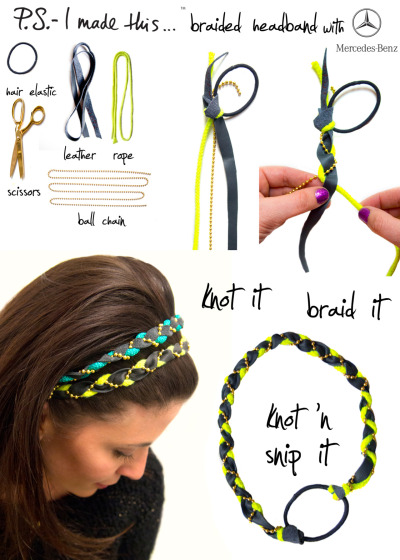
Stand out as an Icon of Style. Get inspired by the epitome of innovation, sleekness, technology and sportiness. Follow the Mercedes-Benz iconic road map for luxury and celebrate style with this DIY fashion project. Inspired by iconic essentials and unique modern design , we created a j’amazing braided headband using Mercedes-Benz leather and layered in texture, to top it off. After all, it is Mercedes-Benz Fashion Week and we want to cruise around in style.
To create, cut a piece of leather approximately 1/2” wide and 2.5-3 ft long. Add a bright cord (or ribbon) and ball chain. Knot all three materials together onto a hair elastic and braid. Once you have a braid long enough to wrap around your head, knot off on the other end of the hair elastic. Be sure to pull tight to make sure it’s secure. Snip the ends and you’re ready to brave a bold braided accessory!
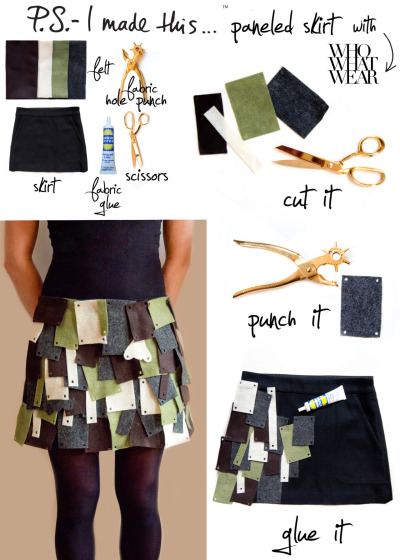
Lose yourself in layers! My friends at Who What Wear and I did just that when we fell forCharles Anastase’s Fall/Winter 2012 stunners. The melting pot of military hues infused into feminine silhouettes is to DIY for! Get creative with your own color story and start “swatching” skirts, shirts, dresses…anything your heart desires.
To create, find a basic mini skirt to use as a base. Incorporate several complimentary shades of felt material and cut rectangles in an array of different sizes. Get creative and cut shapes with scalloped edges to add dimension and movement. Use a fabric hole punch to add extra detail to the felt pieces. Place swatches in a random pattern, starting with the bottom of the skirt, and overlap as you move towards the top…making sure to completely cover the surface. P.S. — Lay your complete pattern out before you start to glue. Adhere the swatches directly onto the skirt and hold in place for a few seconds to secure. Before you get decked in your DIY, make sure to let the skirt dry completely on a flat surface….and then, swatch out!
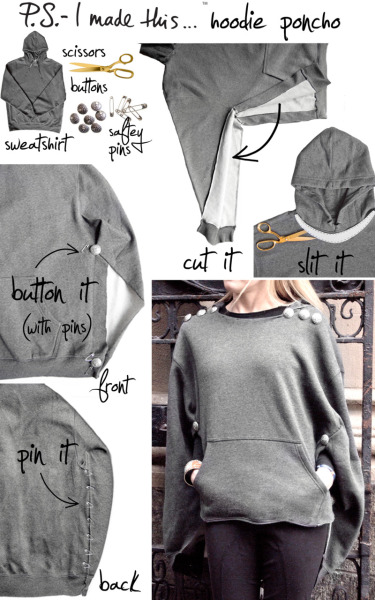
Comfort plus cuteness makes for a winning combo, so punch up your look with a poncho! Create a fresh look by reinventing a classic piece and stay cozy with this nouveau hoodie overhaul.
To create, make a cut from the side seam of the sweatshirt body as well as each side of the inner-arm. Open up the neckline with a crew neck cut-out. Be sure to cut ONLY the top layer so you don’t loose the hood. Close up the back by pinning large safety pins (or feel free to sew) across your new open seam. Cut the bottom sides (both front and back) into a curved shape, keeping the back a bit longer than the front. Secure the sleeve to the torso, which creates a poncho silhouette. Use large safety pins and pin approximately halfway down the bodice. For the armhole, attach buttons on the top and bottom front sections. Use any button you like and attach with safety pins or sew. Use the same buttons to add accents to the shoulder seam.
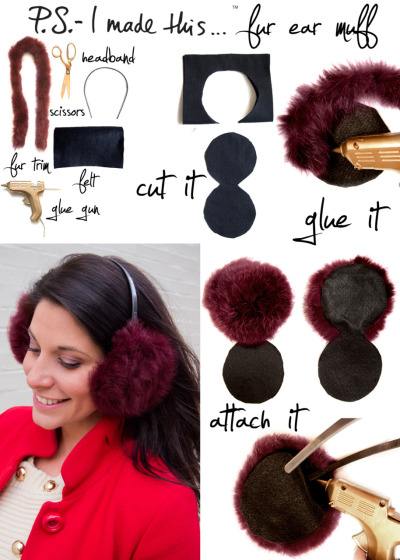
Burgundy, merlot and cabernet wine…their rich and mighty hues add great flavor to design. Lanvin recently created yummy earmuffs in this of-the-moment shade. Get inspired, stay warm, and feel good with a fuzzy fix!
To create your own: fold a piece of felt in half, which will be the base of the earmuff. Trace and cut a circle leaving approximately 3 inches flat on the bottom fold. The size of the circle can vary per person. You will need two of these felt rounds. When open flat, circles should be connected in the middle. Apply small amounts of glue onto the outside of the felt, and begin wrapping around a fur or faux fur strand, gently holding it in place until set. Continue to glue and coil inward until you reach the center. When completely covered, trim excess fur. Attach each muff by sandwiching them outside of a headband, gluing insides of felt together.
P.S. We’re also over-the-moon for these fox fur headphones from Beats by Oscar de la Renta…check them out!
..,WOW YOU ARE AMAZING! (^_^)
ОтветитьУдалить