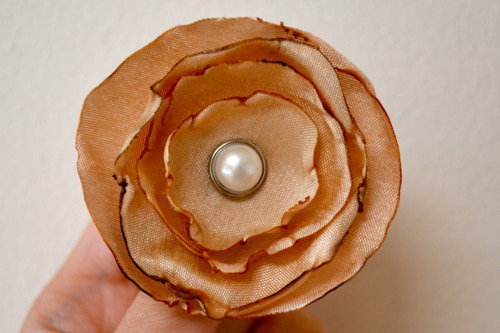
You have seen one of these right?
I’m gonna show you how to make them. They’re really fun to make!
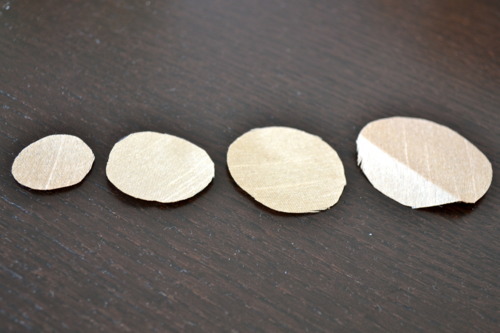
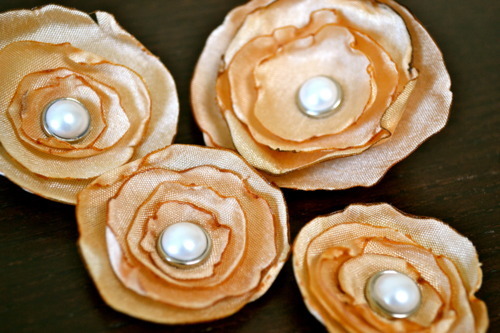
Cut out fabric circles in different sizes like this:
Start with one circle and use it as a guide to cut the next one just slightly bigger. They don’t need to be perfect…at all. Just have fun!
They should be able to nestle within each other like this when you stack them up:

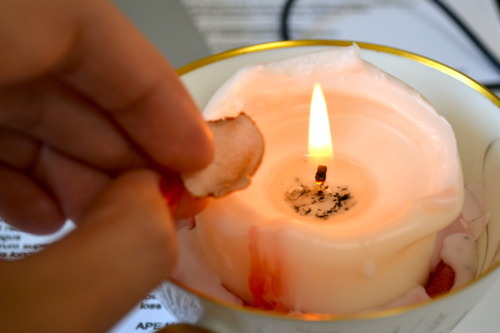
Next, you need an open flame to slightly melt the edge of the fabric circles. Be careful while working on this step. You can use a lighter but I didn’t want to hold it so I used a candle.
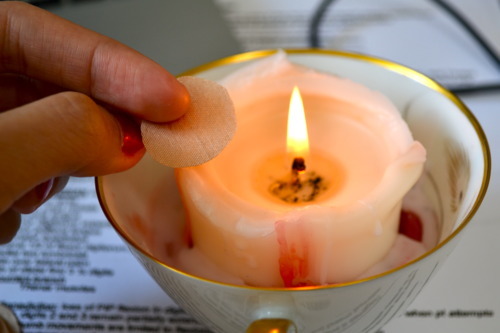
Hold the fabric circle close to the flame, and allow the edge to melt just a little bit. This step is different for each type of fabric you use. You should do a test run with a piece of scrap fabric to find out how it reacts to heat. Too much heat will burn off your fabric and too little will not show the effect. We’re looking for the edge of the fabric to curl up a little bit to create a small cup…
(You can always trim your wick to create just the right amount of flame for your project).
Repeat the same step to all the “petals” and stack them up to create the flower. To attach all the layers together, you can sew using a needle and thread or a hot glue gun or, puncture a hole through all the layers and use a brad to hold them all together which is what I did here.

You can use these to embellish your scrapbook page, attach them to hair clips, head bands, create a bridal head piece, make a fascinator, use it as a brooch, attach it to a waist belt…the possibilities are endless :-)
I used the matching flower to embellish my cosmetic bag here, and I used a contrast color flower to update my zipper pouch here for a fun, surprising look.
If you make these, be sure to share pics!
Enjoy!
Hello everyone,
Warmest welcome to the new followers. Thank you very much for joining us!
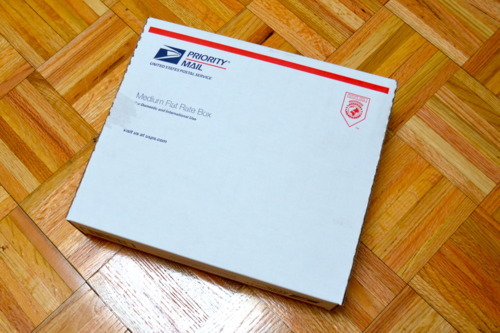
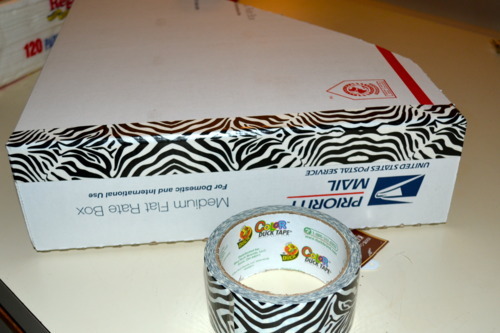
Today, I made use of post office cardboard boxes and patterned duct tape
Let’s get started!
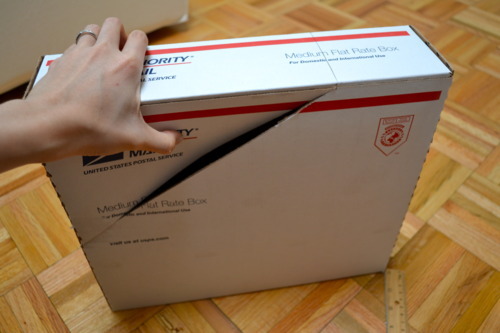
You know these boxes are free, right?
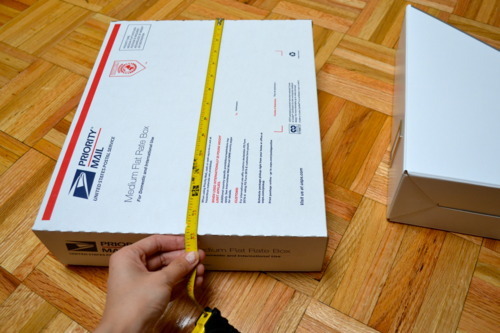
I want to fit my 12x12 patterned papers so I’m gonna use the longer side of the box. It measures 14in.
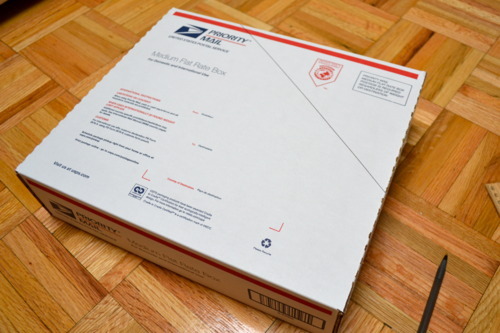
Using a pen and ruler, I drew a line on both side of the box like this. If you make more than one box and plan on having them right next to each other then make sure the slopes of these lines are the same on all boxes.
Cut along your drawn lines using a craft knife and be very careful while cutting
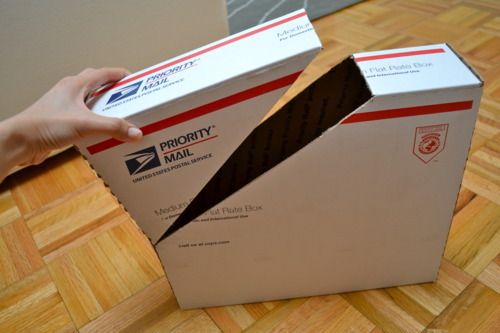
Cut the top part off too…
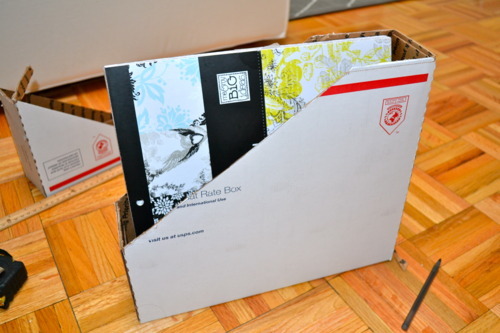
see how my 12x12 paper pack fits just fine inside of it?
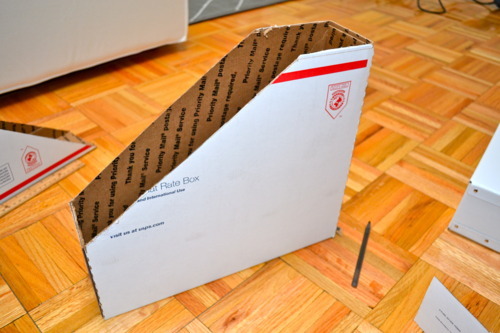
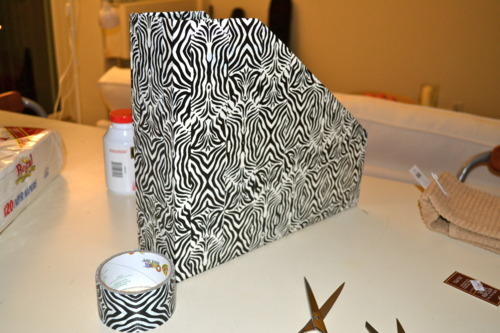
Now the fun part starts…
cover your box with duct tape
ta-da…:)
Here they are on the shelf of my crafting/sewing nook.
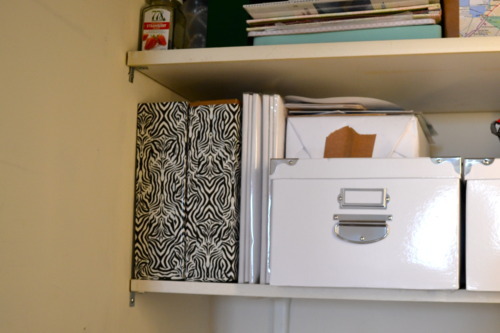
I’ll update you guys on the nook. I’m turning a closet into my crafting, sewing place. Here is a sneak peek

This card holder is made of the best black leather – it just feels super luxe. It’s Leather Factory brand leather that I purchased at my local craft shop! I made this studded card holder because I wanted to make a downtown version of my DIY Business Card Case for holding my ID, credit cards and cash on a night out. Also, I’m addicted to leather. And studs.

I made a modified pattern of my business card case, used chalk to mark it on the back side of the leather and cut it out. The changes I made were to extend the front flap so it came down flush with the bottom of the case and had rounded corners. I also changed the inside slightly to make a curve that was lower in the center and higher on each side instead of the opposite as I did in the original case. If you are interested in a scanned copy of my pattern just leave a comment and I’ll be happy to send it to you. I folded up the inside pocket and used leather cement to secure it. To keep it from unfolding while drying I used a few binder clips – they work perfectly.

After that I made a paper grid (barely visible above on the left) to ensure the metal rivets would be evenly spaced. When I made the Studded Suede Pouch I just got started and hoped it all lined up in the end but since these pieces were round instead of square I decided I needed a plan. I used a ruler to draw a grid of lines that were each about 3/8″ apart and then punched through all the intersections and marked them on the wrong side of the leather. Then I used my leather punch to make the holes. At this point I actually thought the perforated leather looked pretty cool and was tempted to leave it that way or use embroidery floss to make some kind of crazy design.

But I couldn’t give up on my rivets… they’d never forgive me! First I inserted all of them into the leather and then I set them. The final result is super cool looking and the weight of the rivets is enough to keep the wallet closed securely.

Here’s my new shoes and card case waiting patiently for their night out on the town.


WhatIWore: How cute is this little cork clutch?! I originally bought sheets of very thin cork for a DIY show makeover, but thought it a little too delicate for that kind of foot traffic. Instead, I did a little woven wallet makeover! Here’s how!
BEFORE:


Supplies:

Start by measuring out your cork strips. I cut mine 1/4” wide.


Line up strips in tidy row and glue to one edge of wallet, ink marked side down. With hot glue - less is better.

Now weave in short strips. Over, under, over under. For a tighter weave, shimmy the short strips in close to one another.

Next you’ll trim the excess cork from the short strips and glue down to wallet. Lastly, you glue down the end of the long strips.
Now, repeat on the other side of the wallet.

To hide any of those rough edges or hot glue, finish up by placing a long strip around the entire border.

Ta-da! How cute!?

WhatIWore: Looking for a cheap and easy way to update your sunglasses? Here’s a quick DIY on my striped shades.

Supplies:

Next I cut a strip of tissue long and wide enough to fully cover the side band. Using some watered down glue and the sponge brush, I delicately applied the tissue. Mega patience is necessary here! Once tissue is applied, gently smooth out.

Once the entire band is covered, I let the glue set up before trimming excess tissue.
Next I clipped around the curves of the side band, much like you’d trim a curve when you’re sewing.

Now glue excess to inner side of side band, slowly and carefully. Everything should wrap around smoothly.

Finally, once the tissue paper is dry, I coated the side bands with a layer of clear nail polish.
The entire project cost under $20 (I picked everything up from Target) and under an hour to complete!

I’m gonna show you how to make them. They’re really fun to make!
Cut out fabric circles in different sizes like this:
Start with one circle and use it as a guide to cut the next one just slightly bigger. They don’t need to be perfect…at all. Just have fun!
They should be able to nestle within each other like this when you stack them up:
Next, you need an open flame to slightly melt the edge of the fabric circles. Be careful while working on this step. You can use a lighter but I didn’t want to hold it so I used a candle.
Hold the fabric circle close to the flame, and allow the edge to melt just a little bit. This step is different for each type of fabric you use. You should do a test run with a piece of scrap fabric to find out how it reacts to heat. Too much heat will burn off your fabric and too little will not show the effect. We’re looking for the edge of the fabric to curl up a little bit to create a small cup…
(You can always trim your wick to create just the right amount of flame for your project).
Repeat the same step to all the “petals” and stack them up to create the flower. To attach all the layers together, you can sew using a needle and thread or a hot glue gun or, puncture a hole through all the layers and use a brad to hold them all together which is what I did here.
You can use these to embellish your scrapbook page, attach them to hair clips, head bands, create a bridal head piece, make a fascinator, use it as a brooch, attach it to a waist belt…the possibilities are endless :-)
I used the matching flower to embellish my cosmetic bag here, and I used a contrast color flower to update my zipper pouch here for a fun, surprising look.
If you make these, be sure to share pics!
Enjoy!
Hello everyone,
Warmest welcome to the new followers. Thank you very much for joining us!
Today, I made use of post office cardboard boxes and patterned duct tape
Let’s get started!
You know these boxes are free, right?
I want to fit my 12x12 patterned papers so I’m gonna use the longer side of the box. It measures 14in.
Using a pen and ruler, I drew a line on both side of the box like this. If you make more than one box and plan on having them right next to each other then make sure the slopes of these lines are the same on all boxes.
Cut along your drawn lines using a craft knife and be very careful while cutting
Cut the top part off too…
see how my 12x12 paper pack fits just fine inside of it?
Now the fun part starts…
cover your box with duct tape
ta-da…:)
Here they are on the shelf of my crafting/sewing nook.
I’ll update you guys on the nook. I’m turning a closet into my crafting, sewing place. Here is a sneak peek
This card holder is made of the best black leather – it just feels super luxe. It’s Leather Factory brand leather that I purchased at my local craft shop! I made this studded card holder because I wanted to make a downtown version of my DIY Business Card Case for holding my ID, credit cards and cash on a night out. Also, I’m addicted to leather. And studs.
I made a modified pattern of my business card case, used chalk to mark it on the back side of the leather and cut it out. The changes I made were to extend the front flap so it came down flush with the bottom of the case and had rounded corners. I also changed the inside slightly to make a curve that was lower in the center and higher on each side instead of the opposite as I did in the original case. If you are interested in a scanned copy of my pattern just leave a comment and I’ll be happy to send it to you. I folded up the inside pocket and used leather cement to secure it. To keep it from unfolding while drying I used a few binder clips – they work perfectly.
After that I made a paper grid (barely visible above on the left) to ensure the metal rivets would be evenly spaced. When I made the Studded Suede Pouch I just got started and hoped it all lined up in the end but since these pieces were round instead of square I decided I needed a plan. I used a ruler to draw a grid of lines that were each about 3/8″ apart and then punched through all the intersections and marked them on the wrong side of the leather. Then I used my leather punch to make the holes. At this point I actually thought the perforated leather looked pretty cool and was tempted to leave it that way or use embroidery floss to make some kind of crazy design.
But I couldn’t give up on my rivets… they’d never forgive me! First I inserted all of them into the leather and then I set them. The final result is super cool looking and the weight of the rivets is enough to keep the wallet closed securely.
Here’s my new shoes and card case waiting patiently for their night out on the town.
DIY: Cork Clutch
WhatIWore: How cute is this little cork clutch?! I originally bought sheets of very thin cork for a DIY show makeover, but thought it a little too delicate for that kind of foot traffic. Instead, I did a little woven wallet makeover! Here’s how!
BEFORE:
Supplies:
- Thin sheet of cork (I used 1/16”)
- Hot Glue Gun and Glue
- Flat wallet or clutch
- Ruler
- Scissors
- Pen
Start by measuring out your cork strips. I cut mine 1/4” wide.
Line up strips in tidy row and glue to one edge of wallet, ink marked side down. With hot glue - less is better.
Now weave in short strips. Over, under, over under. For a tighter weave, shimmy the short strips in close to one another.
Next you’ll trim the excess cork from the short strips and glue down to wallet. Lastly, you glue down the end of the long strips.
Now, repeat on the other side of the wallet.
To hide any of those rough edges or hot glue, finish up by placing a long strip around the entire border.
Ta-da! How cute!?
DIY: Striped Shades
WhatIWore: Looking for a cheap and easy way to update your sunglasses? Here’s a quick DIY on my striped shades.
Supplies:
- Sunglasses (white or light frames)
- Tissue Paper
- Glue
- Sponge Brush
- Clear Nail Polish
Next I cut a strip of tissue long and wide enough to fully cover the side band. Using some watered down glue and the sponge brush, I delicately applied the tissue. Mega patience is necessary here! Once tissue is applied, gently smooth out.
Once the entire band is covered, I let the glue set up before trimming excess tissue.
Next I clipped around the curves of the side band, much like you’d trim a curve when you’re sewing.
Now glue excess to inner side of side band, slowly and carefully. Everything should wrap around smoothly.
Finally, once the tissue paper is dry, I coated the side bands with a layer of clear nail polish.
The entire project cost under $20 (I picked everything up from Target) and under an hour to complete!
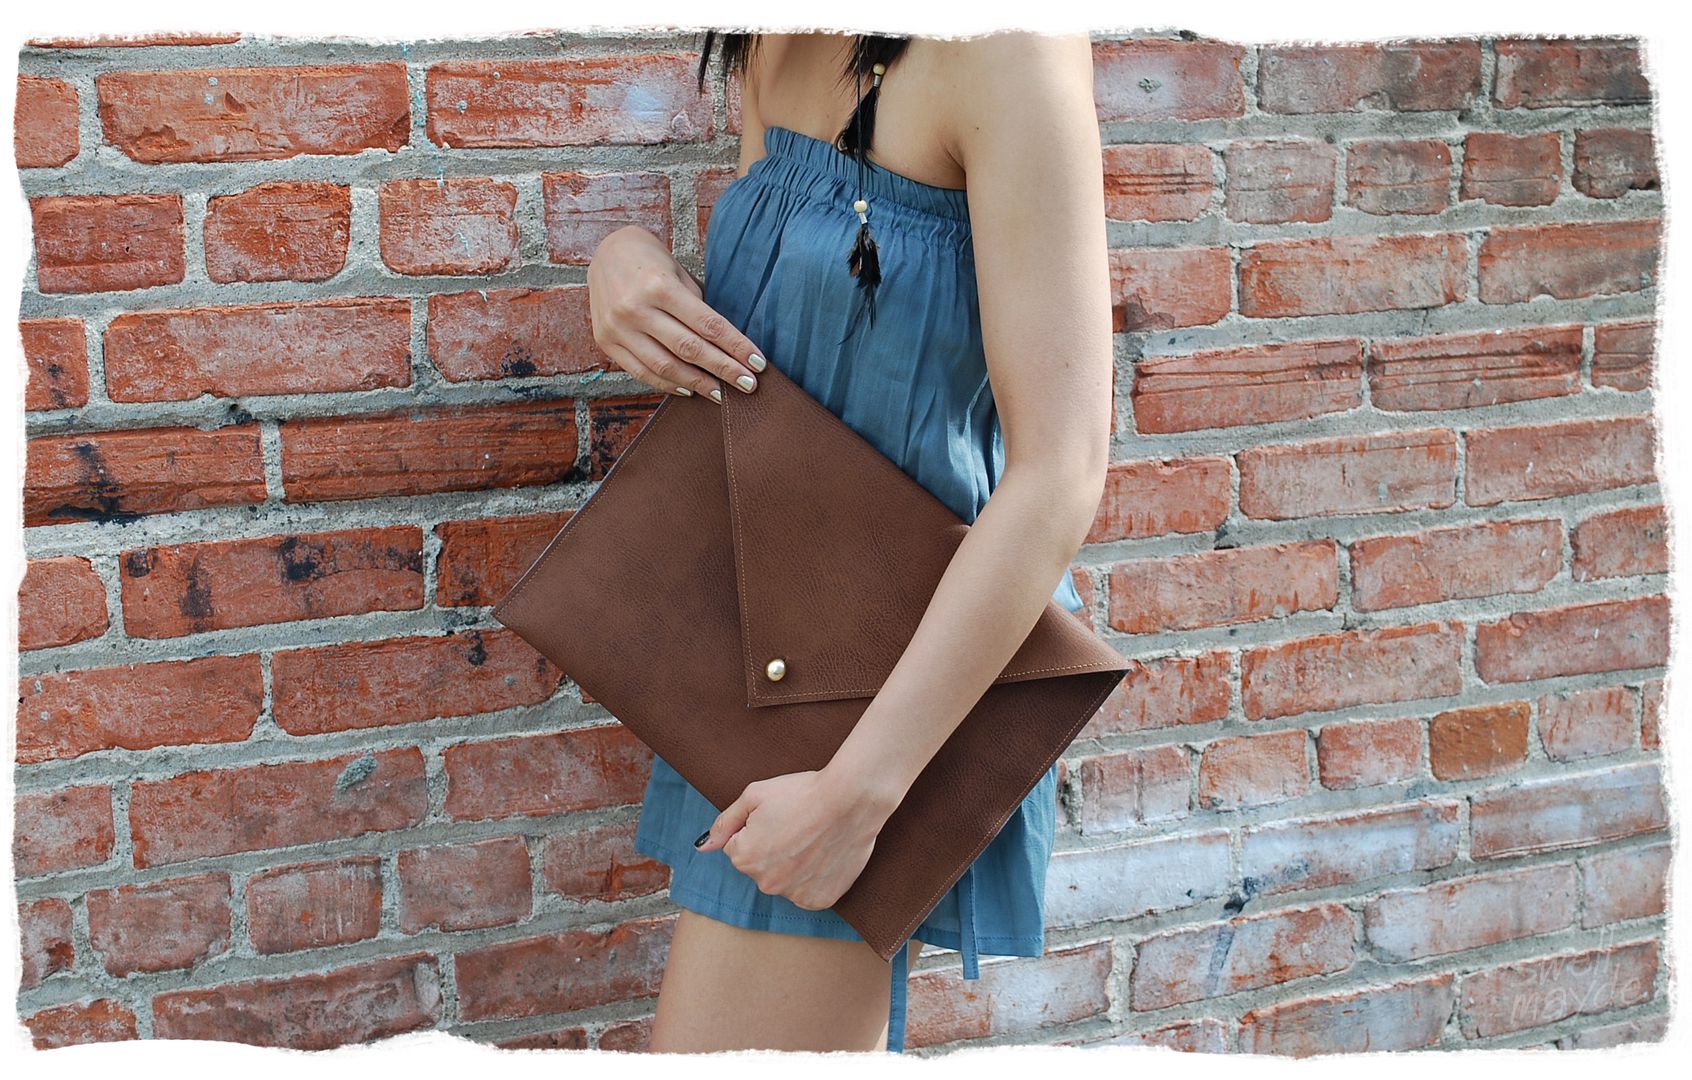
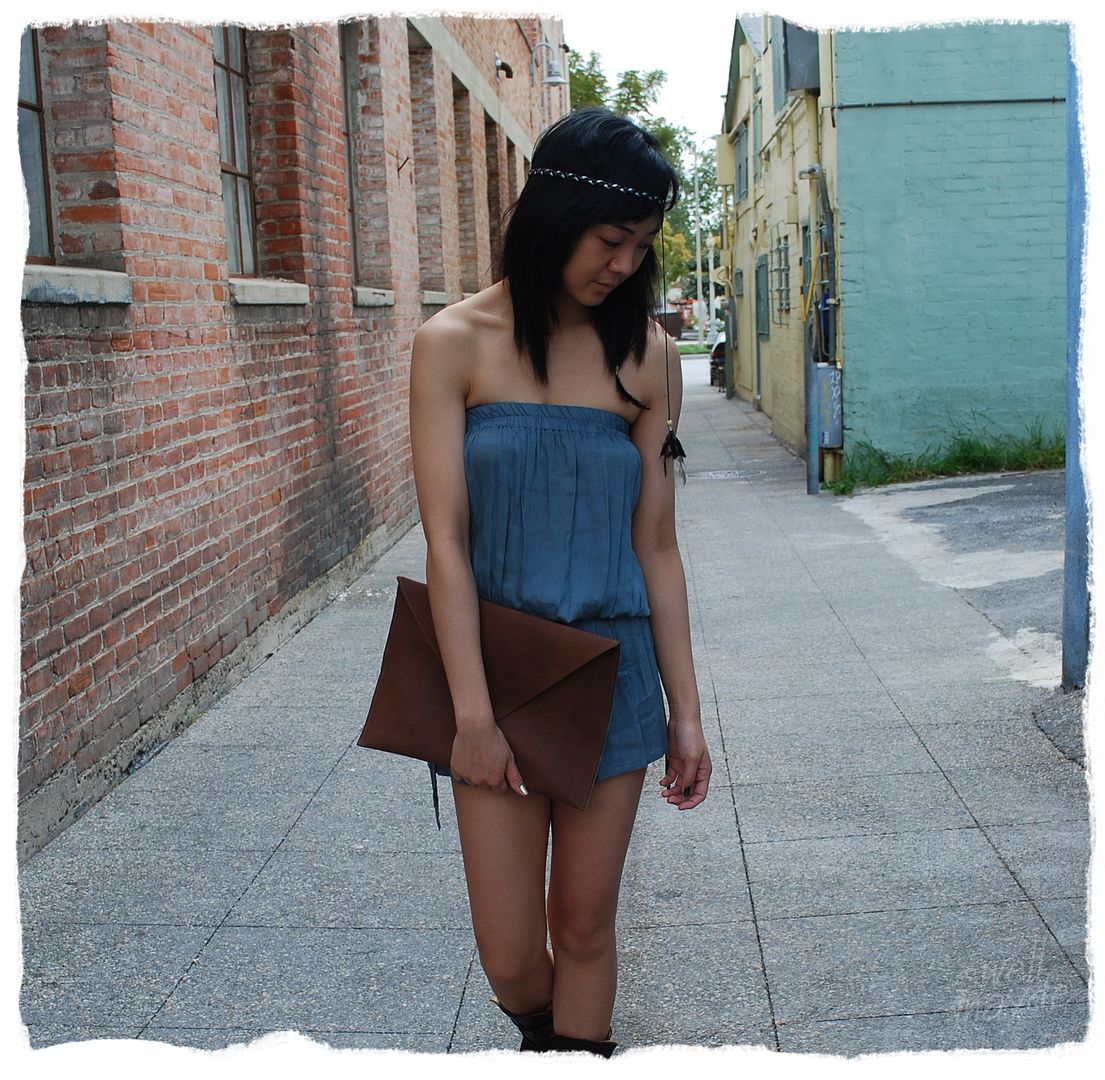
DIY envelope clutch


(vintage romper, river island feather headband)
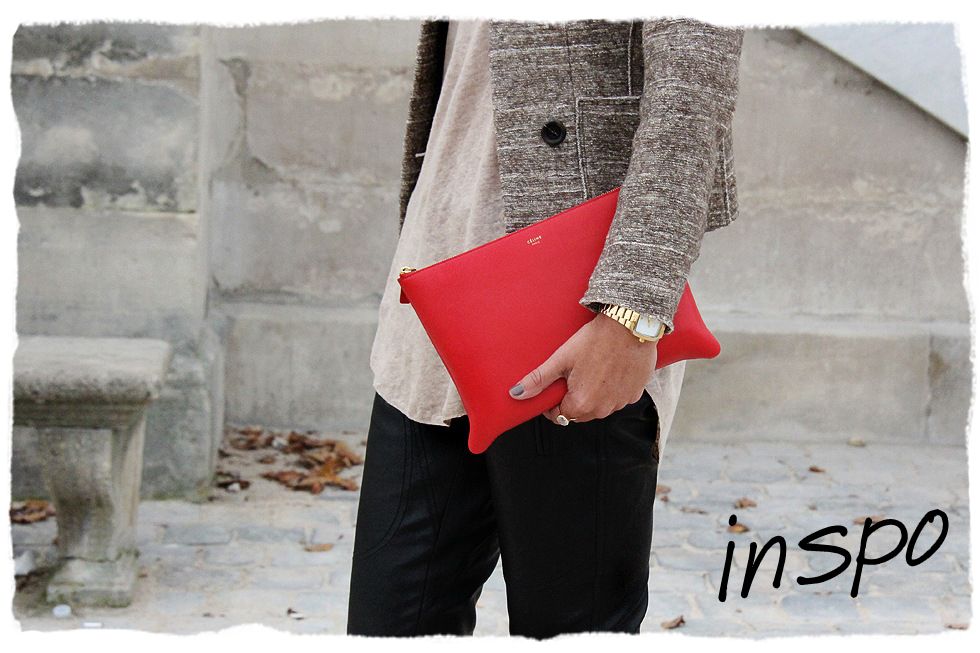
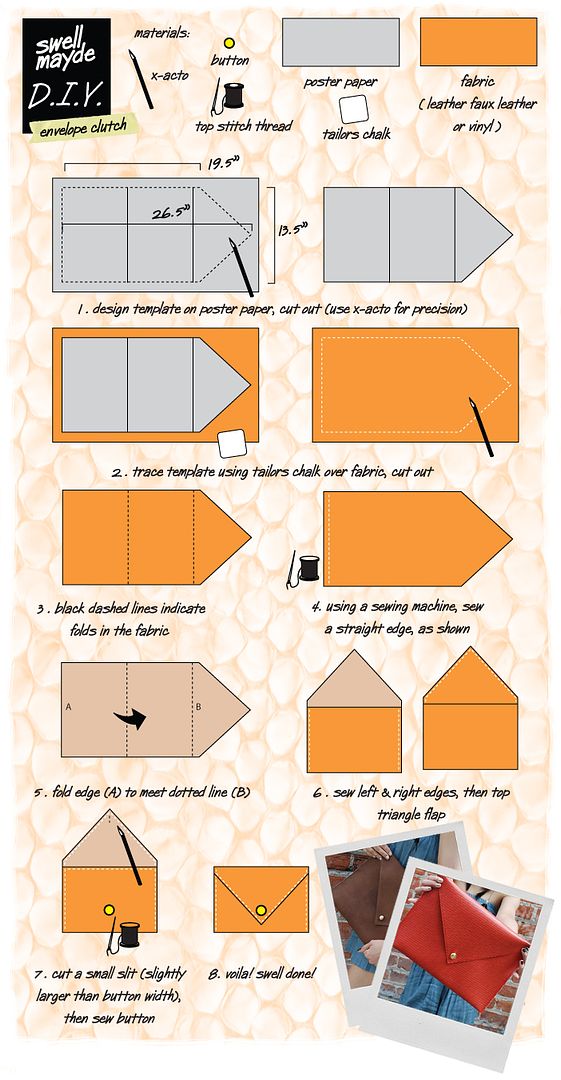
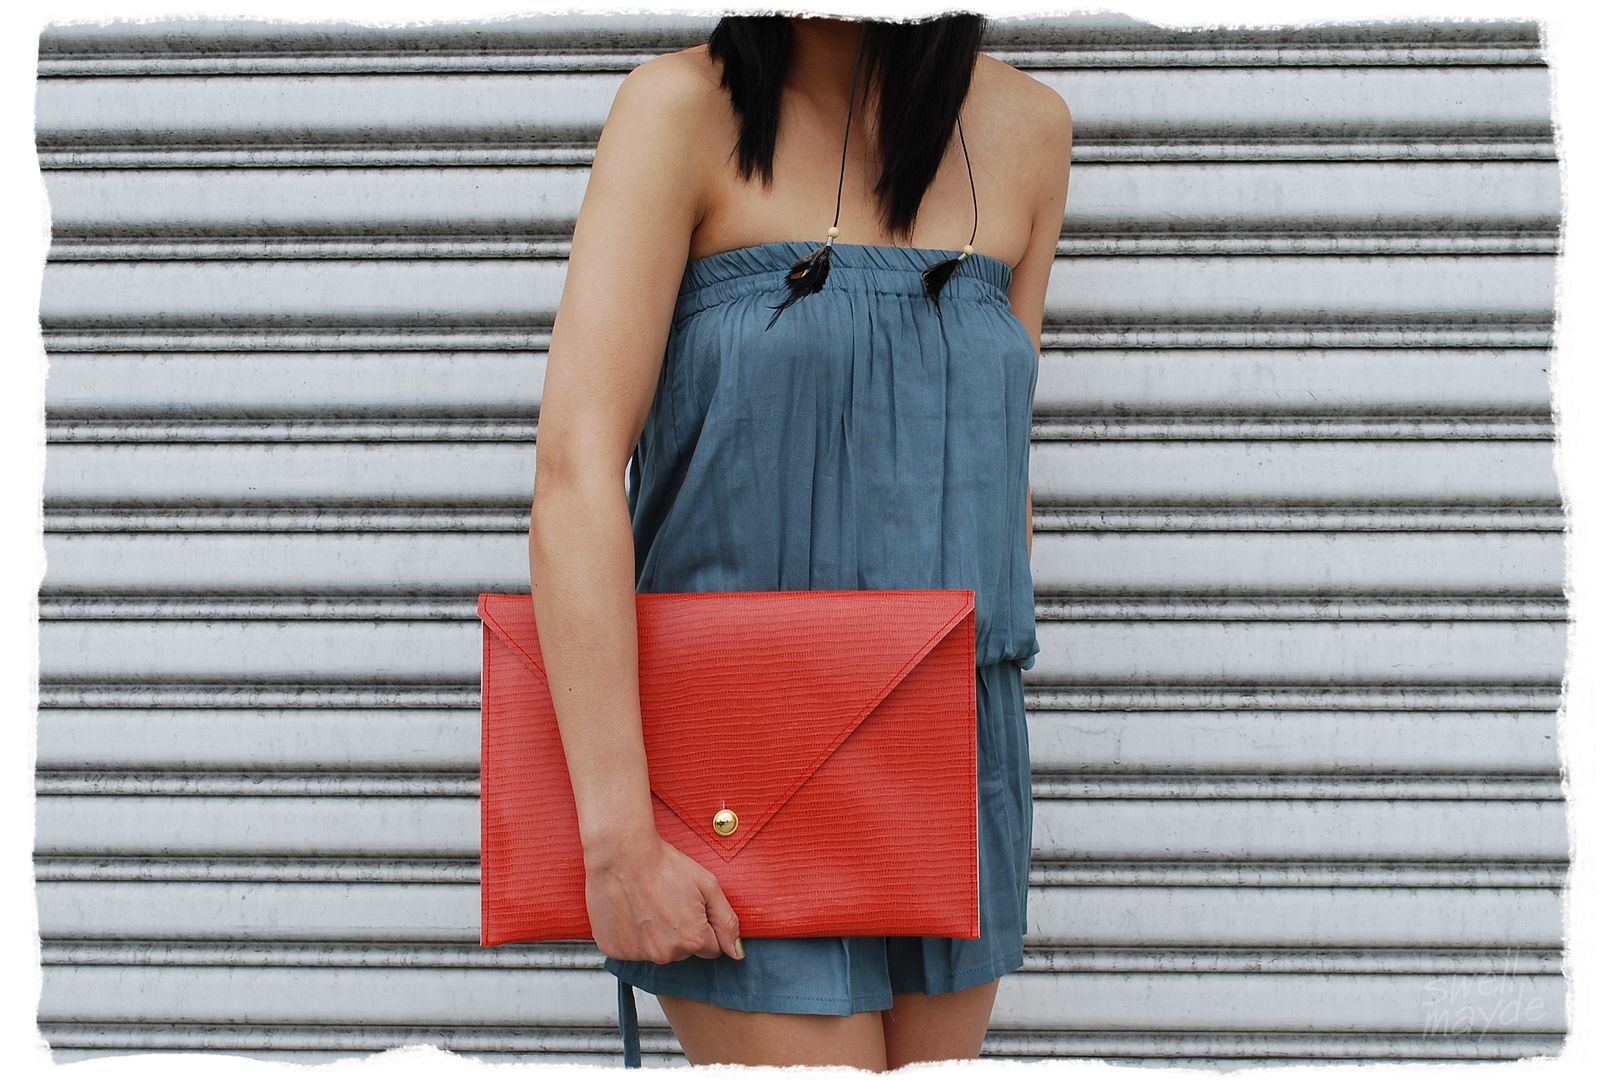
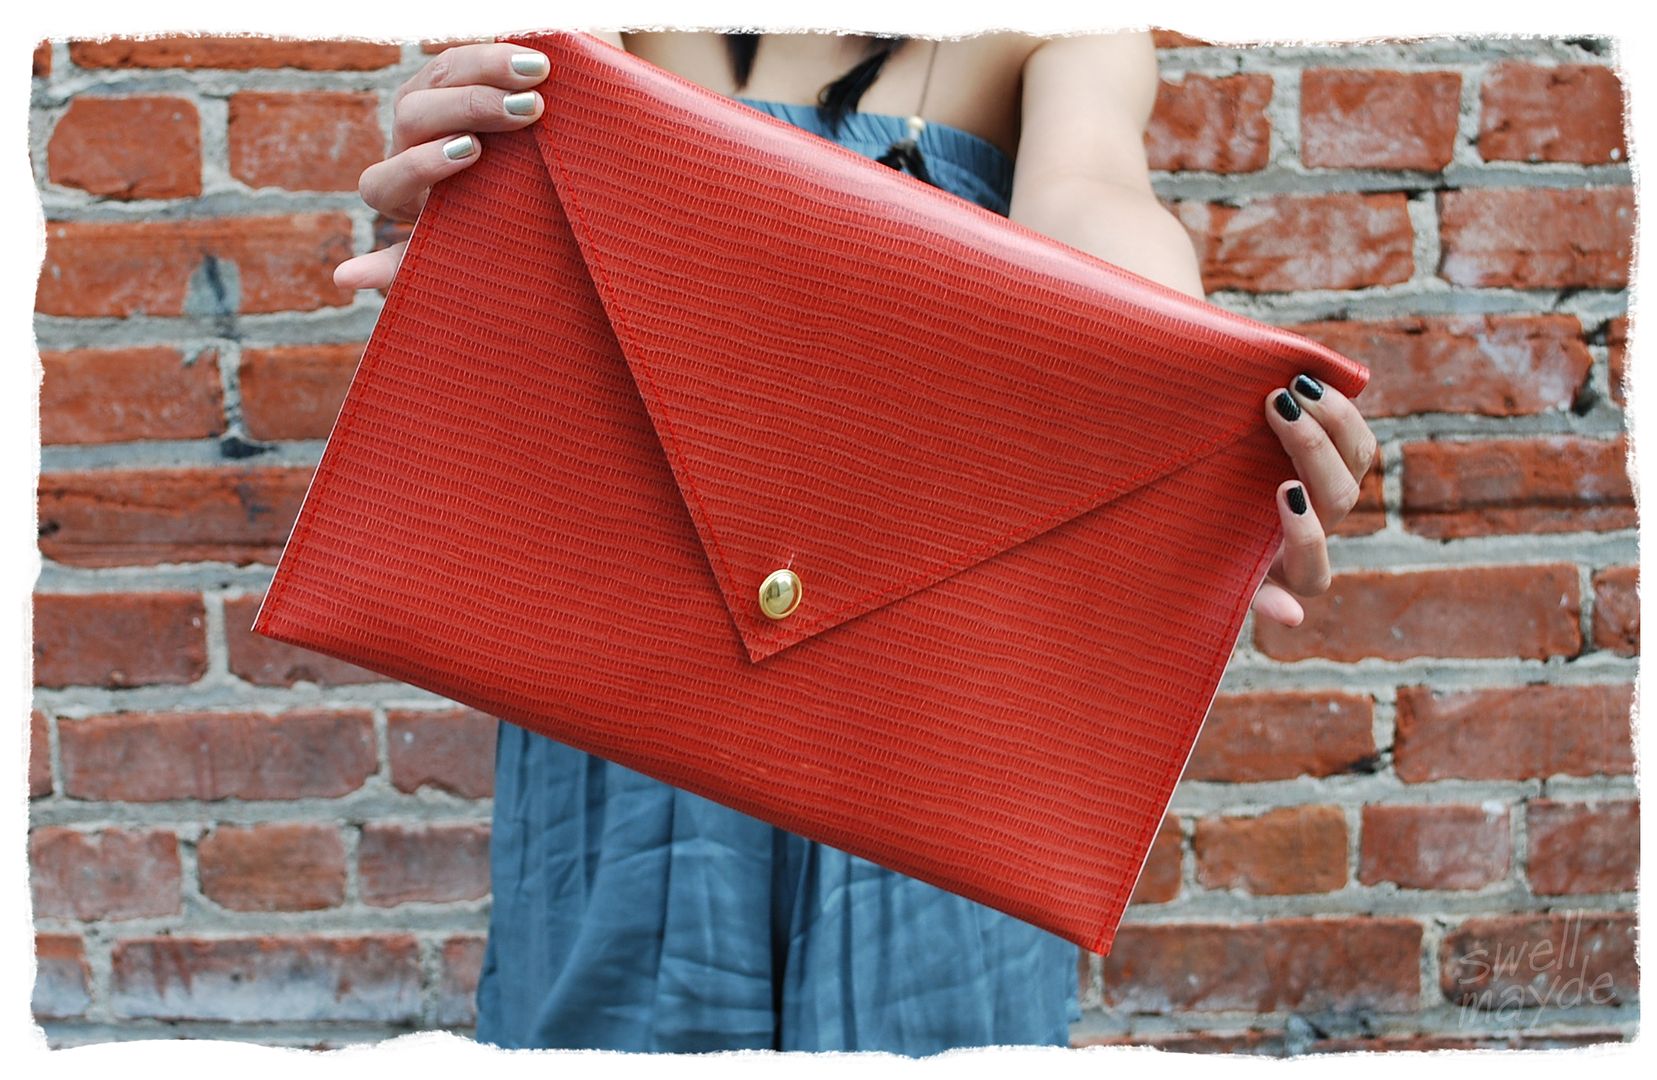
I’ve been wanting an oversized clutch for a while now, especially since I laid eyes on that Celine clutch shot by Tommy Ton for style.com. Its minimalism is so beautiful. Then, I saw the Clare Vivier La Pochette on ofakind.com and instantly knew what my next DIY would be. I couldn’t decide what color fabric to choose, so... why not make 2? The steps are pretty simple and I probably could’ve made 10!! But alas… I restrained myself and settled on 2… I made one in cocoa brown leather and one in coral faux python. Excited to put these to good use throughout the coming spring season…
DIY scalloped hem skirt


this diy was inspired by another blogger… the lovely kathleen of Inspirafashion. she asked me how to make a scalloped hem short/skirt and i liked the result so much I thought I’d share with you all. thanks for the request… such an adorable idea! hope you enjoy! :)
Friday, January 28, 2011
DIY tiered lace shorts


I fell completely in love when I saw the Isabel Marant tiered lace shorts from her Spring ’11 Collection (via style.com), I just had to make a pair of my own. And recently, I stumbled upon a photo of Rumi Neely (via fashiontoast.com), styling herself in a black pair, which felt so effortless.
I’m not much of a girlie girl… but I do love my lace. Why not take something so feminine, like lace, and mix it with something menswear inspired, like a short. It feels so modern, and definitely can be worn in so many ways. It can be paired with an oxford shirt and boots to take a more boyish route… or go all out feminine with a romantic top and heels. This project was pretty simple, I guess the hardest part for me was waiting for the glue to dry… I get so antsy… I just wanted to throw them on!
Sunday, January 23, 2011
DIY graphic print vest


Hello friends!! Here is the first SwellMayde project! :)
Graphic prints continue to catch the corner of my eye... I won’t necessarily wear it head to toe, unless I’m on a beach holiday, but I do love it in small splashes here and there for my everyday life… or even take the minimal route and go monotone, like the project above.
I wanted to share how to create a vest that gives you the opportunity to add a little print in your wardrobe, without it being too overwhelming. It’s as simple as… buy the fabric, measure it, cut armholes, and spray paint your design. And if prints aren’t your thing, I think the vest is still pretty cool without it.
Friday, May 13, 2011
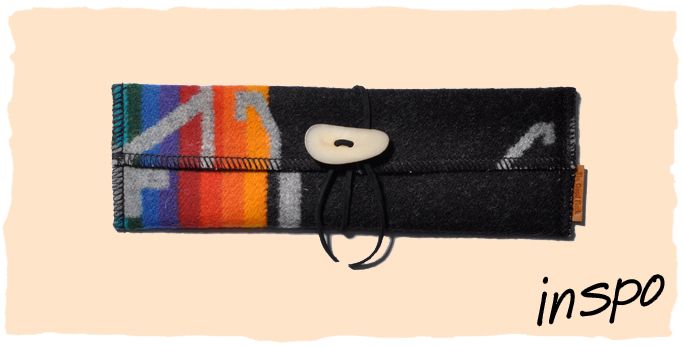
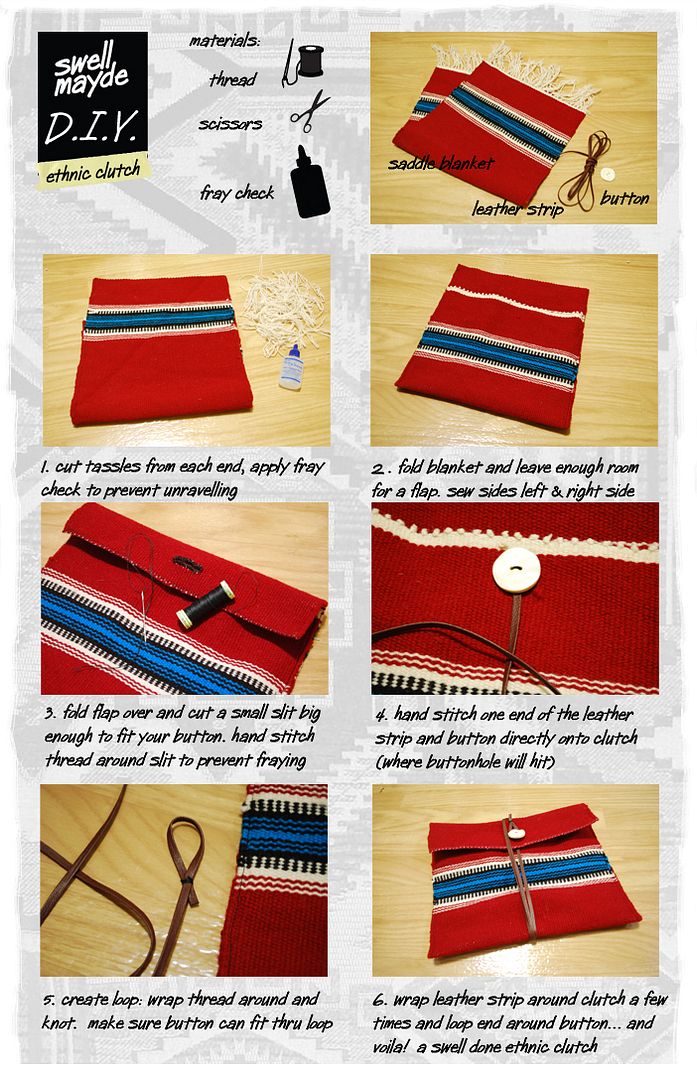
DIY ethnic wrap clutch
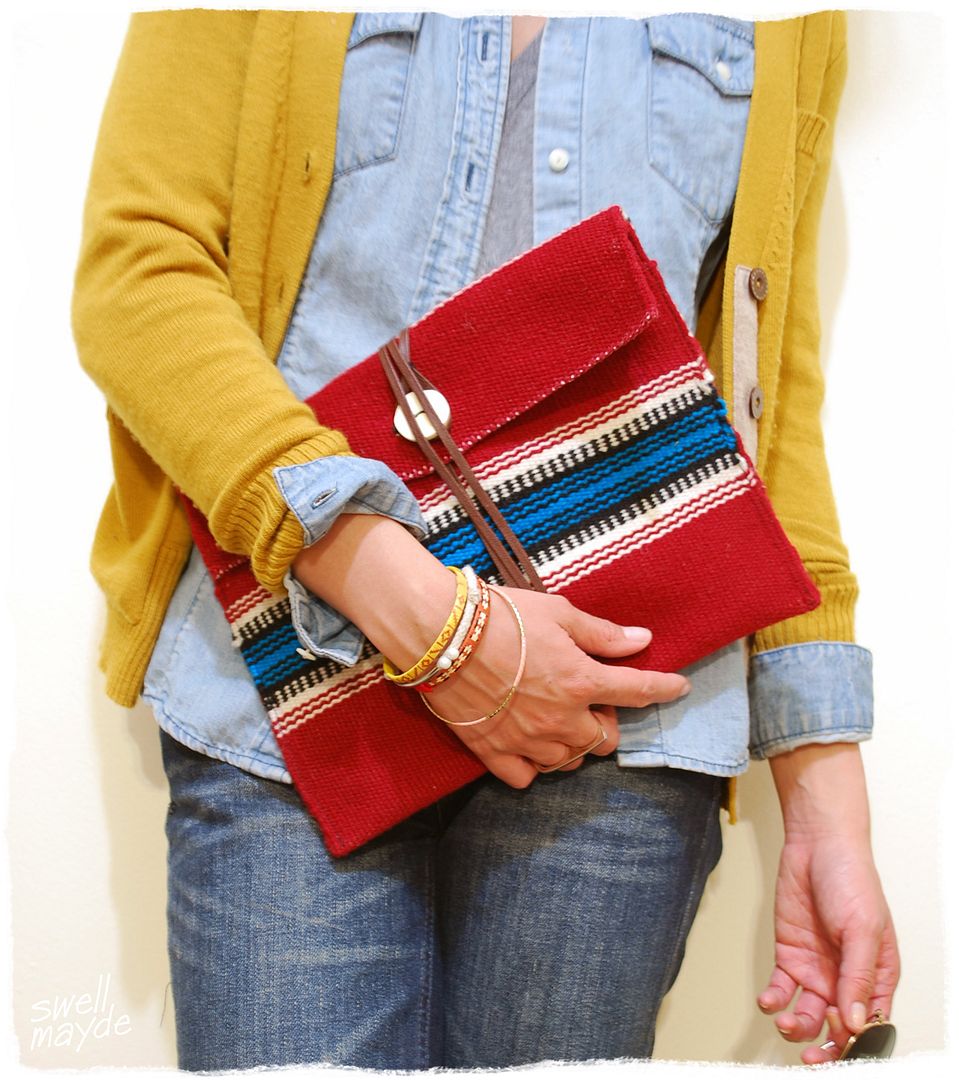

(outfit: madewell cardigan/jeans/bracelets, uniqlo button up, aa v neck, diy braclet)
I’m going on a clutch frenzy friends!! I saw this beautiful pencil case by The Good Flock at the most awesome Levi’s store ever (I must elaborate in a future post) and thought it would be an amazing clutch, once resized.
I’m going on a clutch frenzy friends!! I saw this beautiful pencil case by The Good Flock at the most awesome Levi’s store ever (I must elaborate in a future post) and thought it would be an amazing clutch, once resized.
I was instantly on the hunt for the perfect fabric. This past weekend, I went to the Pasadena Rose Bowl flea market and found a saddle blanket with the color combination I had originally envisioned. I love that it can spruce up any outfit with ease… I would definitely wear it with a white top, jeans, and boots. Enjoy!!
abric Necklace Tutorial // From Jenni
diy: Ombre Lace Shirt

Ombre. Lace. Loose.
Summer, anyone?
I'm stating right here from the get go that this project is an adaptation of Mackenzie's Lace Shirt DIY, over at Strokes of Serendipity. She's a great friend of mine - so yes, I did ask her if it was cool if I adopted her project. And yes, she said it was cool. So...here's a shirt that's cool.
This shirt is more or less what Mackenzie made - I just used a different type of lace and dyed it. I've made similar shirts in the "usual" shirt material, like jersey, but never thought to make one with lace. So, props to Miss Mackenzie! And thank you for letting me take a spin on your DIY.


Supplies:
- Sewing machine and thread (or needle & thread)
- 1 yard of stretch lace, 100% polyester. I used white lace from Fabric.com
- Scissors
- 1-3 colors of RIT Dye, depending on your preference.
I used Teal, Tangerine and Wine**
- Water and a bucket
- Rubber gloves would be a good idea!
- Rubber gloves would be a good idea!
** I'll say this right now, but I'm fully aware RIT Dye isn't recommended for 100% polyester. It says so right on the box. However, I'm stubborn and try to break crafting rules all the time. (ALL the time).
Sooo...to the crew at RIT Dye, if you're reading this...I'm sorry.
With that said, don't expect a super vibrant shade. Because it is polyester, it not only takes a while for the lace to absorb any dye, but it won't hold a deep, vibrant color. Everything will have a faded, light look to it. If you're fine with that, then you'll be good to go.
With that said, don't expect a super vibrant shade. Because it is polyester, it not only takes a while for the lace to absorb any dye, but it won't hold a deep, vibrant color. Everything will have a faded, light look to it. If you're fine with that, then you'll be good to go.

1) Fold the yard of fabric so that the fold is along the top. If you'd like, trim some off at the end. Mackenzie didn't, so her shirt had a little more "flow" to it. I did - about 6 inches - as you can see above. This is entirely up to you; both options will result in different yet equally awesome shirts. It'll also depend on the size of your final shirt and how loose you want it to fit.


3) Rinse it off until the water runs clear.

4) Bring in the next color. Next up was the Tangerine. I used a bigger bucket and dyed pretty much the entire thing, letting the blue edges hang off the sides. I took the lace and dipped/held it into the dye, so that everything up until the blue was dyed orange.

5) Rinse it out until the water runs clear.

6) And for the Wine...
Same process, same bucket. I just made sure that there was some orange visible, as I dipped and dyed.

7) Rinse until the water runs clear.

8) Hang to dry, at least overnight!

9) Fold in half, like you did in Step 1.

10) Fold again, horizontally.

11) Cut out your neck hole. I'd recommend not cutting out a big piece; start out small, because you can always cut more later after you try it on.

When you unfold it, it'll look like this.

12) Sew it up! One straight line on each side. The arrows indicate the general areas where I sewed. They were about 6 inches from the side, but this may differ for you depending on the overall size of your fabric. It'll also depend how loose or tight you'd like the shirt to be, as well as the size of your shirt, your height, etc.

I noticed that it's practically impossible to sew a perfectly straight line on stretch lace. You can barely even see the stitches when you wear the shirt, though.
This can easily be done without a sewing machine. All you need are straight running stitches, so this can be done through the lace with some needle and thread, by hand.

I'm kind of in love with mine, because it's so versatile. You can throw if over your bathing suit for a beach cover up. Or you can wear it with a bandeau like I did above (my bandeau is black jersey) for a lightweight, loose fitting summer shirt - also great for the beach. Or you can just wear it over a tank top and call it a day.

Thanks again to the lovely Mackenzie for letting me adopt her project.
I'd also recommend dying your lace - or any fabric, really - outside, if you can. I'm not really sure why I did this in the bathroom.
More summer clothing projects coming soon! I'm always on a roll with clothes projects during the summer. I'm already working on three more.
xo,
diy: Spray Painted Statement Jewelry

I think by now, it's pretty obvious that I like "out there" - and maybe strange - statement jewelry. Just like the Snake Wrap Bracelet, you'll either think this project is real awesome or real weird. I'm honestly okay with either/or.
And besides, if you're not into unique things...I'm not really sure what you're doing here, because you know S&P's all about pushing creative boundaries.

When it comes to supplies, I make it a point to browse the unexpected section of any store I'm in. I've always had this thing about finding inspiration in unexpected places. I spotted these toy figures in the Kids' section of Michael's and automatically thought of jewelry. I've always been into ancient Egypt, so of course I had to grab a pack of those.

I spotted these dinosaur skulls first, though, and call me morbid, but I thought they were pretty awesome. They're a different take on the usual human skulls used in accessories/jewelry.

Other supplies you'll need -
Jewelry supplies! Lots of 'em. Ring blanks, jump rings, chain, jewelry pliers, super/E6000 glue. And if you'd like to make a few into pendants - you can use jewelry bails, but I actually don't have any right now so I used earring backings instead. Works just as well.
Jewelry supplies! Lots of 'em. Ring blanks, jump rings, chain, jewelry pliers, super/E6000 glue. And if you'd like to make a few into pendants - you can use jewelry bails, but I actually don't have any right now so I used earring backings instead. Works just as well.

Aaand spray paint. Metallics will give you a metal sort of look, while mattes just look cool. I actually somehow forgot to take a picture of all the spray paint (oops) but had this on my phone to update to S&P's Facebook fan page. I used a metallic gold, an antique gold (my favorite), and a matte black.

Spray paint away.


When they're dry, glue on some ring blanks for some pretty fierce multi-finger rings...

...or glue on those earring backings for some pendants. One of them had a loop on it already, so I lucked out with that.

The pyramids and sphinx rings are definitely my two favorites!

Each "toob" (haha) was about $7 at Michael's. They had tons, but I could only really imagine the skulls and ancient Egypt figures as good jewelry pieces. (Edit: Amber left a comment below about the octopus and shark being good choices in the Ocean package...good call! I'd have to agree.)
But if you decide to make a Jamestown Settler necklace, I won't judge.
But if you decide to make a Jamestown Settler necklace, I won't judge.
Hope you enjoyed this quick and simple project, since I know the last two were big ones! Next up = another sewing project, perfect for summer.
xo,
kirsten
Monday, June 6, 2011
diy: Gathered Summer Dress
My favorite part of summer (besides iced coffee, warm nights & beach volleyball):
Summer dresses.

The best thing about dresses is that you can easily make one from almost any shirt. By now I think it's pretty obvious that I love repurposing old clothes, & this dress is just that. I used a thrifted shirt that's bigger than my usual size, and some floral jersey fabric (which I'll talk more about in a bit)
It's so so so easy to make. Perfect for beginner level seamstresses, & doesn't need crazy cutting & measuring. As long as you know some basic sewing, my general run through should be enough to guide you.

Supplies:
- Thrifted tank top, loose fitting. Mine was about $5.
- Jersey knit fabric of your choice. I started with 2 yards & had a ton leftover.
- Coordinating thread. I used maroon thread + a shiny rayon mustard yellow thread.
- Sewing machine
- Scissors, pins, tailor's chalk
*I used a special kind of jersey knit fabric, called ITY knit (interlocking twist yarn). It stretches like a normal jersey t-shirt but has an amazing, high quality & smooth feel to it. I bought mine from Fabric.com, but you can find ITY knits all over the web & at fabric supply stores. I'm personally in love with this fabric - and Fabric.com - and just recently placed another order. I definitely recommend them!
You can even use the fabric from an old oversized shirt - I'm sure you can find some crazy printed jersey t-shirts at the thrift store - and don't forget to look in the mens' and maternity section. As long as it's big enough to give you enough fabric, then go for it.

I tried on the top & marked the spot where I wanted the bottom half to start. I decided to make it high waisted but that's totally up to you!
The measurements of my huge rectangle of jersey was 60 inches wide & 31 inches long. This will obviously be different depending on your top/preferences, but here's how I determined this:
Width -
Laying flat, I measured the shirt at its widest, which was at the bottom. I didn't do this where I marked the line, since I wanted extra fabric for that gathering effect. It was 20 inches at its widest point, or 40 inches all around. SO, I measured 40 inches of jersey knit, then added half of that - so 60 inches wide, total. Or x1.5 the 40 inches. I also added 2 extra inches for extra sewing space.

Length -
I put on the shirt again & measured from the chalk mark to where I wanted to the skirt to hit - about 26 inches, right above my knees. I tacked on an extra 5 or so inches just to be safe, since it's better to start with too much and trim it down later on. Again, this will be different for you depending on your shirt, preference & obviously height.

Along the top/width of the fabric, I sewed it up to give it a clean edge. This is the part of the fabric that will be attached to the top.

I cut off the bottom of the shirt, about 2 inches below the chalk mark...

...then hemmed the bottom.

With right sides facing each other, I lined up the jersey fabric with the side seam of the shirt. Then, I pinned the two pieces together & pleated at random intervals. To create a pleat, simply fold over the edge of the fabric as you pin. Since I had an extra 20+ inches width wise, I was able to pleat all the way around.


I sewed the bottom & top half together...

...which ended up looking like this. See those pleats?
I then sewed up the side of the bottom portion, since it had only been sewn along the top so far.

After trying on the dress yet again & figuring out the definite length that I wanted, I trimmed a good 4 or so inches off of the bottom. A dress form would be really useful at this point, but a hanger can work as well. I sewed up the bottom edge with the shiny mustard yellow thread.

Reminder: don't forget to adjust your thread tension! Tighter, smaller stitches worked best with both of my fabrics.

Not so flattering on the hanger, but add in my favorite leather waist belt?
And it looks like this. This matches perfectly with the Studded Wedges I made back in March! (bordeaux suede wedges studded with furniture nails)


This is what I was drinking earlier today, while writing this up. Strawberry champagne punch: champagne, ginger ale, frozen strawberries. Or just strawberries. Either way, I totally recommend it.
This is S&P's first ever sewing project, so if you have any questions, ask away. There's definitely going to be more summer dresses coming up, so stay tuned for those.
After these last 2 big clothing DIY's, I'll be back later this week with a simpler jewelry project!
xo,
kirsten
Friday, May 27, 2011
diy: Studded Trench Coat

I don't really do designer DIY's anymore...but this was a much needed exception.
There's a reallyyy good chance you've seen the amazing studded trench coats from Burberry's Spring 2011 line. If you haven't, I'm not really sure where you've been these past few months. I think it goes without saying they're pretty awesome:
There's a reallyyy good chance you've seen the amazing studded trench coats from Burberry's Spring 2011 line. If you haven't, I'm not really sure where you've been these past few months. I think it goes without saying they're pretty awesome:

Burberry.com, SS11 Runway Collection
Left to right:
$7,295
$5,795
$12,995
Amazing quality, I'm sure. But I just don't have that kind of money laying around, and I'm guessing neither do you...& if you do, you're probably not reading this. Even if I did have that kind of pocket change, I personally couldn't bring myself to spend that much on a jacket - that's just not my taste!

Of course, I set out to make my own version. I knew if I got a "real" trench coat - knee length and all - I wouldn't use it that much. Long jackets just make my 5'2" self look even smaller.
So I was pretty psyched when I came across this trench coat - esque jacket a few months ago at TJ Maxx. It was $19.99 and I knew exactly what I was going to do with it.

I have a huge stash of studs by default, but you can find studs all over the internet - try Ebay and Etsy for starters. Some specialty supply and fabric stores might even carry studs.
I used 3 different kinds of silver spike and cone studs; each of them had prongs that are meant to pierce through fabric, and bent in with pliers.


A step-by-step for this project would be extremely redundant, so here's a quick run through of what I did:
On each side of the sleeve's seam, I made 2 columns of studs - so 4 columns total - starting at the shoulders. I used round nose pliers to bend in the prongs. When all was said and done, there was a total of 16 rows; I made the first top half entirely of the bigger cone studs, while the second half consisted of two kinds of cone studs.
For the most part I eyeballed the placement of the studs, but I also used a ruler and a charcoal pencil for some more of the meticulous measuring between studs.


I decided to cover the pockets with leather, so I traced the pocket flaps onto soft black leather. I might add some additional leather elements to the coat at a later date.


I'm thinking of completely replacing the belt with a black leather material; the fabric of this belt is wayyyy too thin and scrunches up at random places (as you can see above)...But, one step at a time! I'm just glad to have finished the tedious stud part.
DIY: As American As Cherry Pie Statement Necklace
 How does the saying go… It’s as American as cherry pie? Or is it apple? Regardless if it’s a pie I’m eating it. Add a little ice cream to it and I’m truly a happy camper! My favorite pie is actually an apple crisp a la mode, but I digress. The name of this blog is Glitter ‘N Glue not Kristen Talks About Pies. Moving on…
With the 4th of July around the corner, Americans are taking this weekend to gather with friends and family and celebrate our country’s birthday! Many will be having parties full of pool diving, glittery fireworks, loads of food and yes, pies… it’s an American tradition! Although not an American designer, last year Moschino invited the cherries to their Spring 2010 collection party and incorporated them into fabulous printed dressed and decadent statement jewelry.
 The Moschino cherry necklace was the inspiration for this project
 Materials: Fake Cherries, Chain, Ribbon, Wire Cutters
 I found these fab, faux cherries at a floral supply store in Downtown LA
 Slide the stem of the cherry through one of the chain links. Fold the stem over the link and wrap the stem, cutting off any access stem. Repeat this step a trillion times or until you have enough cherries on your necklace
 Tie a ribbon to the end of the chain to create a bow as your closure
CELEBRATING 100+ FOLLOWERS! - book clutch for 100 pennies!

here is the sweet .99 cent clutch I got from the thrift store months ago.

so...why I have I been waiting so long to create this??? Honestly? I could NOT find a vintage book, you know the hard backs that are cloth covered? I could not find one in the appropriate size or color. But I really wanted to use the clutch for this post so I improvised and covered a plain old book with fabric! WAHHOO! I LOVE the results!
DISCLAIMER: If you are my grandma - please be warned I am going to "destroy" a perfectly good book.
DISCLAIMER 2: If you are my sister - please be warned I am going to "de-face" currency
So, how did I make my version of Kate's amazing clutch??
I started with the following goodies:
99 cent clutch
book. Dont worry! It isnt a cool vintage book! It is a boring college book. see? It's ok.
Mod Podge
scissors
exacto
adhesive - I used E-6000
foam brush
embellishments - I used some synged satin circles to make a flower

step 1. DESTROY THAT BOOK! very therapeutic.

"measure" your fabric

coat the outside of the book cover with mod podge

smooth the fabric over the book. be sure to press it into the creases of the spine. get all the air bubbles!

I put the pages back in and squeezed it down to make sure i had the stretch/shape just right

Flip it over and cut a few slits where the spine is. Like this:

mod podge the fabric into the cover


I didnt take a pic of the gluing process but you just glue in the clutch


I added the penny so the project would cost the full 100 pennies!
The big bummer. this is just about 1/8" too short to hold a kindle. I think it would be a GREAT kindle case!


I hope you like it!!
Mirror, Mirror on the...
 What You'll Need:
Black skirt
Mirror mosaic tiles
Fabric glue
Line up your first tile in the bottom left corner of the skirt, just above the seam. Glue to the skirt by rubbing some fabric glu directly on the material and pressing the tile on top [Note: If you can find mosaic tile with sewing holes on either side, I recommend sewing them instead] .

Next, work your way out from the bottom by gluing pieces above and to the right. Continue adding on until you covered as much of the skirt as you like.
 Shown with hot pink DIY
woven lanyard necklace and Chanel
Dit is zooo cool!

(stappenplan via melodysblog.tumblr.com)

(foto via http://intangibleee.blogspot.com)
Комментариев нет:
Отправить комментарий