Thursday, December 17, 2009
Tom Binns inspired rhinestone necklace DIY

I can't recall the first time I saw this Tom Binns necklace, but it was definitely love at first sight. I've been so inspired by messy artfulness in jewelry this season and have been meaning to do this DIY for a long time and put my own spin on the look! This is a ridiculously easy project and would make an excellent on trend last minute Xmas gift for someone.
You will need...
...a white rhinestone necklace (or two or three). I bought this one at an antique sale for a few dollars.

...some pearl beads. Using beads of the same colour while varying the shape and size of them creates visual interest in the piece. You may also need beads of different sizes to fit the gaps in the rhinestones.

...chains

...gold beads. Silver would work too. Metallic beads add a luxe touch.

...safety pins. Again, try using different sizes if you plan to use a lot of them.

You will also need a spool of fine silver florist wire and a pair of scissors. You will need pliers if you're going to cut chain. These are just guidelines for materials to incorporate in the design, I'm sure you can come up with other odds and ends to work in! You could also link together multiple necklaces or tie on that lovely brooch of grandma's that you never wear - you can always take it off again if you grow tired of the necklace.
Cut around a two foot length of wire, this is a manageable amount to work with and you can always add more if you run out. Start by double or triple knotting the florist wire to wherever you want to start your design in a gap between rhinestones use your scissors or a pair of pliers to fold down the sharp end and flatten the knot.

I love working with florist wire because it is supple and easy to manipulate with your fingers, but it is strong and will hold a shape. If you make a mistake you can take it out easily, but try not to overwork or kink the wire as it will break if messed with too much! If you don't want to just wing it, place the necklace on a piece of paper and draw around it until you have a design you like before you start.
Thread beads onto the wire and wrap it around the metal between rhinestones once to secure each section. Add chains by simply threading a links onto the wire. You might want to try it on at various intervals to check that it's draping where you want it.
Here's the half finished necklace...

And here's a diagram over the finished necklace to show you the path of the wire...
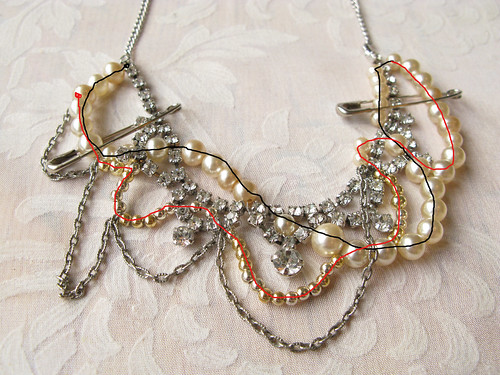
The other end of the wire is knotted between two of the pearl beads.
I didn't want to go too nuts with the safety pins, but I added two in homage. It looks fine without them to and they are, of course, removable. I kind of want to keep this necklace, but I'm going to be good and give it to a friend for Xmas. I'll definitely be making more with the same technique though...

There are tons of DIY's of Tom Binns necklaces out in the interwebs, here are a few more I like. It's great that this project really seems to inspire individual interpretation as opposed to carbon copies. Everyone does it differently. I'd love to see yours if you try it!
DIY Double-Fringed Necklace: Create Couture Challenge

You Need:

*Mocha Suedette Fringe
Additional Tools/Materials:

*hand-sewing needle
*matching thread
*scissors
How to:


xoxox
Carly
**This was actually the project that the person who won the random commenter drawing commented on, saying she loved it! (I know that sentence doesn’t seem to make sense, but my brain is feeling muddled right now:-) So I sent this fringed necklace to the winner – and I hope she likes it! Congrats, Monica!
~If you liked this post, please share it!~
Wednesday, March 23, 2011
V and Co how to: jersey knit bracelet
 i don't know what it is about this time of year that makes me just want to have my bare feet in the sand, be watching the sun setting into the ocean, and breathing in the warm salty air of the beach...
as i get older, more and more i find myself missing that place i used to go to almost every.single.day. as a teen. (my skin doesn't miss it. as a matter of fact, i now wish i listened more and DID put SPF on my face...hindsight is 20/20). my mom calls me from her walk on the beach almost every morning...
*sigh*
yeah, i get a little homesick around this time of the year. heck on my pinterest my "dreaming of summer" has the most pictures in it. ah yes. i miss my ocean. case in point. this bracelet, brought a flood of memories, not because i used to have one like it but because i can totally see me wearing it by the beach, not caring that it's gotten salty and wet, because i can totally make another one in like less than 5 minutes flat when i get home.

it's simple, and it's perfect to dress up your bathing suit, or your cute summer covering with your flip flops in tow, or wear it with your cute summer dress while you dine eating fresh fish while watching the tide come in and the sun set.
*sigh*
i guess you can take the girl out of the beach...but not the beach out of the girl.
i'm counting down to my visit to so.cal. and i can't wait to actually wear my bracelet at the beach. but for now...i'll wear it even if there's snow and winds and i'm encircled by mountains.
lets get started:
*1st you will need approx three strips of jersey knit fabric cut to 1" each with the length of at least 58"
i found my my yellow jersey knit fabric here...my blue fabric at joann's, they have a large variety and you don't have to buy a whole yard of it, like i did. and my gray jersey fabric from robert kauffman
*2nd you will need your fingers. that's it, oh and a pair of scissors.
 how many fingers you use will determine how thick your bracelet will end up. i'll go into more detail on the 4 and 2 fingers...i'm assuming you can figure out 3 fingers! personally my favorite one is the 2 finger one...it's the perfect thickness in my eyes.
 okay...
*first you are going to take your 1" strips and cut on your ends a 1/4" slit.

 *next take your slits and line them up ends together like the picture above.
 *now take your bottom strip and pull it through the slits from TOP to bottom
 *gently pull till you get a little knot.
 now a lot of you will go back in time with me and totally remember doing this with yarn when we were in grade school or somewhere along that time. dont' know if it was a california thing cause i asked my friend who grew up in florida what i should call this and she was like "what are you talking about? i've never made those."
*with your connected strips we are now going to weave the strip in and out of our fingers.
use the next set of pictures as a guideline (next set of pictures are for 4 fingers):
 start off with weaving behind the pointer, in front of the middle, behind the ring, and in front of the pinky finger.
 then wrap it around and behind the pinky, then in front of the ring, and behind the middle, and then in front of the pointer.
 *you should now have all fingers "weaved upon" (ha!)
 *bring one big loop around to face you (from the pinky to pointer)
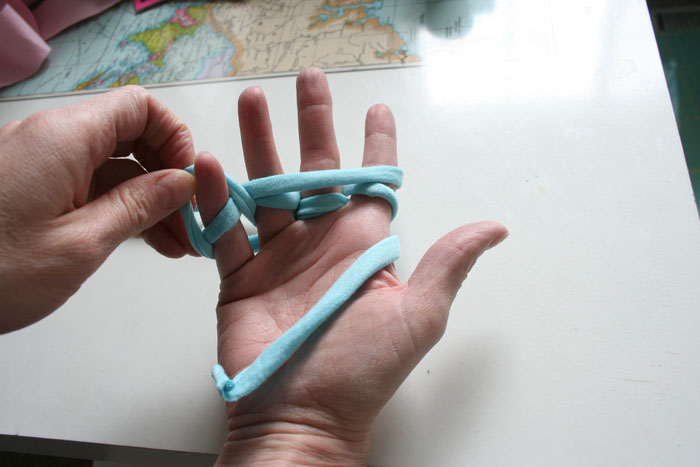 *take your weaved loops and go over your finger and big loop like the picture above.
 *continue to do so with all the fingers going in order.
 *when you get to the end, or at the end of your first chain (at your pointer finger) make a new loop and start the process all over again!
* once you get like 6 chains done, take your starting tail and gently pull (while your chain is still securely placed on your fingers!) so that you can get a good feel as to how long you need to make your chain, depending on your wrist size.
now let me show you real quick how to make a two finger chain then we will proceed on how to finish your chain and how to tie it off:
 **because you are using less fingers you will need less strips. i just used 2 strips when i made my 2 finger bracelet
*just like the 4 finger chain start with a small tail (of at least 4 inches)
*starting on your ring finger, weave behind (your ring finger) and then in front of your pinky.
 *then come back and loop back in front of your ring finger.
 *come back around from behind (from the pinky side) to the front to make a big loop.
 *repeat the steps i showed you while doing the 4 finger bracelet.
*remember to pull your tail so it makes the chain more defined and it gives you a better idea of how long you need to make your chain.
 *once you've determined you have a long enough chain, carefully pull the loops off your fingers, making sure you don't undo any of the chain by losing the loops!
 *slip the extra tail into both loops.
*pull all the way through, and gently tug the end.
 *tie off your bracelet with a knot.
 *cut off excess tails!
so by using 2, 3, or 4 fingers, you get:
 side view.
 and top view of thickness.
 and now you are so ready to hit the beach, pool, lake, or heck the grocery store. cause yeah, they are that cute.
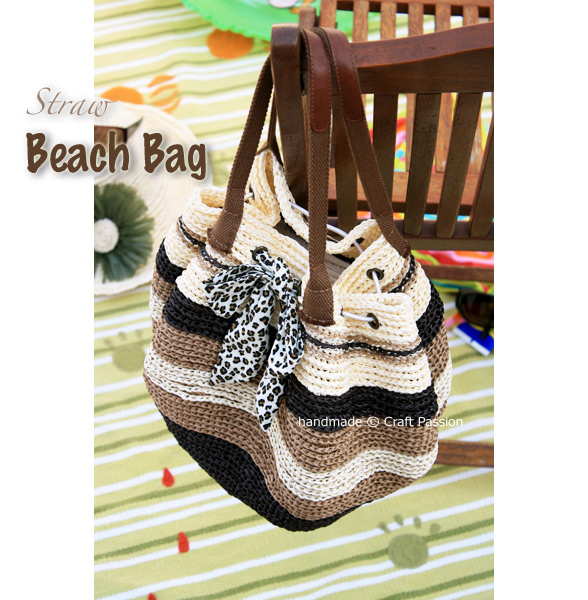
This shoulder bag is made by a double layer crochet technique. The 1st layer is single crochet (back loops only) from bottom to top, then you work upside down for the second layer, just slip stitch on the front loops for each and every stitch. As simple as that!
Remember to crochet 12 holes for the eyelets. Used a long fat white elastic band ( I bought it from hair accessories shop) and sew a fabric to the ends as the ribbon ties. The elastic drawstring closure is superbly convenient, now you don’t have to pull-to-tie and untie-to-release the bag when taking things in and out. Didn’t summer supposed to be easy and relax?
Get the crochet pattern and some how-to photos after the jump.
Crochet Pattern
Abbreviations:
ch = chain
bl = back loop
sc = single crochet
sc2tog=single crochet 2 together
sk = skip
slst = slip stitch
st = stitch
fo = fasten off
mm = move marker
Materials:
1. Crochet rafia yarn, approximate quantity: Beige 180gram, brown 60 gram, dark brown 60 gram
2. 3.5mm crochet hook
3. 15mm eyelet, 12 sets
4. Handles (20″) a pair
5. Strong sewing thread (preferably nylon thread)
6. Elastic band (20″) with 2 ribbons ties (2″ x 16″) at the ends
Tools:
1. Eyelet installation tool and hammer set
2. Strong sewing needle
3. Tapestry needle
Finished dimension:
Approx. 15″ (W) x 12″ (H) excluding handles
Tension: Approx 16 sts x 14 rows single crochet (4 inches square)
Directions:
1st layer – work from bottom to top, crochet on back loops only.
Round Base
With Dark Brown RaffiaBody
beg sl knot, ch3, join with slst to the first ch to make a circle
r1: ch1 sc8, mm (8 st)
r2 – r14: increase 8 sts evenly for each round, mm (112 sts)
r15 – 16: sc into each st around, mm2nd layer – work from top to bottom, crochet on front loops only
r17: increase 8 sts evenly, mm (120 sts)
r18 – r19: sc into each st around, mm
r20 – r23: repeat r17 – r19, then r17 again (136 sts)
With Brown Raffia
r24 – r25: sc into each st around, mm
r26 – r29: repeat r17 – r19, then r17 again (152 sts)
r30 – r40: sc into each st around, mm
With Beige Raffia
r41 – r53: sc into each st around, mm
r54: “ch1 sk 1 st, 1 sc in next 11 st”, *ch1 sk 1 st, 1 sc in next 12 st* repeat 4 times, repeat ” 2 times, repeat * 4 times, repeat ” 1 time (to create 12 holes)
r55 – r56: sc into each st around, slst.
turn your bag upside down, so that the last row of 1st layer becomes the first row (view the pictures below to visualize)
**slst in each st around**
5 rounds of Beige
1 round of brown
1 round of dark brown
1 round of brown
4 rounds of beige
4 rounds of dark brown
6 rounds of brown
5 rounds of beige
6 rounds of brown
23 rounds of dark brown
fo and hide all ends.
 If you are wondering what rafia/raffia yarn is? This is it. Don’t get confuse with raffia straw, they are different in texture. Rafia is thin and soft, modern rafia is made of plastic or paper.
I haven’t tried out plastic yarn – plarn, that you can recycle from your grocery plastic bag but I think it should be feasible in making this bag. If you have tried it out, please let me know the result.
 Follow the crochet pattern above and get it done until the last row last stitch for the 1st layer. Only work on back loops as we need to use the front loops to crochet the 2nd layer.
 Turn the bag upside down, the last row of the 1st layer is now the first row of the 2nd layer. Slip stitch into every front loops of the stitch. Work as the pattern and colors indicated.
Follow the 1st layer’s tension or else you might encounter some “shrinkage” in size. Use a bigger hook if needed to achieve the same tension.
Hide all ends.
 I used ready made thick twill tape / nylon handles with matching color. You can either sew it now or after the installation of eyelets. I did it later.
 12 of eyelets with their back plates. 15 mm diameter eyelet is just nice to fit into the hole/space we accounted.
 Insert the eyelet to the hole, push it through until the eyelet shaft get to the other side.
 Place the back plate onto the other side. Line up nicely with the eyelet.
 Place them onto the eyelet hammer tool plate. Insert the post tool into it vertically ** important**, make sure they are aligned nicely. Hammer and whack it a few times.
 The eyelet shaft rolled and locked the back plate in place.
 The front view. Repeat 12 times to get 12 eyelets installed.
If you haven’t get the handles sewn, you can do it now. If you can’t find the twill handles, you can crochet it with the rafia yarn or sew one.
Pass the elastic band with ribbon ends through the eyelets and tie.
~~DONE!!!~~
перевод
Вязание крючком: солома пляжную сумку {Учебник и Выкройка}
17 августа 2010 |
Любовь эта должность? Дайте мне пальца вверх
13 Комментарии
Вязание крючком: солома пляжную сумку {Учебник и Выкройка}
◄ Назад
Следующий ►
Вязание крючком: солома пляжную сумку {Учебник и Выкройка}
Фото 1 из 3
Нажмите "Next" для фотографий
Это пляж крючком соломой мешок (шнурок типа) я разработана и изготовлена с rafia пряжи в последнее время. Rafia нити тонкие и плоские, как пластиковые полосы, мягче, чем rafia шпагат. Легко вязать крючком и результат удивительно мягкий и нежный на ощупь.
Это плечо сумка изготовлена по технике двойного слоя вязания крючком. 1-й слой является одним крючком (возврат петли только) снизу вверх, то вы работаете с ног на голову для второго слоя, только стежок промаха на передней петли для каждого стежка. Как просто!
Помните крючком 12 отверстий для проушины. Подержанные долго жир белый резинке (я купил его из магазина аксессуаров для волос) и сшить ткань заканчивается, как лента связей. Упругих закрытия шнурок великолепно удобно, теперь вам не придется тянуть до галстук и развязать к выпуску мешок при принятии вещи и выходить. Не летом должна быть легкой и расслабиться?
Получить образец вязания крючком и некоторые инструкции фотографии после скачка.
Вязание крючком Выкройка
Сокращения:
цепи CH =
BL = назад петли
SC = один вязания крючком
sc2tog = один крючком 2 вместе
SK = не показывать
slst = стежок промаха
стежка-й =
для = закреплять
мм = перемещения маркера
Материалы:
1. Вязание крючком rafia пряжа, приблизительное количество: бежевый 180gram, 60 г коричневого, темно-коричневая 60 грамм
2. 3,5 мм крюк вязания крючком
3. 15 мм отверстие, 12 комплектов
4. Ручки (20 ") пара
5. Сильные швейных ниток (желательно нейлоновой нити)
6. Резинка (20 ") с 2 ленты связей (2" х 16 ") на концах
Инструменты:
1. Ушко инструмент установки и молот множество
2. Сильные швейные иглы
3. Гобелен иглы
Готовые размерности:
Приблизительный 15 "(Ш) х 12" (H), за исключением ручки
Напряжение: Приблизительно 16 п. х 14 строк одним крючком (4 квадратных дюймов)
Направления:
1-й слой - работа снизу вверх, вязание крючком на спине петли только.
Круглое основание
С темно-коричневыми рафии
прошу SL узел, СН3, присоединиться к slst на первый CH сделать круг
R1: CH1 sc8, мм (8-й)
R2 - R14: увеличение 8 п. равномерно для каждого выстрела, мм (112 п.)
Орган
R15 - 16: СБН в каждую ул вокруг, мм
R17: увеличение 8 п. равномерно, мм (120 п.)
R18 - R19: SC в каждом ул вокруг, мм
R20 - R23: повторить R17 - R19, R17, то снова (136 п.)
С Браун рафии
R24 - R25: SC в каждом ул вокруг, мм
R26 - R29: повторить R17 - R19, R17, то снова (152 п.)
R30 - R40: SC в каждом ул вокруг, мм
С бежевым рафии
R41 - R53: SC в каждом ул вокруг, мм
R54: "CH1 SK 1-й, 1 ПК в следующем 11-м", * CH1 SK 1-й, 1 ПК в следующем * 12-й повторить 4 раза, повторить "2 раза, повторить * 4 раза, повторить" 1 раз (для создания 12 отверстий)
R55 - R56: SC в каждом ул вокруг, slst.
2-й слой - работа сверху вниз, вязание крючком на передних петлях только
превратить ваш мешок с ног на голову, так что последняя строка 1-й слой становится первой строке (просмотреть фотографии ниже, чтобы визуализировать)
** Slst в каждом ул вокруг **
5 раундов бежевый
1 раунд коричневый
1 раунд темно-коричневого
1 раунд коричневый
4 раунда по бежевый
4 раунда по темно-коричневый
6 раундов коричневый
5 раундов бежевый
6 раундов коричневый
23 раундов темно-коричневый
для и скрыть все концы.
Rafia пряжи для вязания крючком и handicraftIf вам интересно, что rafia / рафии нить? Вот и все. Не путать с рафии соломы, они разные по текстуре. Rafia тонкий и мягкий, современный rafia выполнена из пластика или бумаги.
Я не пробовал из пластиковых нитей - plarn, что вы можете заменить с вашего полиэтиленового пакета продуктового но я думаю, что это должно быть возможным в принятии этого мешка. Если Вы попытались его, пожалуйста, дайте мне знать результат.
Вязание крючком Стро рафии Сумка Учебник Бесплатные PatternFollow крючком картина выше, и сделать это до последней строки последнего стежка для первого слоя. Только работа на спине петель, как мы должны использовать передние петли для вязания 2-й слой.
Вязание крючком Стро рафии Сумка Учебник Бесплатные PatternTurn с ног на голову мешок, последняя строка первого слоя является первой строке второго слоя. Стежок промаха в каждый отдел петли стежок. Работа в качестве шаблона и цвета указаны.
Следуйте напряженности первого слоя, иначе вы можете столкнуться с некоторыми "усадку" в размере. Используйте больше крюк, если необходимо для достижения такого же напряжения.
Скрыть все концы.
Вязание крючком Стро рафии Сумка Учебник Бесплатные PatternI использовать готовые лента толщиной саржа / нейлон ручки с соответствующего цвета. Вы можете сшить это сейчас или после установки люверсов. Я сделал это позже.
Вязание крючком Стро рафии Сумка Учебник Бесплатные Pattern12 люверсов с их задней панелей. 15 мм диаметр отверстия просто приятно войти в соответствующее отверстие / пространстве приходилось.
Вязание крючком Стро рафии Сумка Учебник Бесплатные PatternInsert отверстия к отверстию, нажмите на нее до самого отверстия вала перейти на другую сторону.
Вязание крючком Стро рафии Сумка Учебник Бесплатные PatternPlace задней панели на другую сторону. Линия работает прекрасно с глазком.
Вязание крючком Стро рафии Сумка Учебник Бесплатные PatternPlace их на ушко молоток инструмент пластины. Вставьте сообщению инструмент в его вертикально ** Внимание **, убедитесь, что они выравниваются красиво. Серп и ударить его несколько раз.
Вязание крючком Стро рафии Сумка Учебник Бесплатные PatternThe отверстии вала проката и запер заднюю панель на место.
Вязание крючком Стро рафии Сумка Учебник Бесплатные PatternThe вид спереди. Повторите 12 раз, чтобы получить 12 проушины установлены.
Если вы не получите ручки пришиты, вы можете это сделать сейчас. Если вы не можете найти саржевого ручки, вы можете его с крючком пряжи rafia или сшить один.
Пасс резинку с лентой концы через отверстия и галстук.
~ ~ Совершено !!!
Вязание крючком Стро рафии Сумка Учебник Свободный Образец
DIY: Gem and Chain Ring
I say "general" because the concept of my version would have been more similar to the original if my sew-on gems had more than 2 holes. However, 2 holes are the standard amount of holes in sew-on gems...so, we'll just have to work with it. Making an exact copy would be kind of boring anyway!
Inspiration:

Harrison Ring
Supplies:
- Rectangle sew-on faceted gems (I got mine at Michael's, 10/pk for $1.99)
- Chain, jump ring, jewelry pliers
- Strong glue, such as E6000
- Ring blank
- Wire (possibly!)

 1) Connect the chain to one of the holes with a jump ring.
 2) Wrap it around and connect a link of the chain to the next hole of the gem, using another jump ring.
 3) Connect the end so that it wraps around the entire gem; trim if needed.
 4) If there were multiple holes around the entire gem, more jump rings could be used to keep the chain in place. However, with only 2 holes in most sew-on gems, the chain will most likely be sliding every which way. I used some wire to weave in and out of the links, which kept the chain in place.
 5) Gratned, the chain is ON the gem instead of AROUND it, but I think I like it this way :)
 6) Glue the ring blank to the chained up gem. (If you're using E6000, don't forget to do this in a well-ventilated area & to let it dry for 24 hours!)
High End Cost: $155
S & P Cost: After all the dividing is said & done.... $2!
I really want to try this with some black faceted gems; hopefully I can find some with multiple holes. I'll probably be coming back to this project in the near future!
love love love,
kirsten gail
DIY: Triple Stud Ring – a little tough, a little sweet, a lot cool
 We’re so excited to continue to add to our amazing crew of writers at we heart this. Today, we want to give a big welcome to Kirsten, who will be sharing her crafty ways with the lucky wht readers every month.
A fan of vintage everything (but especially shoes) with a love of art, music, beauty, fashion, she’s a wht chick after our own hearts! And make sure to check Kirsten’s blog, Studs and Pearls for tons of inspirational photographs, musical fun and loads more tutorials.
~ wht
As many of you creative ladies know, studs and multi-finger rings are some of the most well loved fashion trends right now. Double and triple finger rings are such significant statement pieces, and can really bring an outfit to an entirely new level. I personally love both studs and multi-finger rings – so why not combine the two?
My love of studs and my love of jewelry making crossed paths (along with inspiration from high end, designer multi-finger rings) – and the triple stud ring was born. It’s SUPER easy to do, even for beginner jewelry makers.
 all photos: kirsten for we heart this
Supplies:
• Glue gun (or an industrial strength glue such as E6000)
• 3 pyramid studs
• Jewelry pliers
• 2 adjustable rings**

** Any kind of adjustable ring blank will do. You can usually find them with loops (as I did) or with flat metal pads. But you just need the ring – so if your rings have loops, simply twist them off with the pliers. If they have pads, you can also just take them off with pliers.
A quick glue note: If you use a glue gun, you must work quickly, as hot glue dries fast. If you’d like a more solid foundation for your ring, I’d recommend using a glue like E6000. I suggest working quickly with this as well – and in a well-ventilated area! You’ll also need about 24 hours for your ring to completely dry. Your ring will be much stronger if you use E6000, but again, it’s up to you.
Instructions:

1) These were my rings after I twisted off the loops. Slightly open up the rings…

2) …then, using your pliers, bend each end of the ring outwards. Try to make sure the bended end is as horizontal as possible.
 3) Take one of the studs and bend each of the 2 prongs in. Fill the inside of the stud with glue.
4) Insert one of the rings into the glue/stud.
5) Fill in the second stud with glue and place it on the other side of the ring.
6) Add a little more glue and slide in the second ring…

7) Then glue the last pyramid stud to the last side of the ring.

8) AND…you’re done!
DIY: Skull Clutch
 Okay...I've been dying to do this DIY for the longest time! I couldn't find the exact supplies I wanted, but ended up improvising. I'm pretty pleased with how it came out. Not so much because of the piece it was inspired by, but because it uses a fairly standard item - an eyeglass case - in a completely different way.
The inspiration = Alexander McQueen's amazing skull clutches, ranging from $1200-$2000+ ...click here, here, here, here, here for several different examples. And yet another example...

Alexander McQueen Studded Leather Skull Clutch
Saks Fifth Avenue. $1,595.
I loooove these clutches. The price tag? Not so much. I completely understand that this is McQueen we're talking about, one of the most legendary fashion designers ever...But I really don't have $1500 laying around. So this DIY was born, inspired by McQueen, along with a little twist. You can either leave it at a clutch or make it into a small purse...totally up to you.
I suggest reading through the entire DIY before starting. There's so many ways you can go about doing this - especially with the endless amounts of eyeglass cases out there, you can get really creative with this.
 Supplies:
- Eyeglass case of your choice....$8- Skull (or whatever) bead.....$8
- Metallic spray paint, if needed....$3
- About 45 inches of chain, optional....$1.40
- Some elastic, optional.....<$1
- Not shown above: sewing thread, needle, E6000 glue.......<$2
 I've been searching for a large silver or gold skull bead, but haven't had any luck. I've had this natural bone skull bead for a while, though...and figured it could probably work, given a good coating of metallic gold spray paint. This type of bead will be probably easier to find on Etsy or Ebay, but you don't even have to use a skull bead if you don't want to.
 1) Spray paint your bead in a well ventilated area. Let dry, as indicated on the can's directions.
 2) If you'd like to make your clutch into a small purse, keep reading. If you just want it to be a clutch, skip to Step 6 ! ....... Cut two strips of elastic, about 2 inches long.
 3) Slip one piece of elastic through one end of the chain. Sew the ends together.
 4) Repeat on the other end of the chain.
OPTION: To make your clutch convertible, sew the elastic into loops just as I did, but use large jump rings to attach the chain to the loops. This way - you can easily remove the jump rings/chain if you want to convert between clutch and purse.
 5) Glue the elastic pieces to the interior of the eyeglass case. You may have to press down on them for a bit before they actually stay in place. As always, when using E6000, do this in a well ventilated area.
 Close up.
 Once the glue dries...
 6) ...glue on your bead. Let dry.
 7) Done!
S&P Cost: $21...just about
xo!
kirsten
I suggest reading through the entire DIY before starting. There's so many ways you can go about doing this - especially with the endless amounts of eyeglass cases out there, you can get really creative with this.
 Supplies:
- Eyeglass case of your choice....$8- Skull (or whatever) bead.....$8
- Metallic spray paint, if needed....$3
- About 45 inches of chain, optional....$1.40
- Some elastic, optional.....<$1
- Not shown above: sewing thread, needle, E6000 glue.......<$2
 I've been searching for a large silver or gold skull bead, but haven't had any luck. I've had this natural bone skull bead for a while, though...and figured it could probably work, given a good coating of metallic gold spray paint. This type of bead will be probably easier to find on Etsy or Ebay, but you don't even have to use a skull bead if you don't want to.
 1) Spray paint your bead in a well ventilated area. Let dry, as indicated on the can's directions.
 2) If you'd like to make your clutch into a small purse, keep reading. If you just want it to be a clutch, skip to Step 6 ! ....... Cut two strips of elastic, about 2 inches long.
 3) Slip one piece of elastic through one end of the chain. Sew the ends together.
 4) Repeat on the other end of the chain.
OPTION: To make your clutch convertible, sew the elastic into loops just as I did, but use large jump rings to attach the chain to the loops. This way - you can easily remove the jump rings/chain if you want to convert between clutch and purse.
 5) Glue the elastic pieces to the interior of the eyeglass case. You may have to press down on them for a bit before they actually stay in place. As always, when using E6000, do this in a well ventilated area.
 Close up.
 Once the glue dries...
 6) ...glue on your bead. Let dry.
 7) Done!
High End Cost: $1500...at the very least
S&P Cost: $21...just about
xo!
kirsten
DIY: Make a Fabric Covered Gem Necklace
 photos: Kirsten for we heart this
Lately, fabric seems to be making its way into necklaces, earrings, bracelets – all kinds of accessories. I love that it can add an entirely different texture and look to a piece of jewelry. For this DIY, I incorporated fabric from a thrifted skirt with some plastic décor gems and chain to create a one of a kind necklace. Totally customizable and really easy to make!

Supplies:
- Plastic lightweight decorating gems*
- Scrap fabric (mine was 40 inches x 4 inches)**
- Thick chain
- Scissors
- Jewelry pliers
- Hot glue gun (optional)
*I used 7 gems. These can be found in the home décor section, and are usually used to fill vases.
**Make sure your fabric is thin, lightweight, and not too thick!

1. Tie a knot at one end, making sure there’s about an inch of fabric left above the knot. Place a gem in the tube that has formed. Make sure the fabric wraps around the entire gem, and tie another knot.
2. Insert another gem, and tie another knot.
3. Keep going! Again, make sure there’s about an inch left after the last knot.

4. Cut a slit in the fabric at each of the ends.
5. Tie onto the chain. Repeat at the other end. If you would like, use a little hot glue to further secure the knots.
Voilà – on-trend necklace, made by YOU!
Kirsten of Studs-and-Pearls.com is currently in graduate school, working towards her Masters of Science in Nutrition. She loves vintage shoes, photography, and baking at obscure hours of the night. Her art and DIY supplies are currently taking over her apartment, and she wouldn’t want it any other way.
DIY: Knuckle Duster Eyeglass Case Clutch

All I can say about this DIY is: love love LOVE. It's a redo of the first two eyeglass case clutches I made last year (here and here), but this one is my favorite by far. The general shape and build is inspired by the Alexander McQueen clutches, even though eyeglass/sunglass cases obviously weren't used in the original designs. I don't do as many designer DIY's as I used to - but when I thought of this, I knew I had to do it.
If you make your own clutch (whether the design is inspired by a McQueen clutch or is a style that's all you) you'll probably save a few thousand dollars.....just saying.
If you make your own clutch (whether the design is inspired by a McQueen clutch or is a style that's all you) you'll probably save a few thousand dollars.....just saying.

Supplies:
- Large eyeglass/sunglass case
- Bead (s)
- 3 flat metal pieces (I used scrapbooking brads)
- Rhinestone (or whatever!) trim
- 3 ring blanks
- 3 ring blanks
- Super glue/E 6000
- Jewelry pliers

You can go so (SO) many different ways with the beads you choose. I bought these little guys at one of my favorite supply shops in Manhattan, Beads on Fifth. They go along with my personal love for anything creepy & pretty (if that's even the right way to describe it?) - I also love that they're etched with a subtle floral design.
The rhinestone trim I used was purchased at M&J Trimming, also in Manhattan. You might recognize it from the Rhinestone Mutli-Finger Ring I made recently.
The metal pieces can be anything - flat charms minus the loops, metal scrapbooking tags, or whatever you have on hand. I had a few silver scrapbooking brads leftover from the Elastic Brad Belt project, so I used those. These were purchased at Michael's.
As for the case? I got this sunglasses case at TJ Maxx for $6.99 - I had a gift card from my birthday last July, so I figured I'd use it up!

1) Glue the ring blanks onto the case, pad side down. Let it dry for a little bit.

2) If needed, pry off the prongs (or loops, depending what you have) on the metal pieces with pliers.

3) Glue the metal pieces on top of the ring blanks. Again, let it dry for a bit, just so they aren't sliding around when you continue onto the next step.

4) Carefully glue the trim along the top.

TIP: Glue the center of the trim to the middle piece first, wait until it's semi-dry then work on the right and left sides. There's going to be a lot of sliding around if you don't let the glue dry at least for a little bit in between steps.

5) And when that's (almost) dry? Glue the beads on top of the trim. If your trim has an uneven surface, you might have to press and hold for a bit. Let everything dry overnight.


It's a PERFECT fit for my phone + cards, cash, lip balm. So easy to make, too.
(I love my obnoxiously bright shoes. They're vintage, the heel height is practical, and they cost me $1.99!)
If you decide to make one, it goes without saying that I fully expect to see a picture! My e-mail is kirsten.studsandpearls@gmail.com, or you can always send it to me on Twitter or S&P's Facebook fan page.
Also, thanks to my good friend Miss Gabriella Vargas for helping me shoot these pictures. Self-timer can be pretty evil sometimes, so the help was immensely appreciated
DIY: Recycled Plastic Triangle Earrings

Happy Earth Day! In honor of today, this project is a straight up recycling DIY.
This project uses recycled plastic that would have otherwise gone in the trash. It may not be the most sturdy material, but I personally think it's better than having it sit in the junkyard. You can use almost any kind of plastic - fruit containers are a good one. So is the (kind of annoying) packaging that some items come in.
This project uses recycled plastic that would have otherwise gone in the trash. It may not be the most sturdy material, but I personally think it's better than having it sit in the junkyard. You can use almost any kind of plastic - fruit containers are a good one. So is the (kind of annoying) packaging that some items come in.

Supplies:
- Plastic scraps
- Paintbrush
- Masking tape, preferably of a thin width (not shown)
- Scissors
- Super glue
- Small rhinestones, if you'd like
- Earring posts and backings
- Spray paint for base (I used Krylon in Flat Black, which is matte)
- Metallic acrylic paint
- Plastic scraps
- Paintbrush
- Masking tape, preferably of a thin width (not shown)
- Scissors
- Super glue
- Small rhinestones, if you'd like
- Earring posts and backings
- Spray paint for base (I used Krylon in Flat Black, which is matte)
- Metallic acrylic paint

You'll only need 2 small pieces for your earrings, so you can make a LOT out of one piece of plastic. These plastic containers once held croissants, jewelry supplies and a lens hood for my Nikon camera.

1) Cut out 2 plastic triangles (or whatever shape you want). Place it against your ear, just to make sure they'll fit comfortably. One of the points was digging into the side of my face, but I was easily to trim that down.
After cutting out one piece, you might want to trace it onto the next piece of plastic, so that both pieces are the same size.
After cutting out one piece, you might want to trace it onto the next piece of plastic, so that both pieces are the same size.

2) Spray paint, and let dry a couple of hours (a MUST).
I spray painted on an old issue of Elle magazine - how ironic is it that I happened to open up to that page?
I spray painted on an old issue of Elle magazine - how ironic is it that I happened to open up to that page?

Dry.

3) Apply the tape in the pattern you want, making sure it's completely flat. You can do a chevron print like this, or diagonal stripes, or horizontal stripes...totally up to you.

4) Wipe off the excess paint off of the paintbrush, and carefully paint in the pattern. Let dry for a bit.

After peeling the tape off.

5) More tape, for the second half of the pattern.

6) Peel off when dry.

7) Glue on some rhinestones, if you'd like. Using super glue with a pointed tip will help with precision.

8) Glue on the earring posts, and let dry completely.

Finished. You can't even really tell that it's plastic!

Of course, you don't only need to make earrings. There's going to be a lot of plastic leftover, so you can even make a ring if you'd like. I used the same paint for this ring, but added more rhinestones.
Regardless of what you make, they'll be really lightweight, completely customizable, and not in a landfill :)
Regardless of what you make, they'll be really lightweight, completely customizable, and not in a landfill :)

I've been using that coffee sleeve for the past 5 years. I made it from a thrifted plaid button up and some scrap fabric. In those 5 years, I can't even imagine how many cardboard sleeves I would have used otherwise.
I also usually use a coffee mug...but sometimes you can't help but buy a cup when you're running errands or meeting up with a friend. Thankfully, I always have a coffee sleeve with me.
Hope everyone has a great weekend. And if you celebrate Easter, hope that's a good one, too<3
xo,
I also usually use a coffee mug...but sometimes you can't help but buy a cup when you're running errands or meeting up with a friend. Thankfully, I always have a coffee sleeve with me.
Hope everyone has a great weekend. And if you celebrate Easter, hope that's a good one, too<3
xo,
kirsten
Tags: DIY, earrings, jewelry, rhinestone, ring, spray paint, tutorial 17 comments Links to this post 

Monday, April 18, 2011
DIY: Spike Ring

By now, I think it's pretty obvious I have a soft spot for statement jewelry. This ring creates the illusion of a spike going through your finger, although the ring is SO lightweight you probably won't even feel it.
EDIT: Everyone keeps asking where I got the spikes. They're NOT spikes! Technically, at least. They're cone bead caps, as I indicated below. Bead caps are way easier to find, unlike spikes, which is why I used them. You can find some on Etsy here - you'll have to browse through them if you want to find caps without the fancy filigree.
EDIT: Everyone keeps asking where I got the spikes. They're NOT spikes! Technically, at least. They're cone bead caps, as I indicated below. Bead caps are way easier to find, unlike spikes, which is why I used them. You can find some on Etsy here - you'll have to browse through them if you want to find caps without the fancy filigree.

Supplies:
- Jewelry pliers
- Super//E6000 glue
- Adjustable ring blank
- 2 cone bead caps

1) If your ring blank has a loop on it, twist it off with the pliers. Separate the two ends of the ring to widen up it up a bit.

2) Bend each of the ends out, making them as flat as you can.

3) Glue one of the prongs into the inner top part of a bead cap.

4) Repeat on the other side. Let dry.

Easy :)
Side note: Has anyone ever tried matte nailpolish? It's my favorite! Matte nailpolish has that edgy vibe, but it's still girly - considering nailpolish itself is pretty girly. But the matte finish is fairly offbeat, which I love.
My original plan was to post a jeans DIY, but the pictures of me wearing the finished product are on a friend's camera. We went to a show in Manhattan and I wore the jeans, but I didn't bring my bulky Nikon...so when I get those from her, I'll be sure to post the project!
Also, be sure to send in any questions for the Q&A I'm having! Leave them in a comment, e-mail me at kirsten.studsandpearls@gmail.com or tweet me at @kirstengail. Be sure to include your name and location.
xo,
kirsten
Tuesday, April 12, 2011
DIY: Snake Wrap Bracelet

This DIY starts off pretty crazy - but I promise the finished piece is way cooler! You might even have all of the supplies already...except the rubber snake.
If you're into accessories of any kind, I'm sure you've noticed the snake trend going on in rings, bracelets, necklaces, etc. It's been around for a while, so I kind of wish I thought of this earlier - but it wouldn't hurt to make it anyway. This bracelet was inspired by the pieces below...

Kara by Kara Ross Coiled Snake Cuff (Gold) - $250, Saks Fifth Avenue
Theo Fennel Alias Oxidised Silver Mamba Torc Cuff (Silver) - $1,300, Harrods.com
Theo Fennel Alias Oxidised Silver Mamba Torc Cuff (Silver) - $1,300, Harrods.com


Supplies:
- Rubber snake (Mine was $1)
- Metallic spray paint (not shown)
- Paintbrush & acrylic paint of the same color, optional
- E6000/super glue
- Snake chain (appropriately named!) *
- Rhinestone flatbacks, optional
- 2 coiled leather crimps
- Several jump rings, at least one big one
- Jewelry clasp
- Jewelry pliers & scissors
*My bracelet wraps around my wrist 3 times. My wrist measurement is 6.5 inches, and I used roughly 32 inches of chain (or 16 inches when folded in half). Since the snake head overlaps the tail, the entire snake component of the bracelet is 2.25 inches (aka the entire length of the tail) You can use my measurements to adjust accordingly, depending on the measurement of your wrist.

1) Cut off the head (about 2 inches) and tail (about 2.25 inches). I threw away the rest of the snake before I could start feeling bad for an inanimate object.

2) Spray paint! You may have to pause in between layers, as it takes a few minutes for the paint to stick to the rubber. Repeat on the reverse side.

3) When that's dry, you can touch up any missed spots with acrylic paint, if you'd like.

4) Carefully pierce a hole in the tail. I alternated using scissors and pliers.

5) Attach a jump ring.

6) Pierce a hole in the base of the head. Keep in mind that you're going to be putting jump rings through these holes, so don't make them too far from the edge.

6) Attach the largest jump ring.

Closeup of the snake chain.

7) Insert the chain through the jump ring on the tail. Take the ends of the chain and glue into the coiled crimps. (I didn't have any gold crimps, but I had some silver ones on hand - however, whether or not you want them to match is totally up to you.)

8) Attach to the jewelry clasp with a jump ring.

9) Hook onto the jump ring in the head.

10) Glue the bottom of the head to the top of the tail. And if you'd like, glue rhinestones to the eyes.
EDIT: A reader commented on the Facebook page suggesting red rhinestones for the eyes, which would be pretty cool. I do have some colored rhinestones, but they're all way too big for the eyes. I also then realized that rhinestones along the top of the head would look pretty sweet. I think I might do that to mine!
EDIT: A reader commented on the Facebook page suggesting red rhinestones for the eyes, which would be pretty cool. I do have some colored rhinestones, but they're all way too big for the eyes. I also then realized that rhinestones along the top of the head would look pretty sweet. I think I might do that to mine!

The finished piece!
I don't even own any snake jewelry, but I love this DIY because of the materials, more so than the actual concept. It uses something completely random and unexpected (and maybe slightly strange). As I said on Twitter and Facebook - when I uploaded a cell phone shot of the rubber snake & scissors - I really pushed the crazy button with this one. But it was totally worth it, in my opinion ;)
I also want to say thank you (x 100000) to everyone who said congratulations on the About.com job and/or the CNN feature! I tried to thank everyone individually, but there's been so many comments and tweets, I may have missed a few. But you know that I totally appreciate the support; I'm really excited for everything.
xo,
kirsten
Monday, February 21, 2011
DIY: Watercolor Petal Necklace
 This necklace is probably one of the more girly things I've made - and I'm usually not really into super girly things - but I can't help it...it totally reminds me of spring and warm weather and sunshine. It was inspired by this Lanvin Ribbon & Pearl Drop necklace below; it’s also $450.
(Nordstrom.com)
I instantly thought of the fake flowers I used when I made a hair fascinator and birdcage veil for my friend’s wedding last year (click here for pictures here, under “Weddings”!)…I also happen to love watercolors, so I thought this would be the perfect chance to combine craft and art.

Supplies:
- White faux flower*
- Watercolor paints; student grade is fine
- Paintbrush
- Pearls, or whatever beads you would like
- Headpins, if needed
- Jump rings
- Long piece of chain
- Clasp, if needed
- Jewelry pliers & scissors
- Paper towels
*I took this picture after I plucked away at the first few layers of petals. The bottom/bigger petals can be easily made into a second necklace!
 1) Take apart the flower, and decide which petals you want to work with. I ended up using 9 of the top/smaller petals.
 2) Paint the petals! Don’t be afraid to mix colors. I love the gradients that can be made with watercolors. TIP: Don’t use too much water. Try painting the entire petal with a light wash of color, then gradually work on adding more saturated color. Your hands WILL get paint on them, so keep those paper towels on hand.
 I happen to love all shades of blue - especially turquoise - so I went for a similar shade of the original. Deeper blues on top with some green blended in towards the bottom. I wanted something similar, not exact, so the watercolors are perfect to control the colors and shades I used.
 3) Let dry, at least for an hour or two.
 4) Carefully pierce holes on top of the petals. I used the blunt end of a sewing needle. Attach the jump rings, then attach to the chain. Add a clasp if needed; I made this one long enough so that it doesn't need a clasp.
 5) Instead of pearls, I used connector gems. But it’s totally up to you as to what beads you use.
 Just like the last DIY, I spent $0 since I already had all the supplies, but a faux flower will probably cost you about $2-3 at your local craft store.
...In other news, I'll be guest posting DIY's at a few other fashion blogs within the next month or so. I just finished a fun shoe tutorial for the lovely Geneva at A Pair and A Spare and my monthly DIY for We Heart This. I'm also going to be a March sponsor for Malori at Sunday Morning Sugar, so keep an eye out for some fun things her and I are working on.
I'm also working on completely revamping my jewelry shop. It needs a serious face lift, so I'm pretty excited for this. Not to mention I take online grad classes (for something completely unrelated...Nutrition!) and may have a few freelance writing jobs lined up.....I've also been working on custom jewelry orders for family friends......."busy" is an understatement these days, but at least I'm never bored, right? ;)
Follow me on Twitter and become a fan of S&P on Facebook!
xo,
kirsten
Saturday, February 12, 2011
DIY Leftovers: Sweashirt Necklace, Sweatshirt Headband
...As promised!

Two quick DIY's using the leftovers from the Sweatshirt Blazer. More specifically, the collar and the bottom portion...
 ...become a necklace and a (warm!) headband.
 ...become a necklace and a (warm!) headband.
COLLAR NECKLACE:
Trim excess fabric along the seam with a good pair of scissors. Trim down either side of the collar to your desired length. Take some sew on gems - or buttons, or beads, or a combination of everything - and sew/hot glue them to the collar. Measure two long pieces of silk or grosgrain ribbon, sew/hot glue each piece onto either side.

SWEATSHIRT HEADBAND:
Trim excess fabric along the seam, trim the entire piece so that it's short enough to fit around your head. Make sure to leave about an inch or so for sewing or gluing. Attach the ends together. Take a piece of scrap fabric, tie a bow, trim it down if needed, then sew or glue on.
Trim excess fabric along the seam, trim the entire piece so that it's short enough to fit around your head. Make sure to leave about an inch or so for sewing or gluing. Attach the ends together. Take a piece of scrap fabric, tie a bow, trim it down if needed, then sew or glue on.
I paid $5 for that sweatshirt in the last DIY. I guess you can say I got my money's worth!
Also, a huge thank you to Shine Yahoo! for including S&P in the feature, "10 fashion blogs you may not know...but should" ! I was glad to recognize some other names on that list, too.
Monday, February 7, 2011
DIY: Sweatshirt Blazer
 *EDITED 2/9/11 with reader suggestions!*
So, I made this sweatshirt (slash cardigan slash blazer?) kind of on a whim. Didn't plan it up, improvised and made it up as I went along. Let's hope it makes sense. By all means, if you decide to make this - improvise the heck out of it and see what works best for you !
ALSO - save two of the scraps leftover from this project. I'll indicate what pieces to save. DIY's using those leftovers coming soon ;)

 Supplies:
- Crewneck sweatshirt. Hanes is about $5. *
- A good pair of scissors
- Measuring tape
- Hot glue gun...BUT preferably thread/sewing needles
- Vintage brooch (possibly)
*I used a size Medium. I think, because of the nature of the finished product, a small would have worked better for me. For reference - I'm pretty small, about 5'2", and usually wear a size small or medium (but usually a medium for comfort's sake). Given that information, you can hopefully gauge what size sweater you can work with. Just remember that these crewnecks are not fitted to begin with.
 1) Measure the exact halfway point across your sweater.
 Use some pins if you'd like; you'll be cutting straight down the middle.
 2) Choose a point several inches from the bottom; this is where the diagonal fall of the top will start. I measured about 8 inches up from the bottom and pinned these points.
 3) Cut off the bottom, right above the seam. (Save the bottom piece!)
 4) Place pins in a diagonal line from the point you measured earlier to the bottom left and right corners of the sweater.
 5) Cut along the pins. ONLY the FRONT/TOP layer.
 6) Going back to the vertical slit you made in the middle of the sweater - accordian fold both sides so that there about 3 or 4 folds. Pin this and carefully try it on. You will most likely have to readjust the folds for a better fit, several times.
 For me - I made 3 folds, tried it on, sewed the folds down, tried it on again, then made a deeper/diagonal 4th fold to give it some shape. Then sewed this fold down.
 EDIT: I'd really recommend using a needle and thread to secure everything together; it will hold up much better than hot glue. I used hot glue the first time around since I was just playing around with the idea of making a sweatshirt into a blazer, but a needle and thread would be a much better choice!
Figuring out the folds be a little tricky, as can trying to get the sweater to have a fitted - well - fit to it. Just keep trying it on and re-pinning until you get it right.
 8) Cut off the collar right along the seam. (Save this, too!!)
 9) Line some pins in a diagonal line on the upper most part of the collar. Repeat on the other side.
 10) Cut along the pins...11) Aaaand you're all done. I used a brooch as a closure, but this can be a little tricky since there's so many layers of fabric. I'm sure you can figure out something, though!
*Check the comments for some great closure suggestions by Aureolis!

For a DIY that I didn't actually plan out, I think it turned out okay. If you decide to make this, feel free to share some tips, tricks or suggestions.

Check back soon for two mini DIY's with the leftovers!
(Don't forget to follow me on Twitter and become a fan of S&P on Facebook)
1
GUEST POST at DSC: Colorblock Paperclip Necklace
 My first guest post/fashion DIY at DollarStoreCrafts.com is up! A colorblock paperclip necklace, inspired by the $168 Acrobatics Necklace at Antrhopologie. This one is a much simpler version of the Antrhopologie piece...although I've attempted the more complex, full on version of the Acrobatic Necklace. I'll probably share that sometime soon. Either way, check out the tutorial on DSC !
I've been drinking TONS of crème brulee coffee today, non stop. It's probably not helping my caffeine addiction - but it's just too good. Here's to hoping I'll have a really productive day (A clothing DIY for S&P, bullet shell necklaces for Limette, online graduate school work and some leisurely drawing, maybe?)
xo,
kirsten
DIY: Elastic Brad Belt
This project uses thick elastic and the least expected item for any kind of fashion DIY - scrapbooking brads. These are usually used to accent photographs & pages, and come in a wide variety of shapes, sizes and colors. I found these large circle brads in silver/gold/brass/copper, and used them to "stud" a waist belt made from sewing elastic.

Supplies:- Thick sewing elastic
- Scrapbooking brads of your choice
- Metal belt closure (I took mine from a thrifted belt)
- White gel pen
- Hot glue gun


1) Measure a piece of elastic at the length desired - I decided to make mine a waist belt. Add half an inch to an inch at both ends. Slip an end of the elastic through one of the belt closures and secure with some hot glue.
 2) Measure equal increments along the elastic, and mark with the gel pen. I made mine at 2 inch increments.
 3) Carefully insert the brads and bend the prongs to secure them (below). If you'd like, use a little hot glue to further secure the prongs.

 4) Insert the rest of the brads along the elastic.
 5) Glue the other end to the second half of the closure.

Supplies:- Thick sewing elastic
- Scrapbooking brads of your choice
- Metal belt closure (I took mine from a thrifted belt)
- White gel pen
- Hot glue gun


1) Measure a piece of elastic at the length desired - I decided to make mine a waist belt. Add half an inch to an inch at both ends. Slip an end of the elastic through one of the belt closures and secure with some hot glue.
 2) Measure equal increments along the elastic, and mark with the gel pen. I made mine at 2 inch increments.
 3) Carefully insert the brads and bend the prongs to secure them (below). If you'd like, use a little hot glue to further secure the prongs.
 4) Insert the rest of the brads along the elastic.
 5) Glue the other end to the second half of the closure.
Who says scrapbooking can't be stylish?
Enjoy <3
xo,
kirsten
Enjoy <3
xo,
kirsten
DIY: Headband Earmuffs
This project was inspired by two things - this pair of earmuffs I found on BrownsFashion.com a few months ago, and having really cold ears during New York's chilly winters. I can't remember the exact cost of the inspiration piece, but it was definitely pricey -a couple hundred US dollars, if not more. This version will cost you way less!

Supplies:- Headband (I got mine at H&M)
- Faux fur fabric (at least a 25x25 inch piece)
- Vintage brooch (optional)
- Not shown: Hot glue gun, jewelry pliers, scissors, sewing needle, thread
 1) Cut out 2 circles. Mine were 3 1/2 inches wide. It might help to make a cardboard template for your circles before cutting the faux fur.
 2) Hot glue the back of one circle, to the backside of one end of the headband. I made mine so that an inch of the headband was glued to the circle. (Tip: Before glueing anything down, try on the headband-fur combination to figure out proper/comfortable placement)
 3) Attach the other circle, back side facing the other back side, with a little bit of hot glue.
 4) Whip stitch around the edge. Repeat 1-4 on the other side.
 5) Pry off the pin back on the booch with jewelry pliers, then hot glue onto the headband.
Stay warm!
xo,
kirsten at s&p
DIY: Embellished Striped Tank Top
I took one look at Sass & Bide's The Art Beat cotton tank top and knew a similar shirt would be easily DIY-able. It's a bit time consuming to make, between waiting for the paint to dry and handsewing embellishments, but it's totally worth it. I love how mine turned out!
Inspiration:

Sass & Bide Art Beat cotton tank, $155
Supplies:
- Vneck shirt, a size or two larger than you normally wear
(for an oversized fit).
- Black fabric paint (Acrylic paint works, but fabric paint is more ideal. My black fabric paint happens to be MIA)
-Various metal embellishments, such as chain, metal beads, charms, etc.
- Masking tape, paintbrush
- Scissors, sewing needle, thread
 I already had this shirt on hand; I purchased it for about $8 at TJ Maxx a few months ago. It's a light pink/peachish color, and has a worn in feel to it.
 The embellishments I used; chain and small round beads. I also ended up using gold pyramid studs (not shown here).
 1) Start by cutting off the sleeves.
 2) Cut an arc shape at the bottom of the shirt. Start off with a slight arc, then try it on, and cut again from there until the arc is to your liking. Better to cut off a little bit at first than too much!
 3) Add strips of masking tape to the shirt (I made my stripes about 1.25 inches apart). Make sure you place old magazines or newspapers in your shirt so the paint doesn't seep through to the other side.
Paint on the stripes; for a more distressed look, dip your paintbrush in the paint, wipe of the excess on a scrap piece of paper, then dab the brush along the shirt.

 4) When the paint is completely dry, peel off the masking tape. Repeat on the other side (if you'd like).
 5) Sew on whatever hardware/embellishments you'd like on the shoulders.
 6) I used 3 gold pyramid studs, 2 pieces of gold chain and a few small gold beads on each shoulder.
 7) Done!
Some Useful Tips...
- When adding the masking tape to the shirt, make sure you cover all areas in between the stripes. Fabric/acrylic paint is pretty sneaky and can get into gaps easily.
- If you do get a little paint in between stripes, just leave it! Trying to wash it off will just smudge the paint.
- After hand sewing the embellishments onto the shoulders, you may want to use something like FrayCheck to seal the thread.
- Because of the delicate nature of the hand sewn embellishments, hand wash your shirt.
High End Cost: $155
S&P Cost: $12
xo,
kirsten
На этом раскопки мои закончились. Но дальше будет ещё более интереснее. Дальше на ждёт увлекательнейшее путишествие по мастерицам из сайта Fashiony. Там будут все мастер классы на русском. До встречи
хохо
Margo
very nice bracelet.looking so good.To get more design in weaveron textile click on this link....:http://www.weaveron.com/
ОтветитьУдалитьyeezy boost 350 v2
ОтветитьУдалитьyeezy shoes
curry 7
moncler coat
kyrie 6 shoes
jordan shoes
birkin bag
yeezy
kyrie 6 shoes
yeezy supply