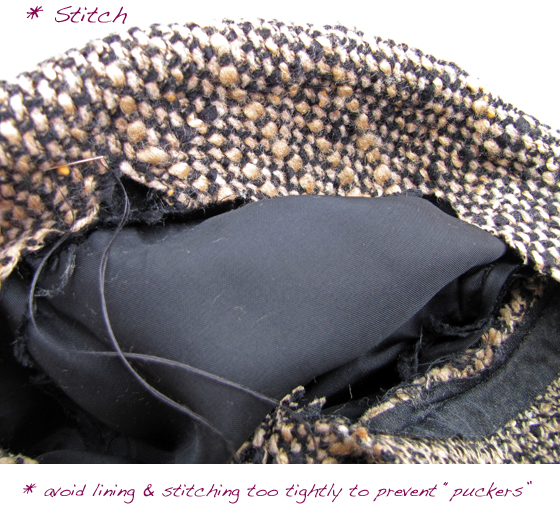
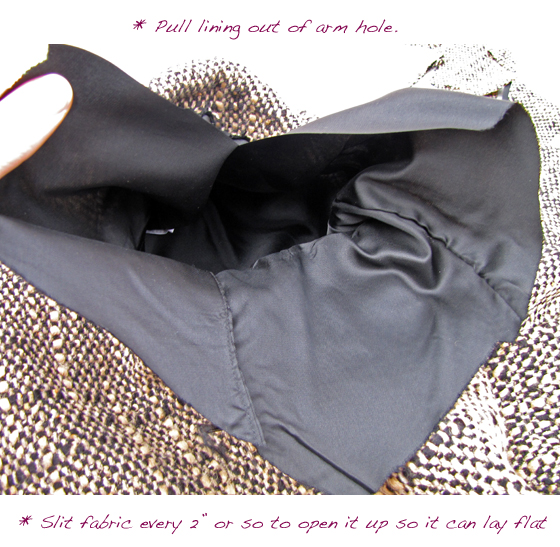
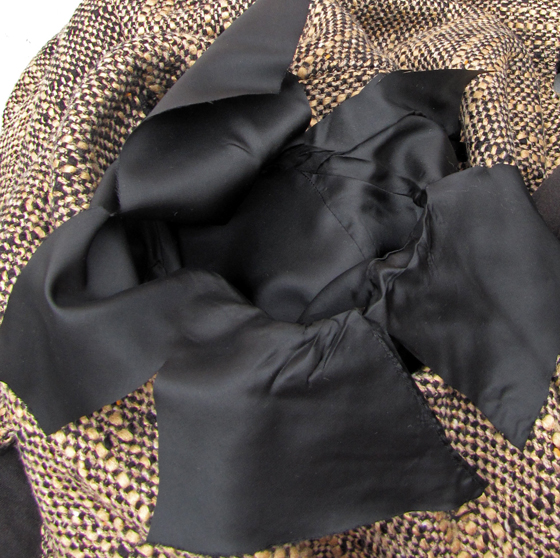
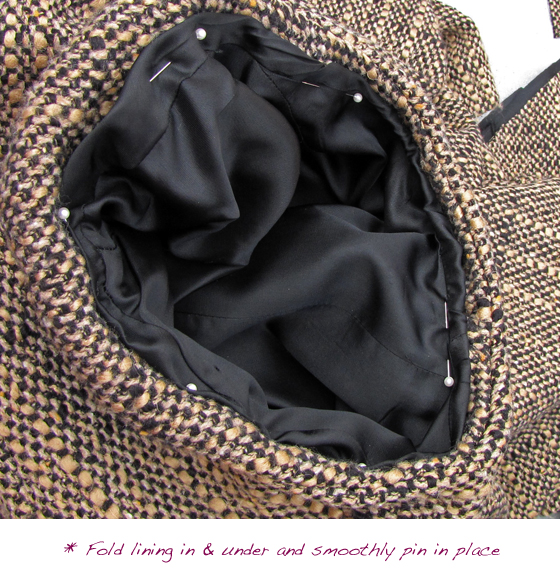
Супер пупер * Fashion DIYs * от .... loveMaegan
Начнем!!!


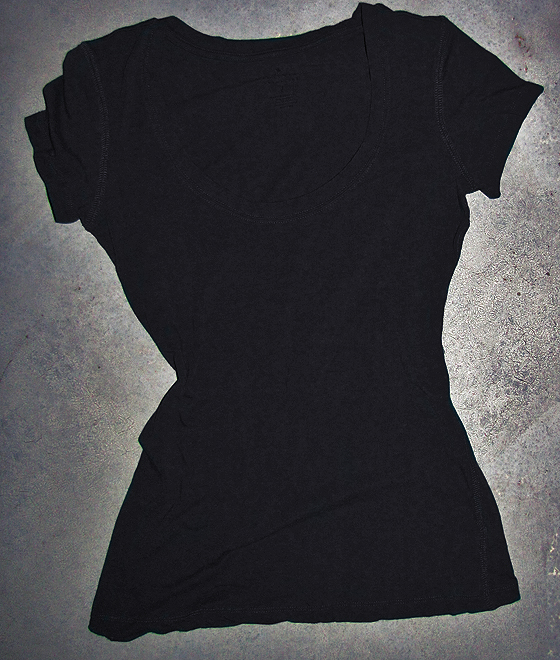
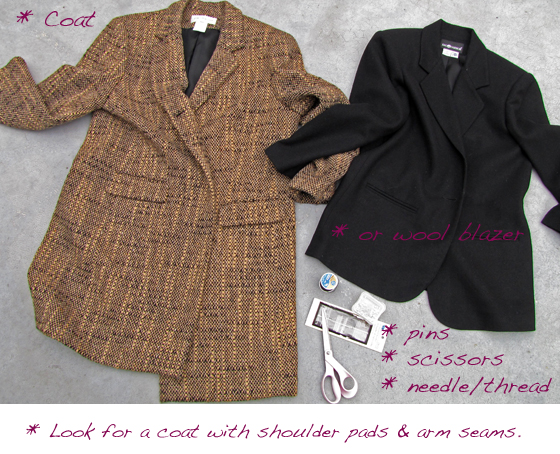
* T-shirt, jacket, blazer or top of any kind really*
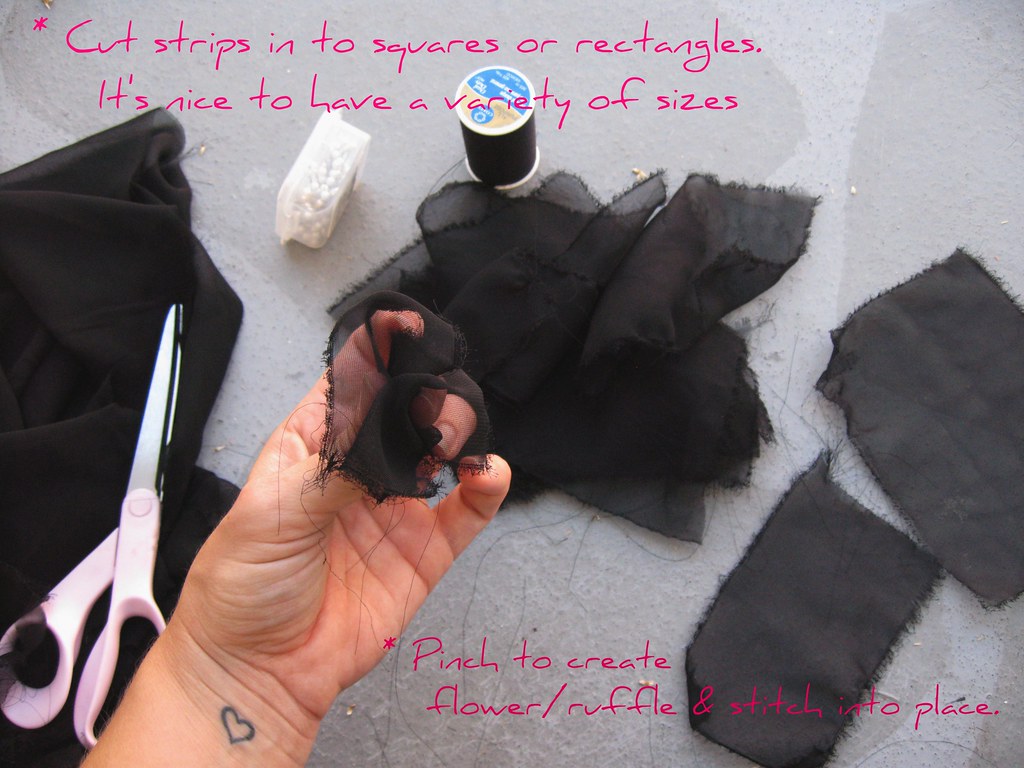
I needed a bit more than I anticipated. At least 40 squares per sleeve.

* NOTE: The edges of the chiffon I used for the sleeves is frayed more than the bag/shoes because I "tore" the fabric to give it that look. For the bag and shoes, I cut the petals out separately. See below. * Also NOTE: this is quite a long and tedious project
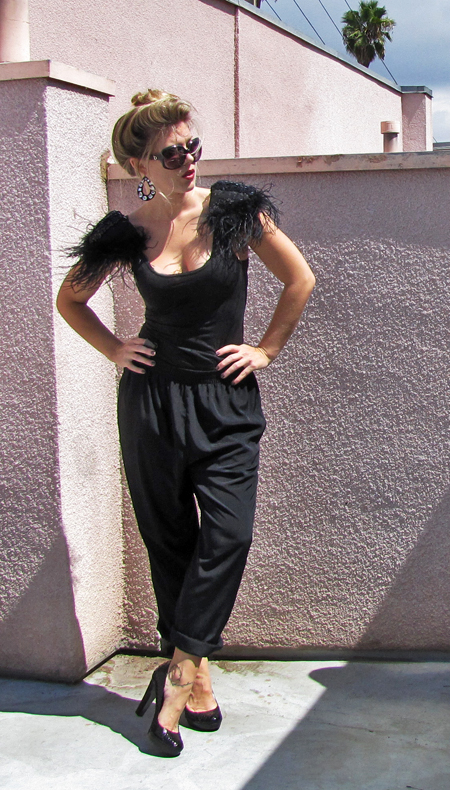
Asos Marabou Waistcoat

Boas = $3.99 or 4.99 {x3=$12-$15}, Vintage vest =$5-$10, needle/thread=$2-$5


DL1961 Premium Denim gray jeans {gilt/fuse.com} | Frye Veronica Distressed Slouch boot -black | old men's white thermal ...and a rather easy DIY ~ Have Fun

image via Who What Wear also see Missotten sheer skirt at Yoox


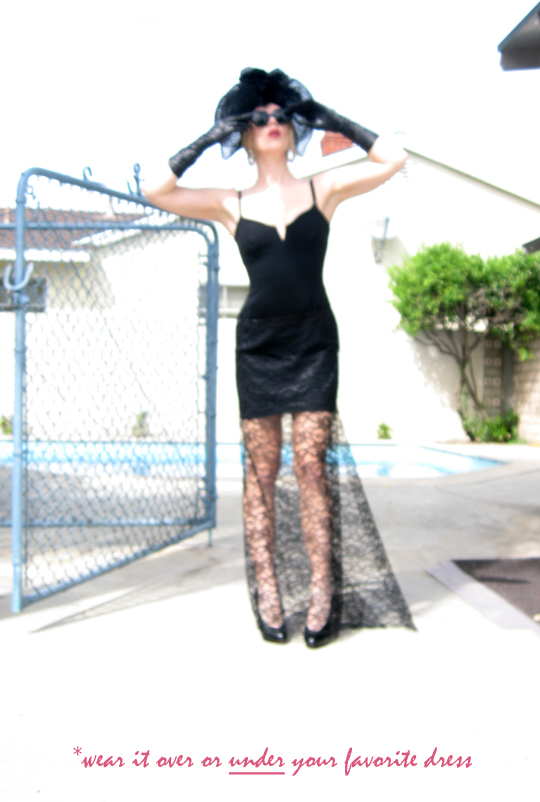
I used black because it was what I had ...it's also quite possible everyone has an LBD to wear with it. However, since it's spring, a lighter, softer hue would be nice ...and as stated above, a soft mesh/tulle would be gorgeous and a sheer chiffon would be ballerina-esque, but you'd have to hem the edges. I like to keep it easy for DIYs but if you're a pro, you could easily close the back seam.
Have Fun!

Notes:
* I cut off the knots on the ends of the boas ...but I try to avoid cutting them anywhere else because the feathers will start to unravel.
* I did this first to a dress years ago and left the feathers a bit fluffier.
* Feather boas make a great base because they are already all stitched together and they are relatively inexpensive {if you buy them at your fabric store} These were $11.99 each and the thinner ones are about $7.99 ...but choose wisely ;) Also note the super large boas, will not work.
* You could buy a bag of feathers and hand-stitch each one on separately but it would not be as secure and would take about 3 days straight.
* If you find a dress you want to feather, floor-length would work well too ...but you'll need many more and will most likely just stitch straight on from top to bottom. Try on your dress and while the dress is on, pin your feathers in place ...just around the top, where you want them to start. If you're planning a higher waist, it would probably look better belted, so begin your feathers directly below where the belt would sit.
* Ostrich feather boas would be the best ...but they are not budget friendly.
* note: I did not leave the peacock feathers in mine. I liked it better without.
Easily use the same tutorial to make a feather dress
{below - which I made in or around 2001}.
All you need is a simple little black dress.
s, sewing, making

* You can also line it with fur if you want it thicker

* I'd also like to do this with a thicker-furrier-fur for a completely different look! Michael Kors Inspired
Michael Kors Sleeveless Wool Coat


Nearly every time I have stepped foot in a thrift store -throughout my life- I have spotted a vintage camel hair coat yet I have now been to every thrift shop {within reason} and I cannot seem to find one -anywhere. It is killing me. {okay, I actually found a couple vintage cashmere ones for $95 but I was not about to spend that on a coat I was going to hack up}
What's funny -er, ironic, is last time {around July} I was in my favorite Goodwill, I spotted two of them, one that may have been perfect, but I passed it up thinking I had my Burberry trench and didn't need it. And here I am now endlessly searching for one. I even found one on ebay, seemingly perfect, nicely priced, and at the last minute some b*tch outbid me. kill.
So, I'm making due. I've found some other great coats that this DIY was just perfect for and really, I'll probably get more wear out of these colors than I would have the camel one ...although if I find one now, I'm totally snatching it up. I'm going to do the black wool blazer as well. I can't wait to wear it with a billowy sleeved blouse that usually is too cold to wear in the winter ...but now = a fabulous solution.
I am in love with this ...and have been wanting to do it for a while now, I just hadn't found the perfect coat to alter. ..blah blah.
I made a flower pin out of the extra sleeve.

This may look harder than it actually is. I'm not a master seamstress, really. BUT, you could totally take a coat {with photos} to someone and have them do it for you.
{you could do a wrap/tie belt with the extra material as well}
SEE HOW I WORE IT HERE
Recycle your clothes DIY

Voila!
...to be honest, I wish the roll on top was larger. I may actually do this again once I find the perfect sweater ...because I LOVE IT!
...I rolled/stitched the tops of the cut-off arms & made leg warmers. I. hate. waste. & I. love. leg warmers.
* The shorts are from Victoria's Secret ...but it doesn't look like they have them any more :(
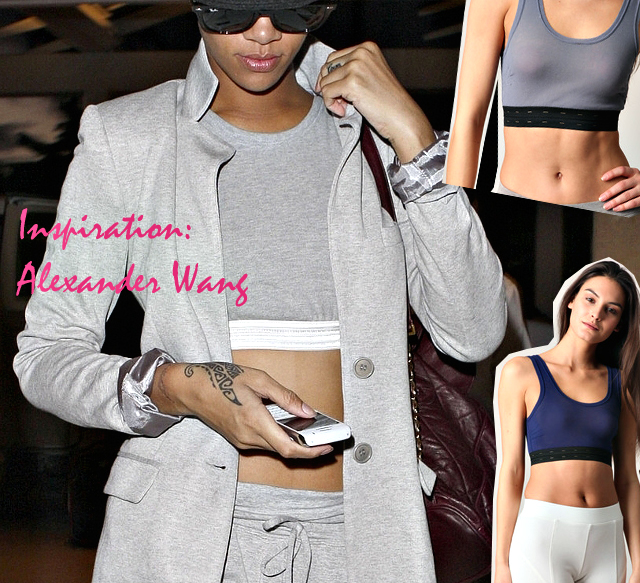
Rihanna image source ...T by Alexander Wang bra top

* Old wife beater or tank top
* Elastic {I used 1-1/2" wide}
* Scissors, pins, needle, thread

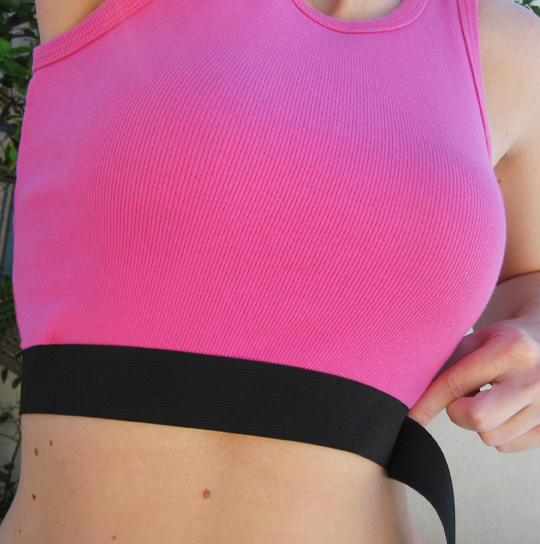
* With the bra you're going to be wearing with it, try on your tank & decide how short/long you want it. You'll want to stitch the bottom 1-1/4" of the tank to the elastic so lay your elastic over it and mark it.
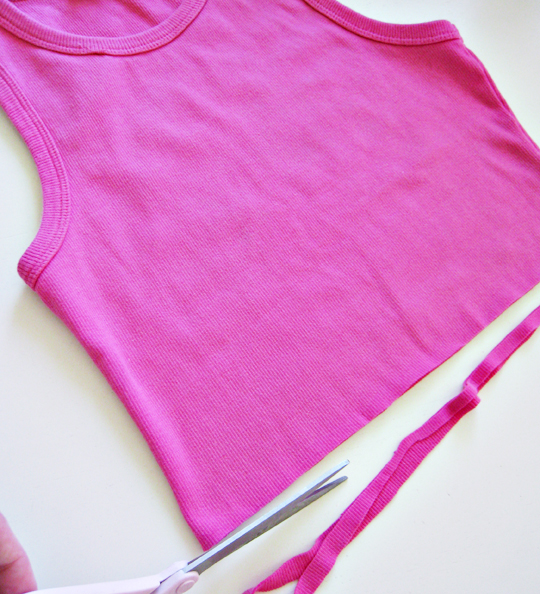
* Lay tank flat and cut {I had to cut twice ;)}
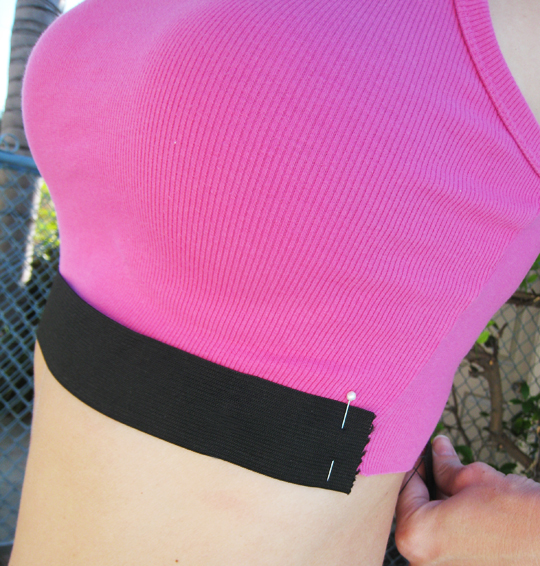
* Pin the end of the elastic to the side seam of your tank & try it on again. Measure elastic around the edge of the tank. Cut the elastic about 1" to 1-1/2" SHORTER than measurement so it will fit like elastic is supposed to {but not too tight}
* Remove and pin the rest of the elastic to your tank
* Using a wide & loose criss-cross stitch, hand-stitch elastic to tank. {If you've got a serger/overlock machine , obviously this would be your preferred method} Remember you are working with stretch materials and you're going to have to stretch it to get it on. This is why you keep stitches loose or they will snap! {you may also choose to use elastic thread}
* Make sure your stitches on the elastic side are very small so they are near invisible.
* Finish the elastic off by stitching the end & side together.
I originally chose the pink tank because I thought it would stand out best for this tutorial but I kind of love how it turned out. I actually had a few of these tops in the 90's by Calvin Klein and wore them under my school uniform oxford button downs. I wish I still had them ;)
Maeg-it Yourself ...a tutorial


* 1 yard of lace fabric ...unless you want it longer, then measure appropriately {I had an almost square piece of vintage ivory lace}
* Matching thread
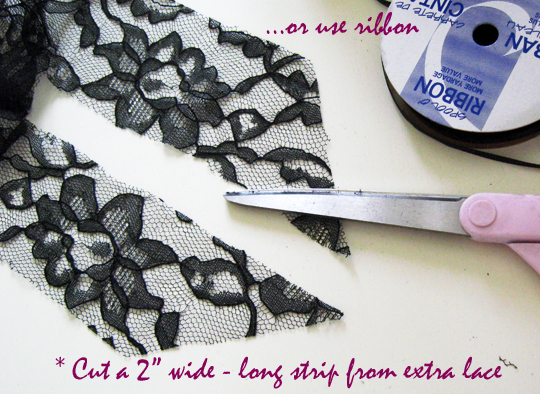
* Ribbon {color & size & texture of your choice}
* Scissors, pins, tape measure
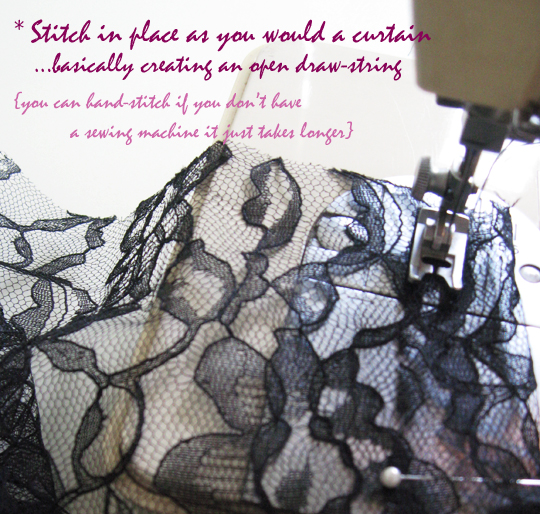
* This is a simple drawstring style skirt.

* Cut edges off lace, and into a circle of sorts. I left the longer sides flat because cutting a full circle would have made the skirt shorter. If you want more of a mini skirt, a perfect circle would be more appropriate.

* Lay out your lace and find the center. Pull up and snip with your scissors.

* Continue cutting a perfect circle. This will be your waist

* Try on your skirt. Since I wanted the option to wear it at my waist OR my hips, I made it about 4 inches larger than my hips at their largest point. {since it will be gathered, it's okay if it's a fairly large circle/waist}

* Using your ribbon to determine the size of your waist band {drawstring tunnel}, fold your center circle fabric over it and pin in place.

* To continue creating your drawstring tunnel, you'll have to notch the fabric. Tip: whenever your fabric won't lay flat, snip it with your scissors until it does, then pin that section in place.

* This is the inside of your skirt

* Hand stitch your drawstring tunnel flat in place. If you have perfectly matching thread, you can use any stitch that will work because you won't see it at all.

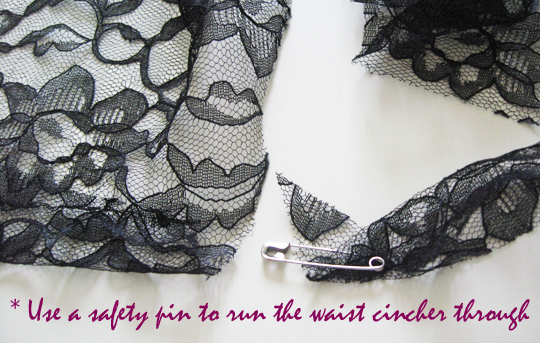
* Flip your skirt right side out and try it on. Decide where you want the front to be and cut a slit in the center of your tunnel ...pull your ribbon through {by using a safety pin if needed} and tie a bow. At this point, if you don't like the length or the way some of the edges are falling, just cut them into the shape you like. You will leave the edges raw. They won't fray ...but if they do a little, it just ads to the romance of the style. Tip: I scalloped the edges a bit by cutting around the floral/lace pattern at the edges.


wearing: black leggings, old black lace printed tank, black blazer, Tiffany lock pendant/chain, Boutique 9 lace up pumps
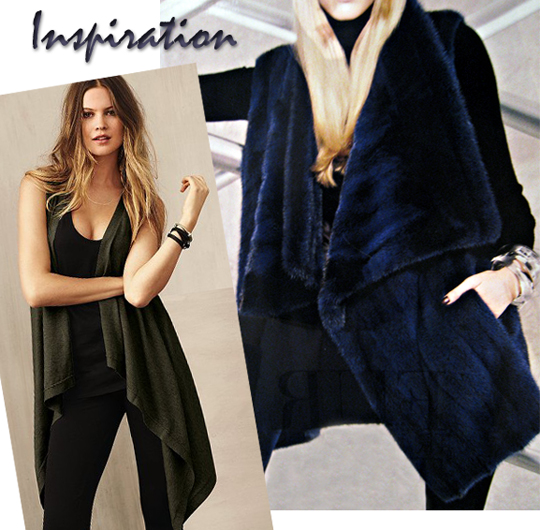
Victoria's Secret asymmetrical knit vest & Michael Kors navy fur vest
* About one yard {36" x 65"} of Faux Fur or any other material will do for this {if you knit, you could knit it up easily!}
* Measuring tape or ruler
* Pen/Something to mark with
* Scissors
* Using my sweater as a pattern {29-1/2" x 56" remember knit has stretch} - but keeping the width of the faux fur, I measured from the end/side to the arm hole {22"} ...from the top of the fur to the top of the armhole {7-1/2"} ...from armhole to armhole {13-1/2"} ...and marked each measurement on the inside/backside of the faux fur/fabric
* I then measured the circumference of the armhole {15"} ...and with measurement marks, I sketched a circle ...and cut it out. Using my original measurements and the circle I just cut out, I drew the other armhole on and cut it out as well.
* If you're not a perfectionist like me, you can really just eyeball these armholes, fold the fabric and cut as I did in my last faux fur vest DIY. But to assure your asymmetrical style, keep the width longer than the length.
As a lover of the asymmetrical sweater {I have 3}, I finally held it up and looked at the construction. Realizing it's just a long rectangle with arms, I thought it'd be a perfectly easy DIY {sans arms} to do with any fabric {silk, felt, crepe, really anything that has a nice drape to it}. I'm using this faux fur, only because I had it, but since there's no sewing involved, I may also make a shorter version out of the extra black leather I have left over from the leather wrap belts I made. I love the idea of the vest because you can pair it with a pretty printed blouse underneath and show off the sleeves. If you have your own favorite asymmetrical sweater and like the way it fits, I'd use that as a pattern when cutting yours out. {click here to see LeRoy helping ...as usual ;}
I began this project at the end of September 2010 ...got a shoulder done and realized just how time consuming it actually was. I worked on it Sundays during football through the end of October but then the Holidays hit and I haven't had a second to revisit the project since {especially knowing there was no end in sight}. I truly am in love with it however and will finish it ...eventually. I thought it would be a perfect DIY if you're getting married next Fall or Winter ...begin now and you'll be done by then!
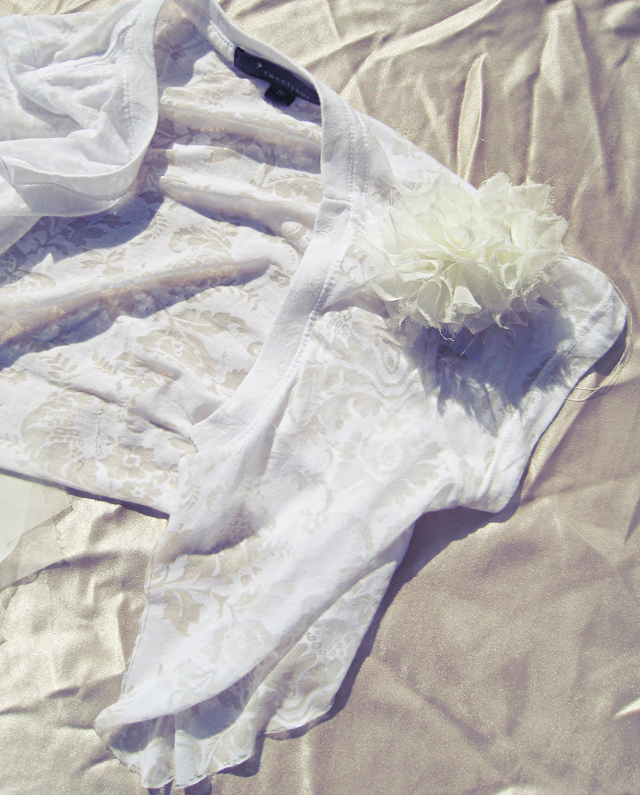
* A fitted white or ivory T-shirt ...preferably with cap sleeves. You may also choose to use a jacket or shrug you already have and/or sew one up yourself if you've got the skills. However, the T-shirt works quite well. I used the burnout one because it's the only one I had.
* 4-10 yards of sheer fabric - I've gone through about 2 yards so far, depending on how close you're stitching your fabric pieces together, you'll need more or less than 8 yards. I may need 10yards at the rate I'm going. I'm using a sheer polyester in ivory
* Pen/Scissors/Matching Thread and needle
{This would also be adorable for all your bridesmaids in a similar or lighter hue to the dresses they're wearing, especially if they're strapless}
* This is the same technique as my Baby Couture Ruffled Onesie & my Pouf Sleeve Top
* Sketch an outline of your shrug on your T ...try it on first and mark just below your bust as where you'll draw the length out. It will shorten a bit but it's always better to start out long and trim away than do all the work and have it be too short or too small. Draw a straight line down the center ...and a corresponding line across the back as well. NOTE: If you have a shrug or jacket already, skip this step, obviously.
* Cut along your pattern.
* This is how it should look
* Snip and Rip your sheer fabric, beginning by removing the selvage. You want the frayed edges. Don't worry about they fraying too much. This is what gives it that romantic/vintage look. Make your strips about 2 inches wide.
* Create approximately 2x2inch squares by cutting down your strips.
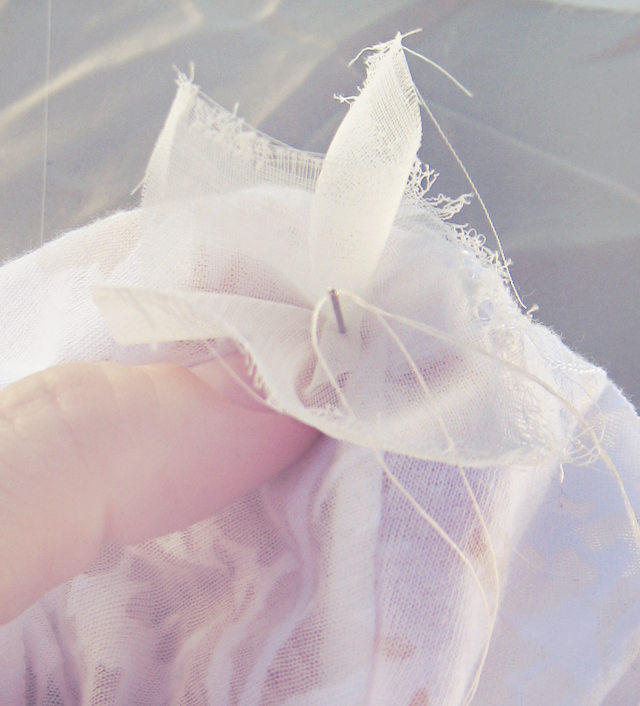
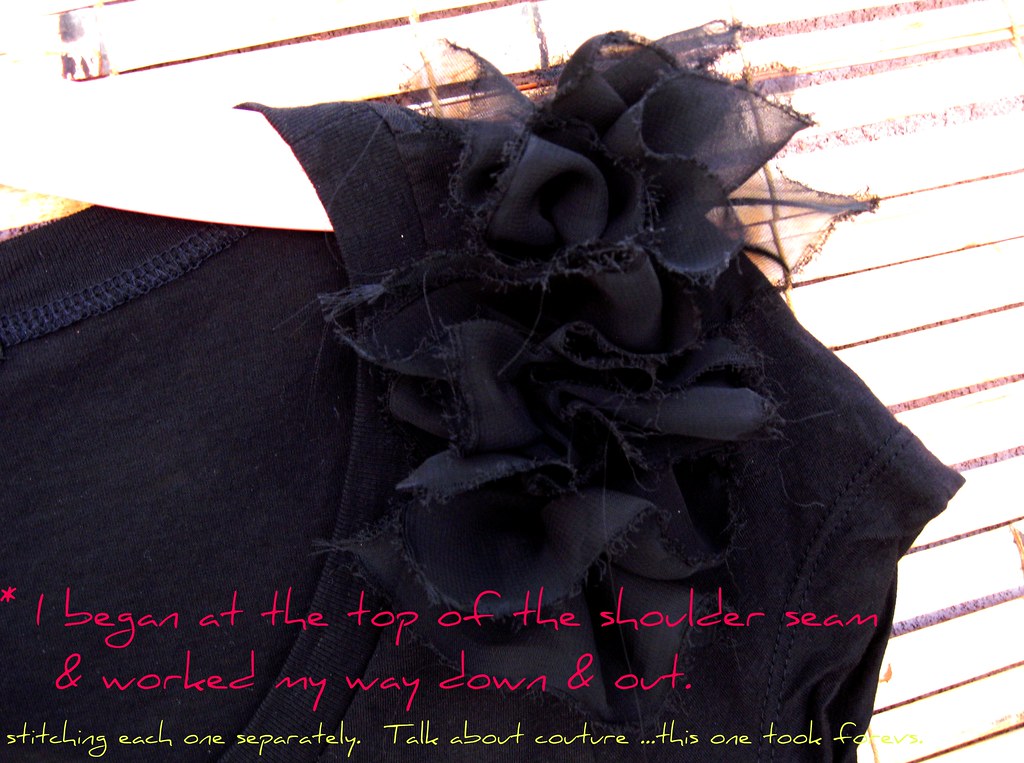
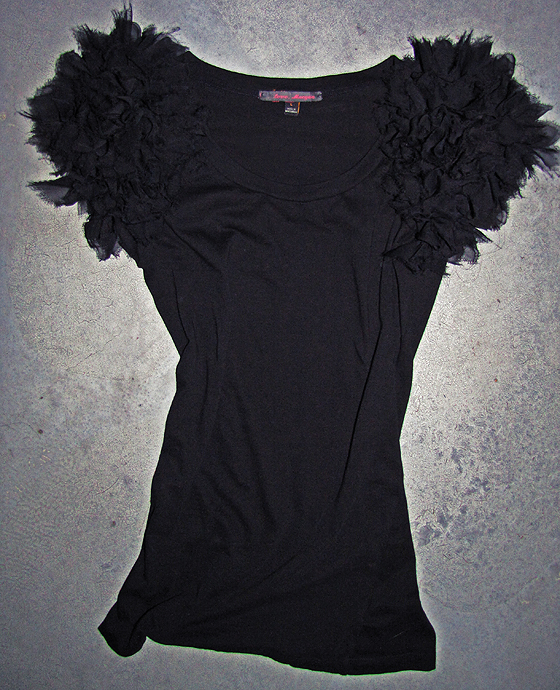
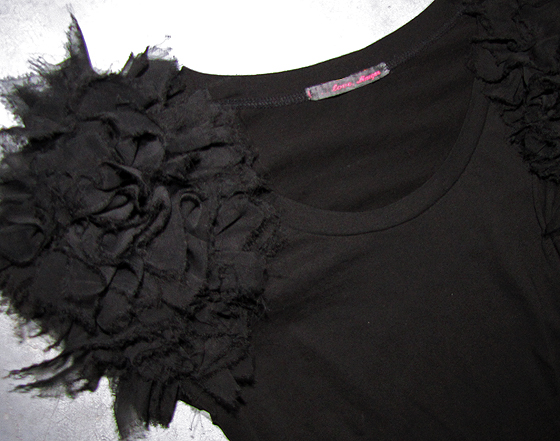
* Begin stitching at the top of your shoulders and work down and out. Your squares should be close enough together that no part of the t-shirt is visible through. AND you're going to do THE ENTIRE T-SHIRT. No t-shirt will be showing when it's complete.
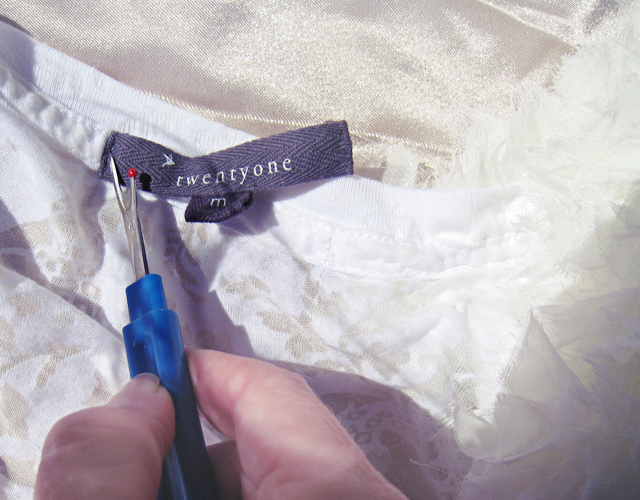
* Remove the tag with a seam ripper :)
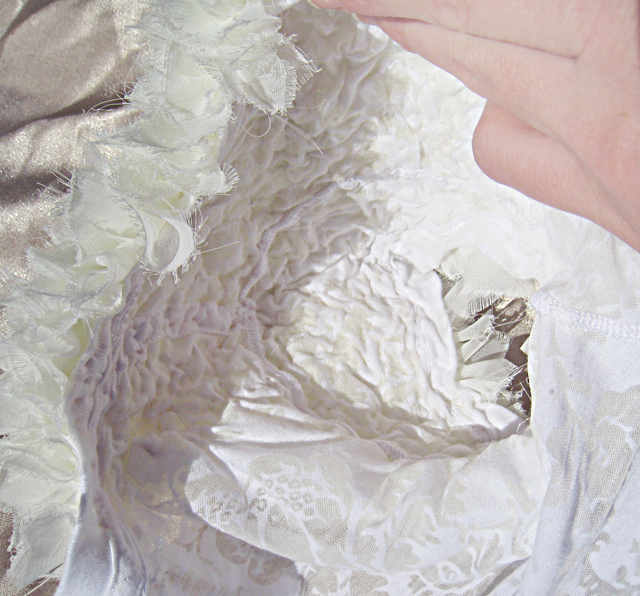
* The underside will look a little like brains. Make sure while you're stitching that you're not pulling or gathering the t-shirt. Once you have enough done, the shirt will feel thicker and sort of morph into molded creation ...if that makes any sense. {also, if you've got skills, you can line it and hide all of this}
. . . though I'm nowhere near finished!
Yes, this project will take you forever - that's a lot of shirt to cover ...so start now!
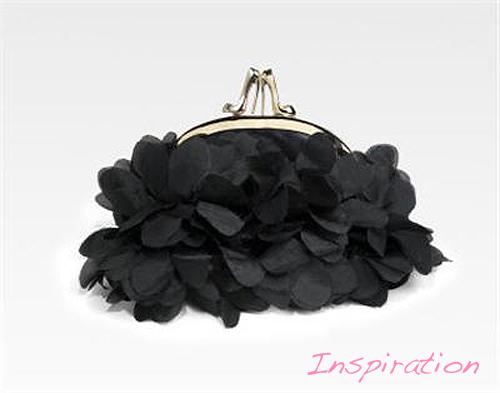
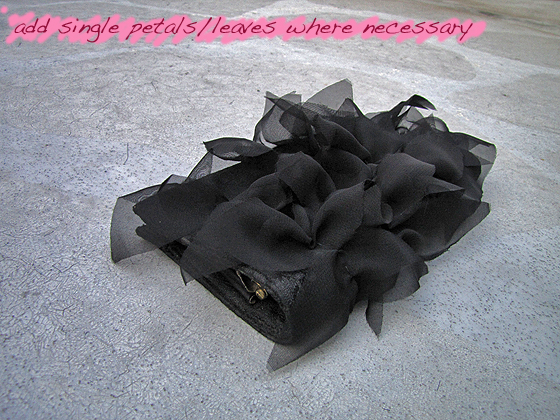
Christian Louboutin Satin "Petal" Bag

I used a 9" x 5" true vintage lace/satin snap clutch I found at Goodwill for 3.99
{if you're going for an exact look ...use a purse like this or this}


Fancy Shoulder Pads
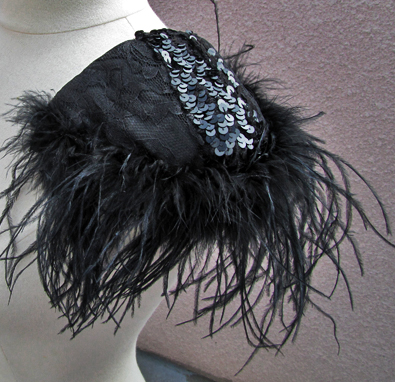

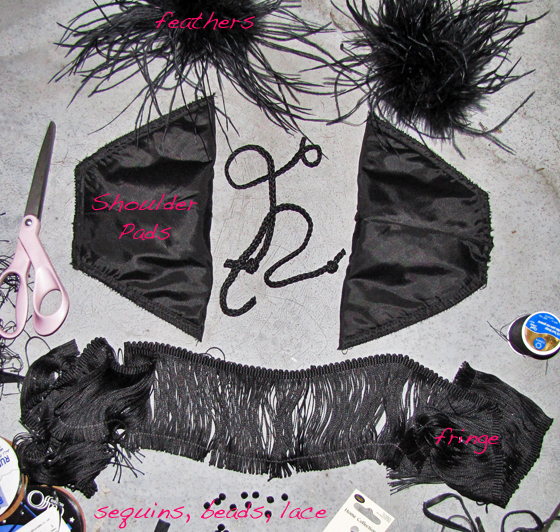
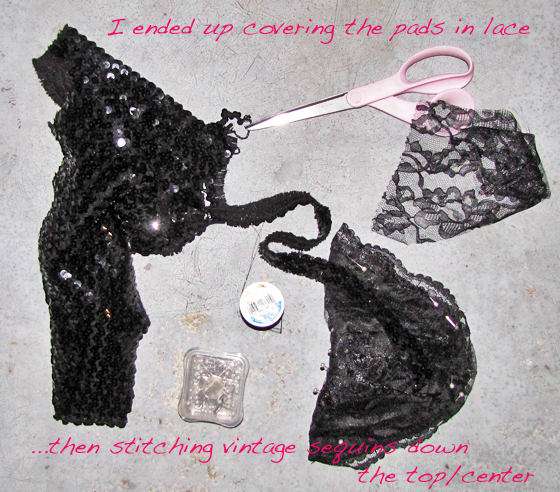

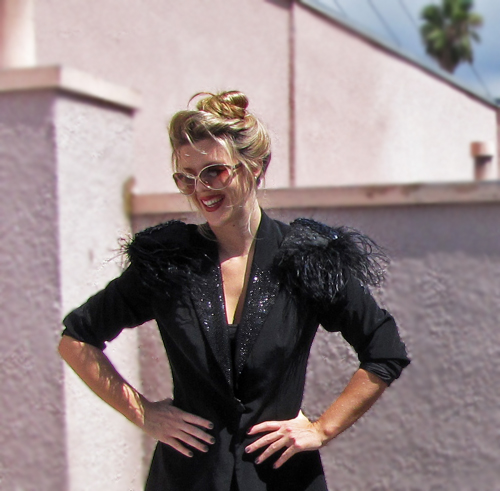
I am definitely not the first or the second or probably even the 5th person to do DIY shoulder pads ...but it doesn't mean I didn't want to DIY my own version. And while they are a bit daring, I am kind of in love with them. I haven't found a great and removable way to attach them aside from just pinning them on but if I were to wear them out, I would most likely hand stitch them to whatever I wanted to wear them with ..but loose enough to remove them at the end of the night without ruining the garment.
* You can purchase shoulder pads at your local fabric store ...or, rip them out of an old jacket like I did.
* I started {as I always do} with the idea of using many different materials/notions {fringe, beads, rope, studs, pearls, chains, leather pieces} but never really have an exact plan. In this case, I made the first one to my liking then duplicated it. I have so many ideas for these I may just have to make more. Have fun!
Пока все!!! :(
Начнем!!!
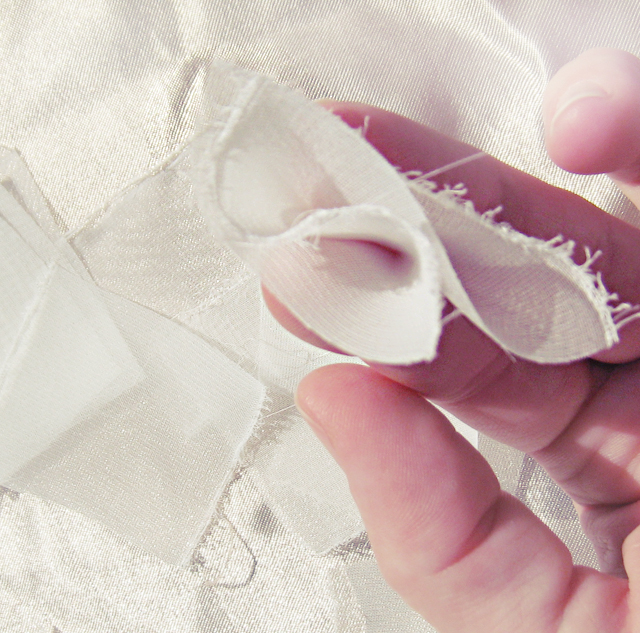
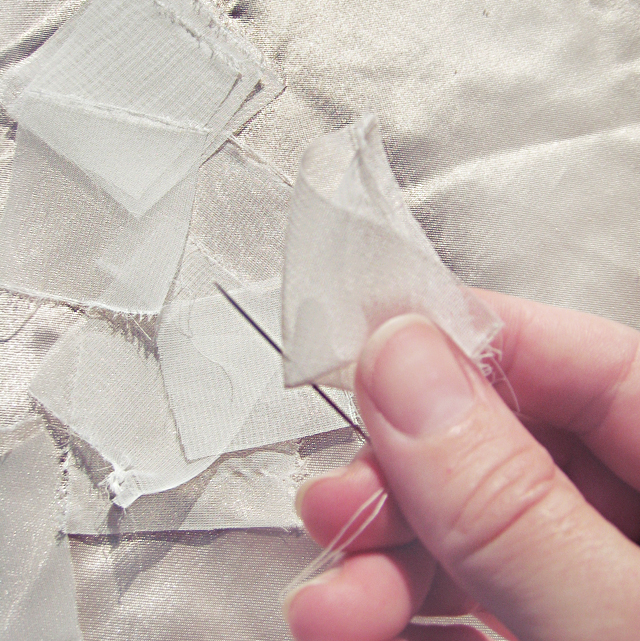
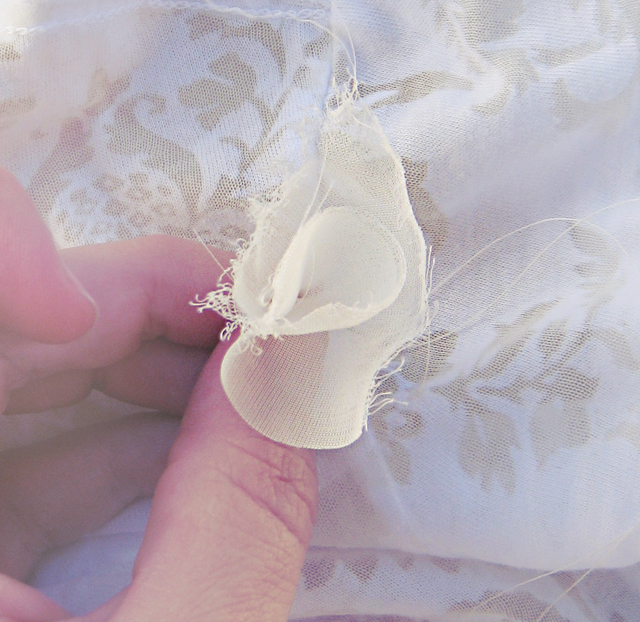
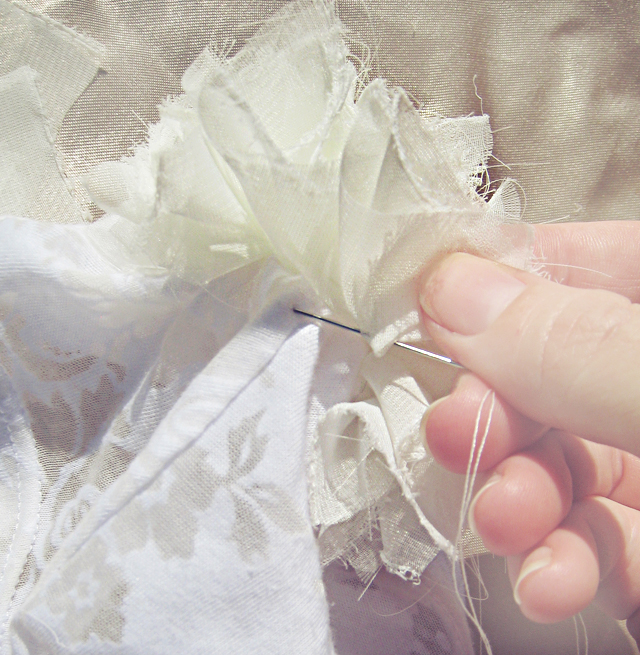
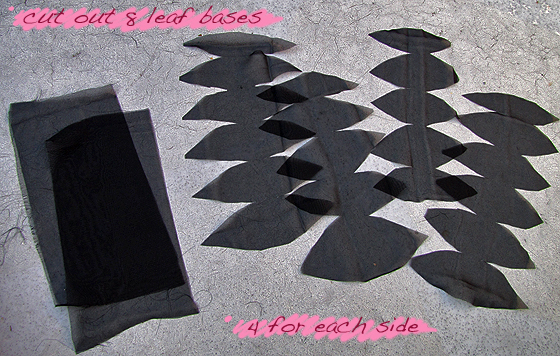
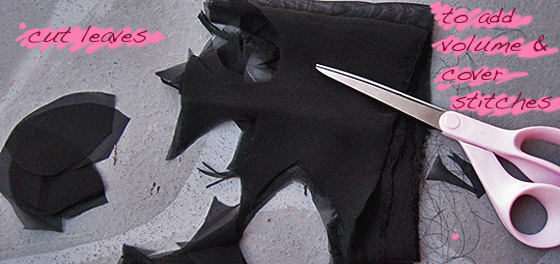
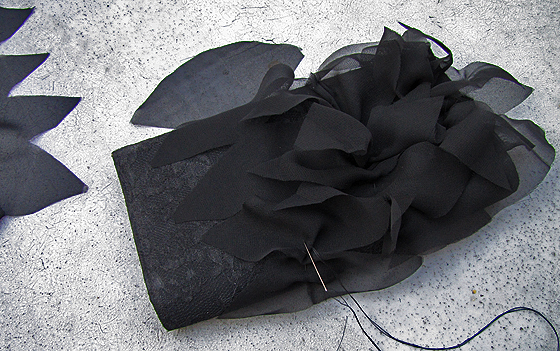
Petal Ruffle Puff Sleeve Top ~ DIY ~

* T-shirt, jacket, blazer or top of any kind really*
I needed a bit more than I anticipated. At least 40 squares per sleeve.

* NOTE: The edges of the chiffon I used for the sleeves is frayed more than the bag/shoes because I "tore" the fabric to give it that look. For the bag and shoes, I cut the petals out separately. See below. * Also NOTE: this is quite a long and tedious project
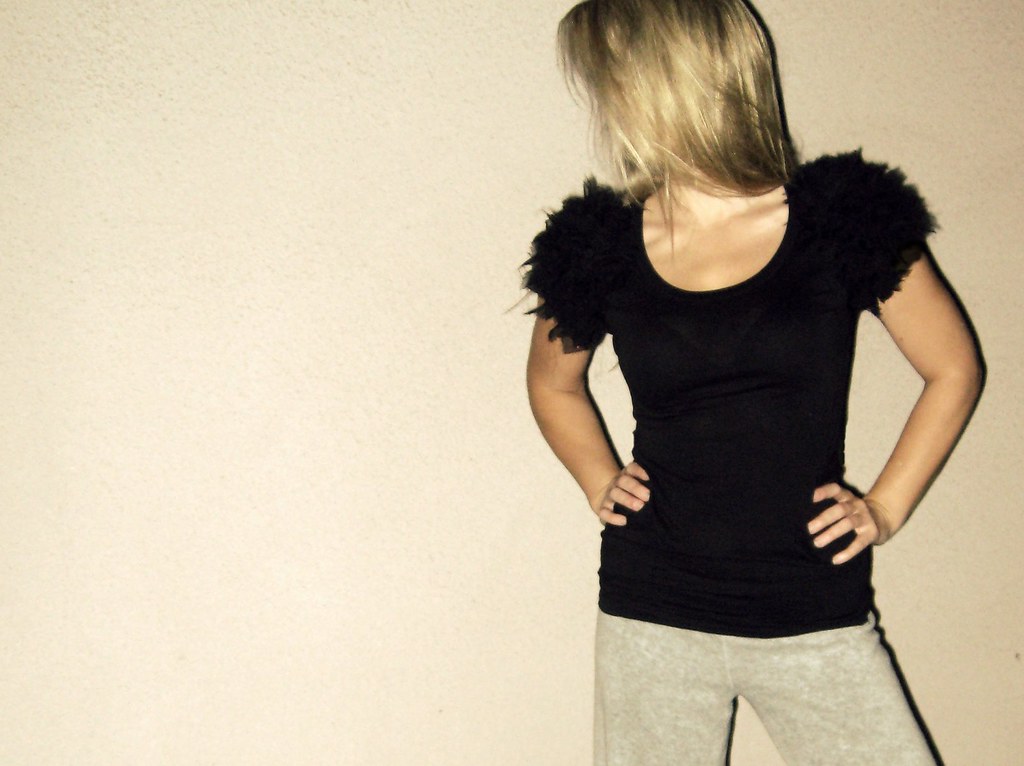
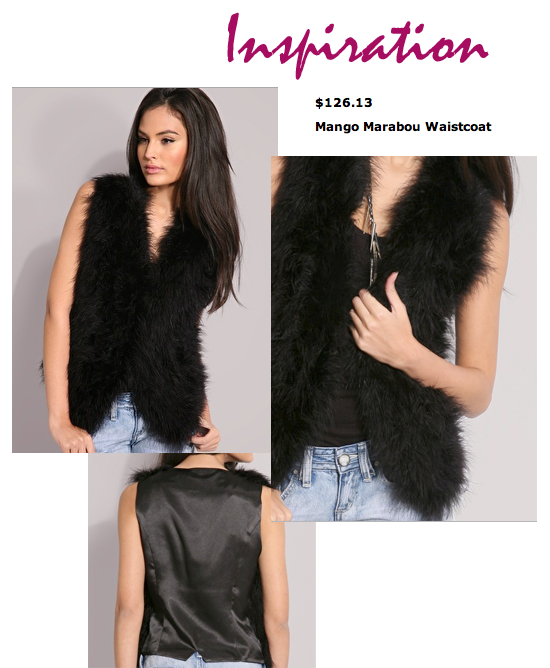
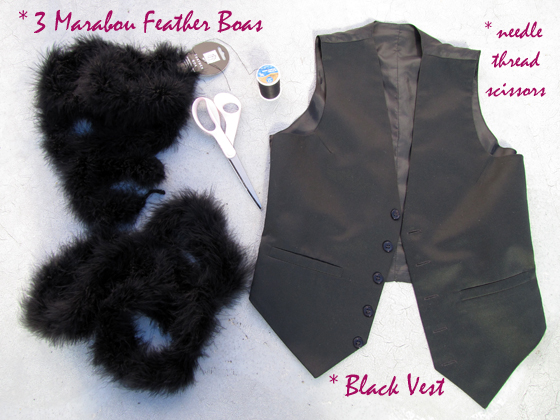
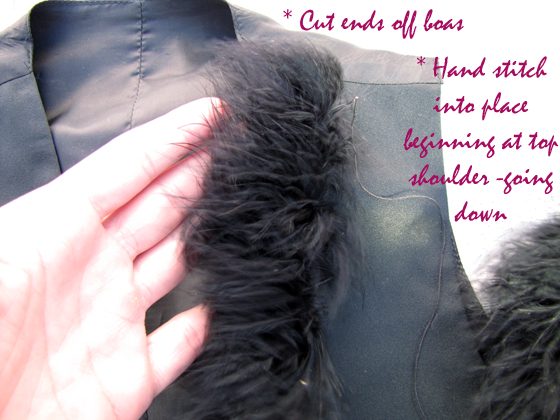
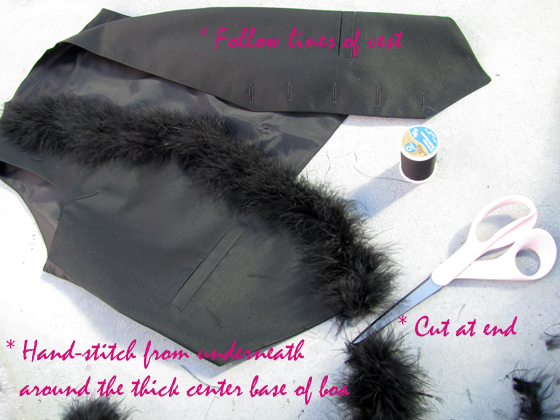
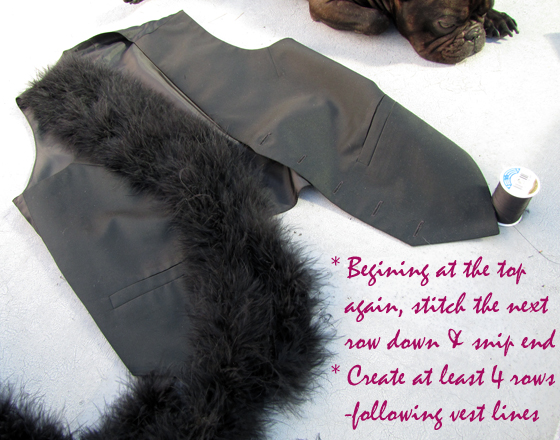
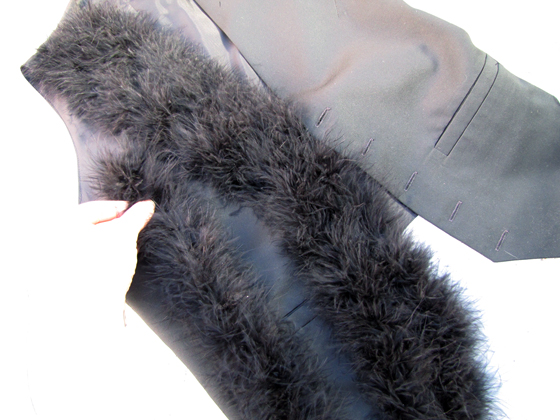
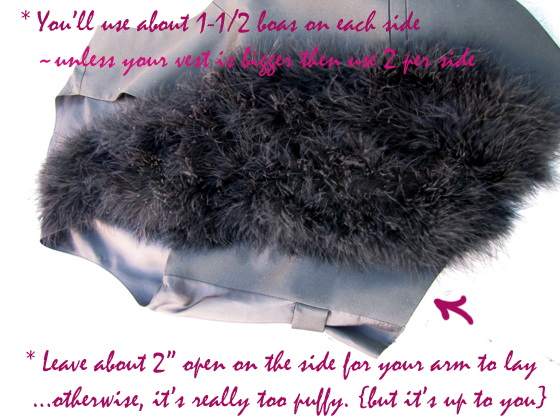
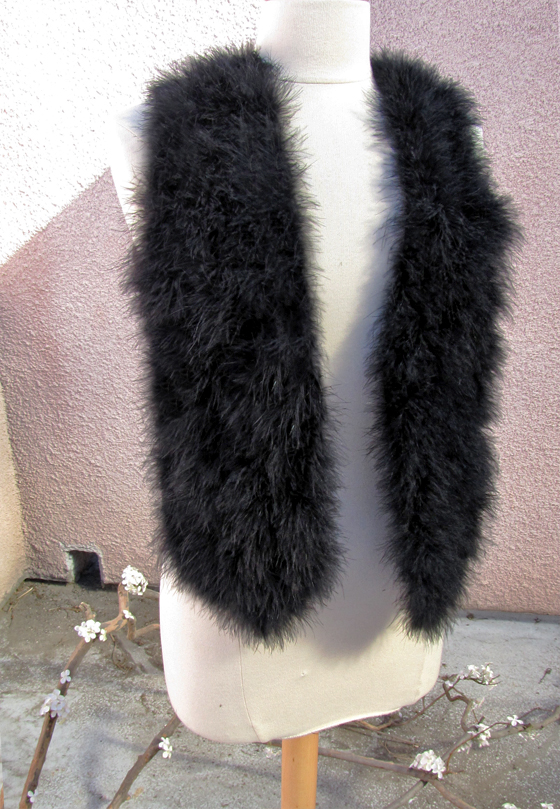
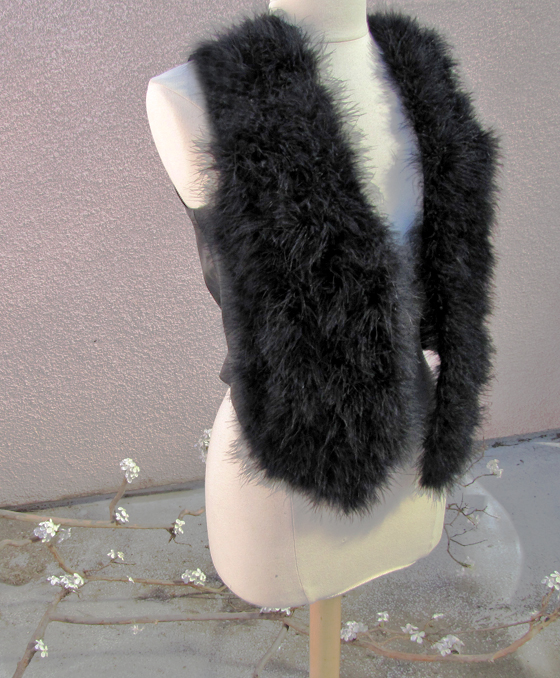
Marabou Feather Vest DIY
Asos Marabou Waistcoat

Boas = $3.99 or 4.99 {x3=$12-$15}, Vintage vest =$5-$10, needle/thread=$2-$5

DL1961 Premium Denim gray jeans {gilt/fuse.com} | Frye Veronica Distressed Slouch boot -black | old men's white thermal ...and a rather easy DIY ~ Have Fun
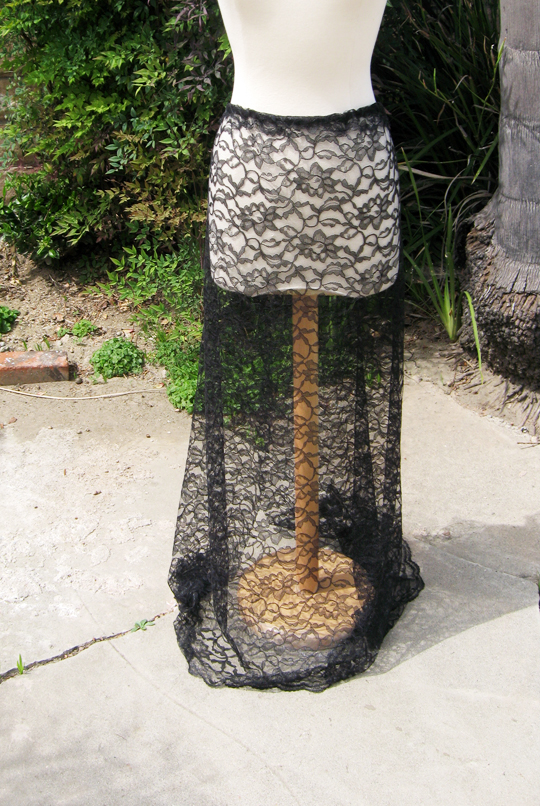
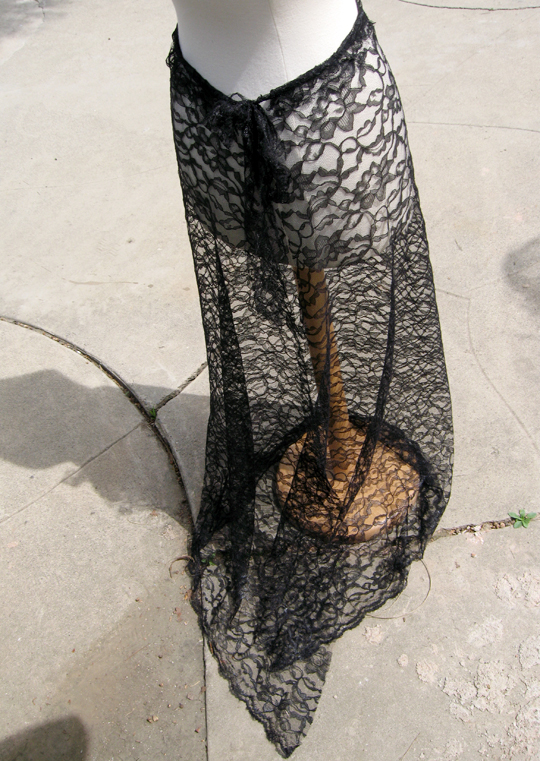
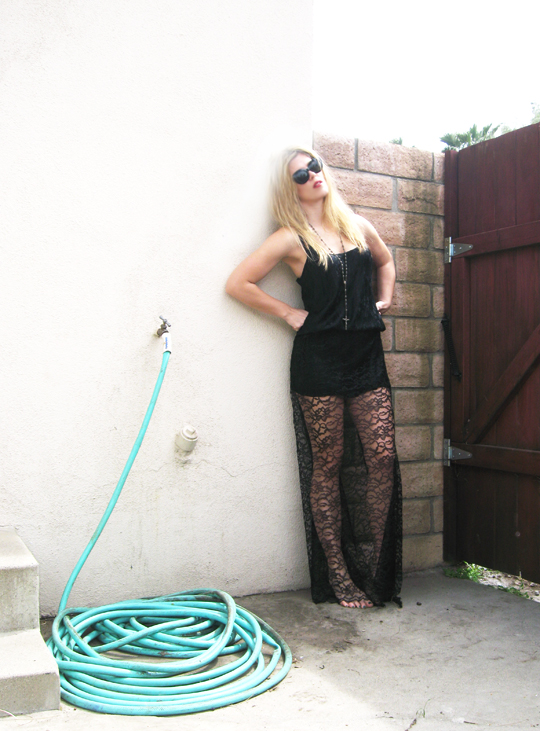
Long Sheer {Lace} Skirt DIY
image via Who What Wear also see Missotten sheer skirt at Yoox
I used black because it was what I had ...it's also quite possible everyone has an LBD to wear with it. However, since it's spring, a lighter, softer hue would be nice ...and as stated above, a soft mesh/tulle would be gorgeous and a sheer chiffon would be ballerina-esque, but you'd have to hem the edges. I like to keep it easy for DIYs but if you're a pro, you could easily close the back seam.
Have Fun!
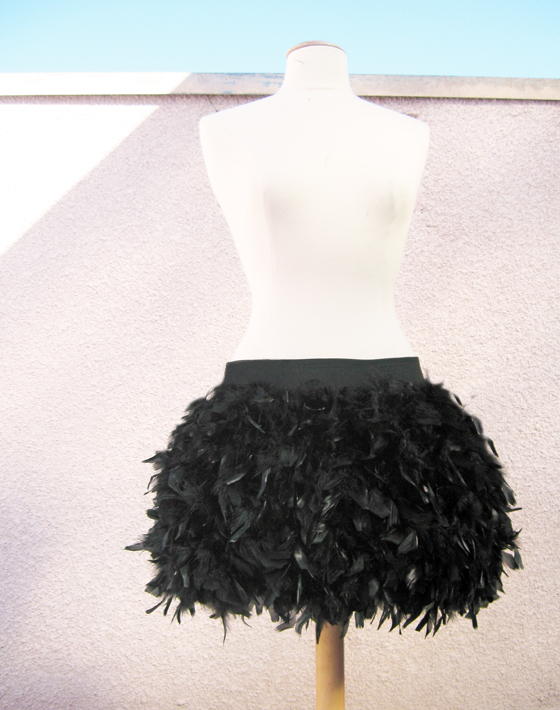
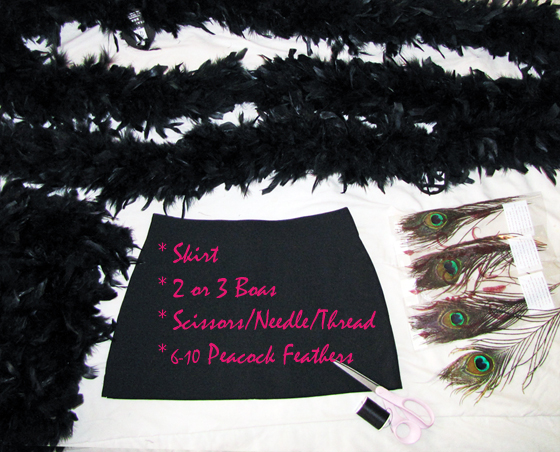
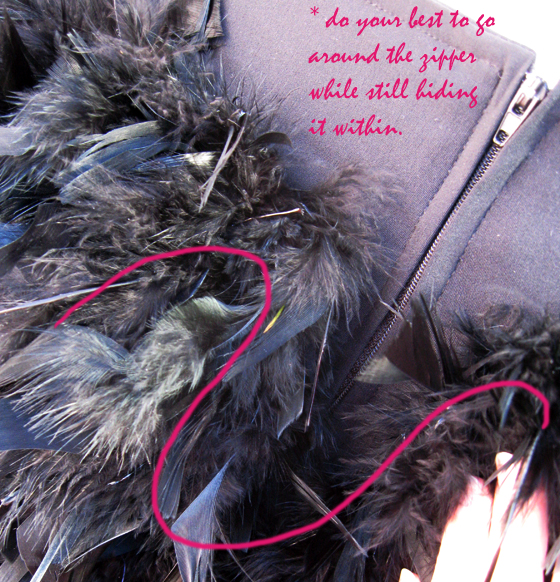
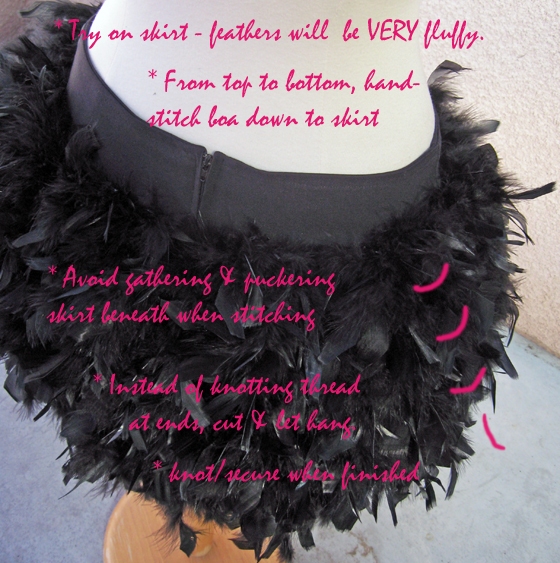
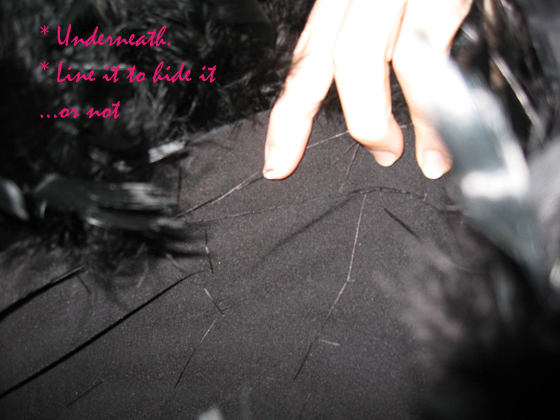
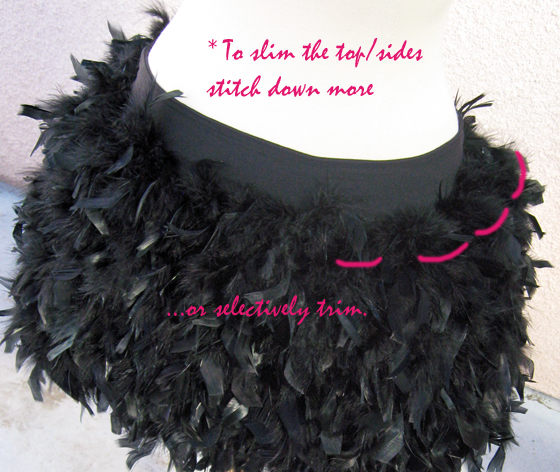
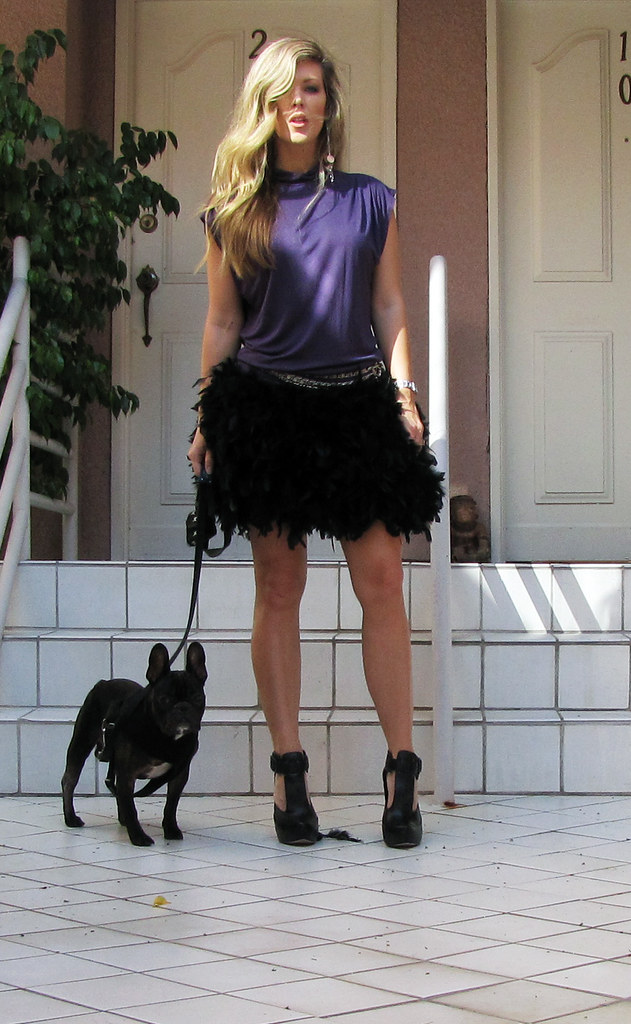
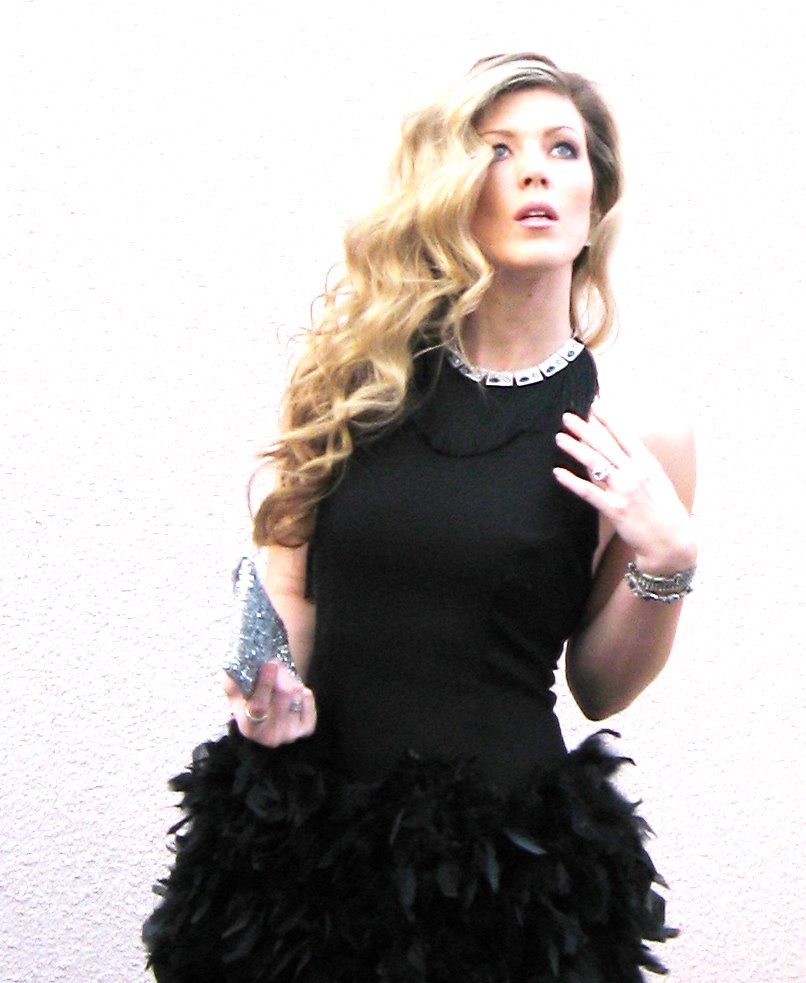
Feather Skirt DIY
Notes:
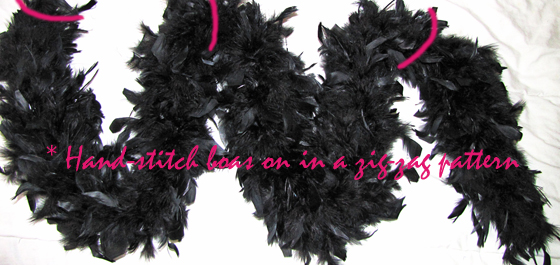
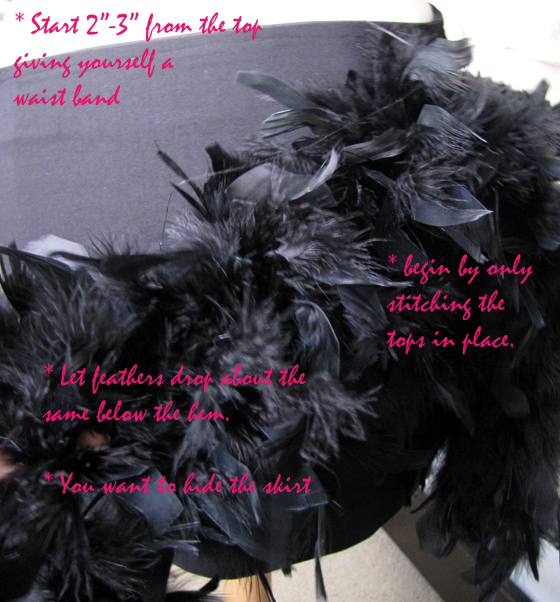
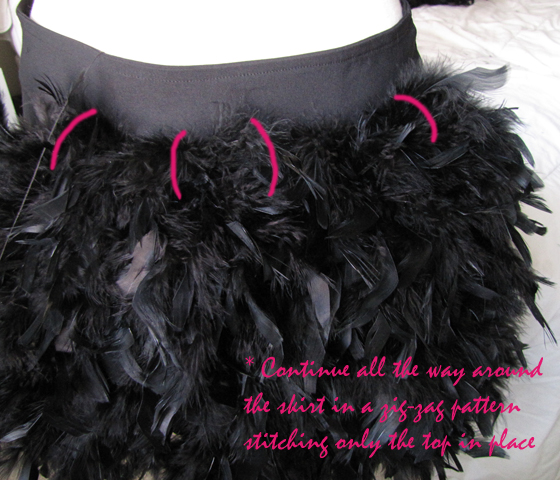
* I cut off the knots on the ends of the boas ...but I try to avoid cutting them anywhere else because the feathers will start to unravel.
* I did this first to a dress years ago and left the feathers a bit fluffier.
* Feather boas make a great base because they are already all stitched together and they are relatively inexpensive {if you buy them at your fabric store} These were $11.99 each and the thinner ones are about $7.99 ...but choose wisely ;) Also note the super large boas, will not work.
* You could buy a bag of feathers and hand-stitch each one on separately but it would not be as secure and would take about 3 days straight.
* If you find a dress you want to feather, floor-length would work well too ...but you'll need many more and will most likely just stitch straight on from top to bottom. Try on your dress and while the dress is on, pin your feathers in place ...just around the top, where you want them to start. If you're planning a higher waist, it would probably look better belted, so begin your feathers directly below where the belt would sit.
* Ostrich feather boas would be the best ...but they are not budget friendly.
* note: I did not leave the peacock feathers in mine. I liked it better without.
{below - which I made in or around 2001}.
All you need is a simple little black dress.
s, sewing, making
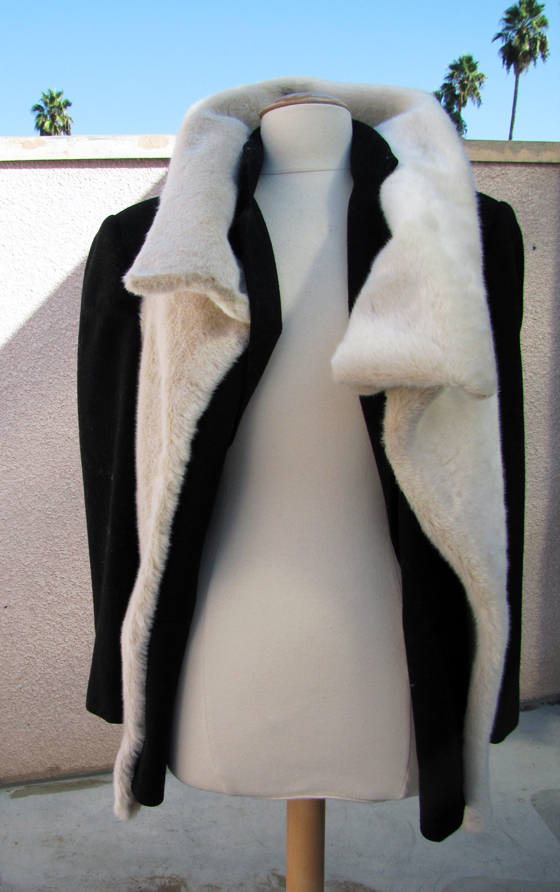
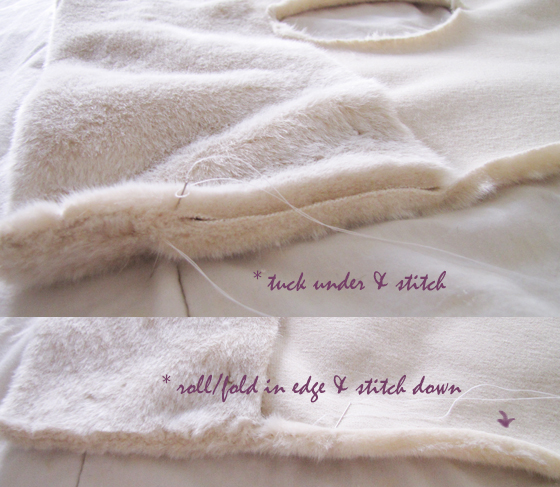
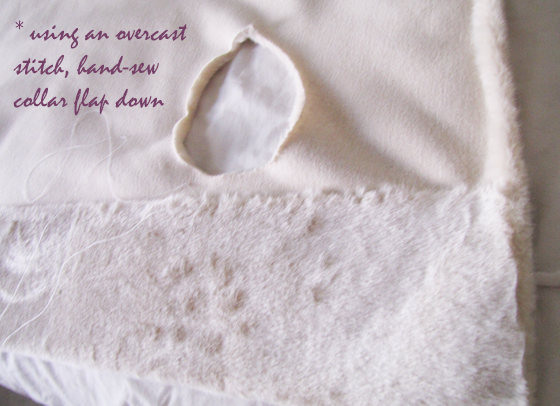
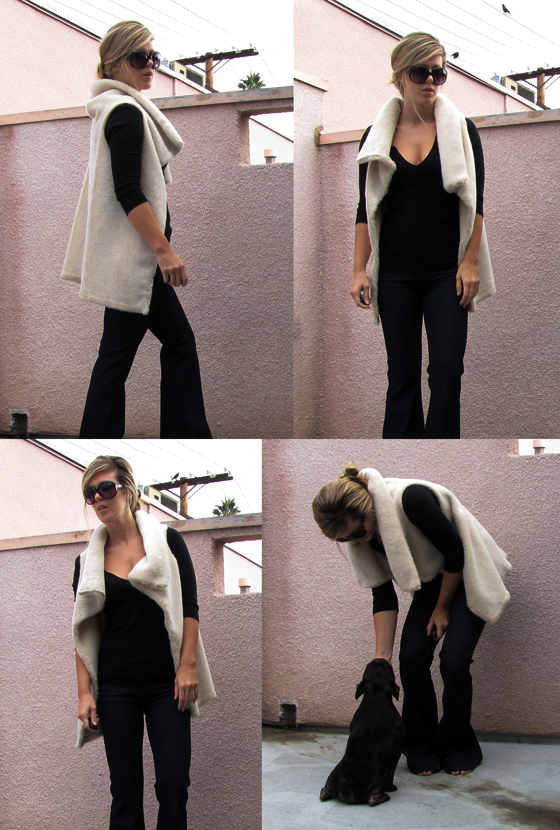
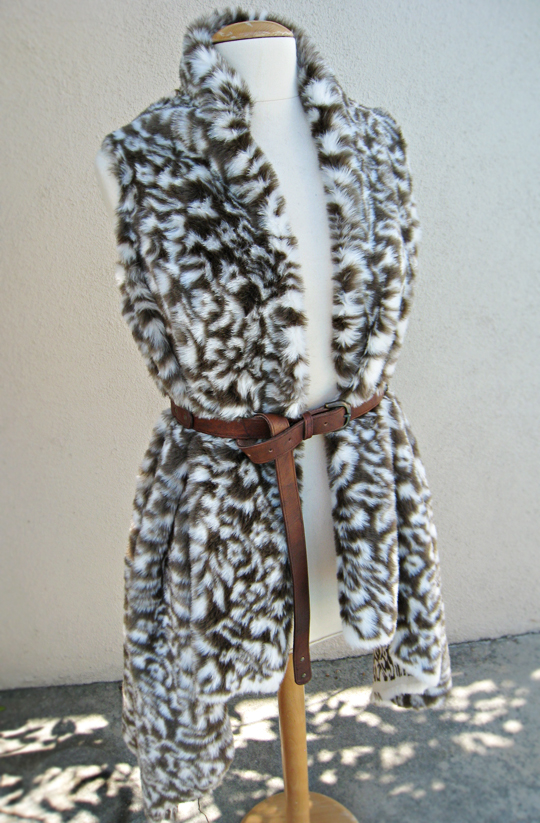
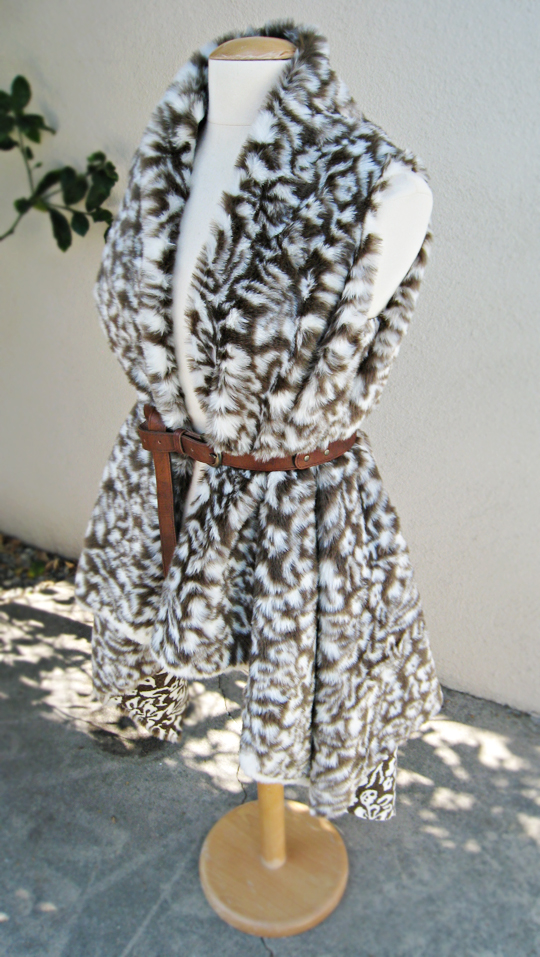
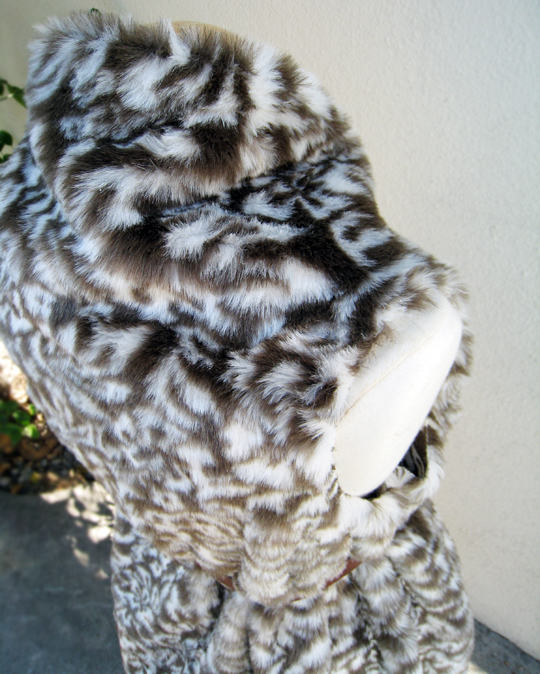
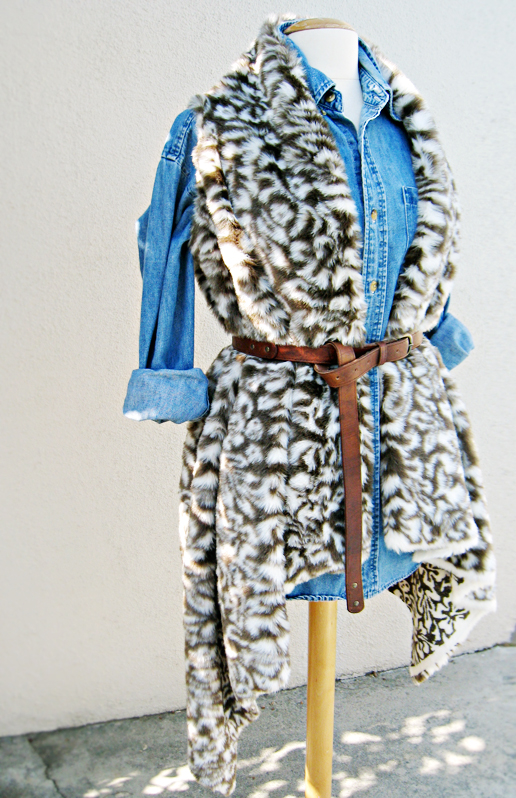
Faux Fur Vest DIY

* You can also line it with fur if you want it thicker

* I'd also like to do this with a thicker-furrier-fur for a completely different look!
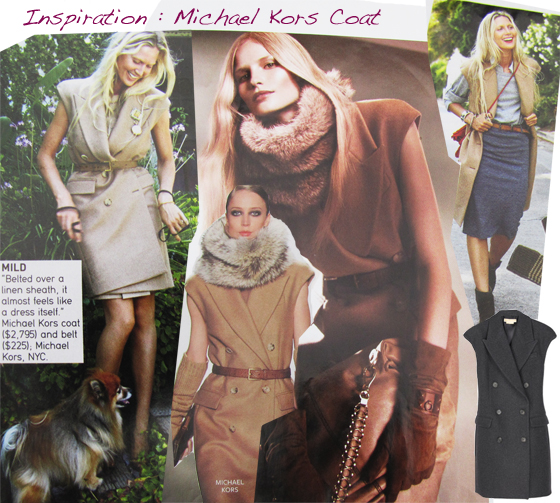
Michael Kors Inspired
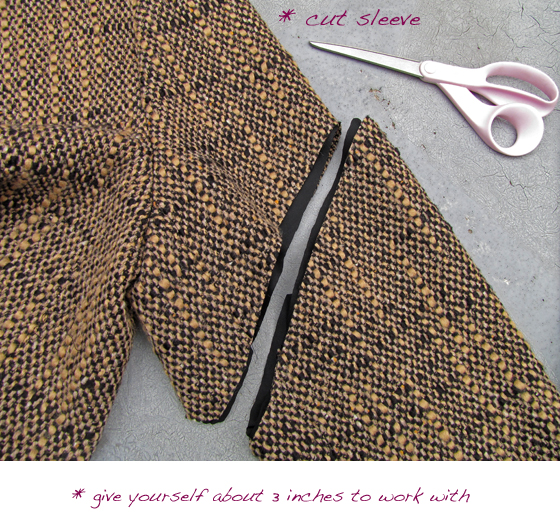
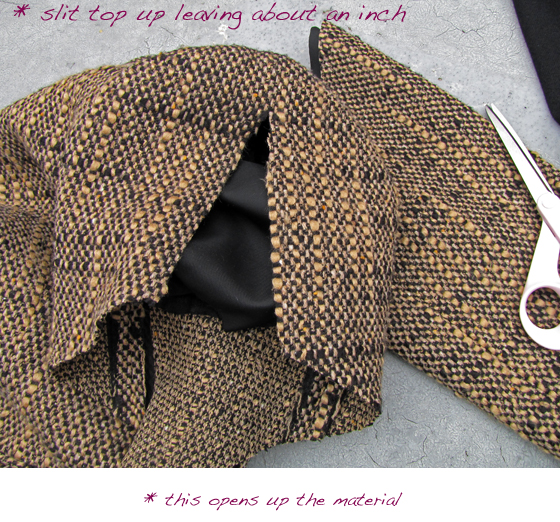
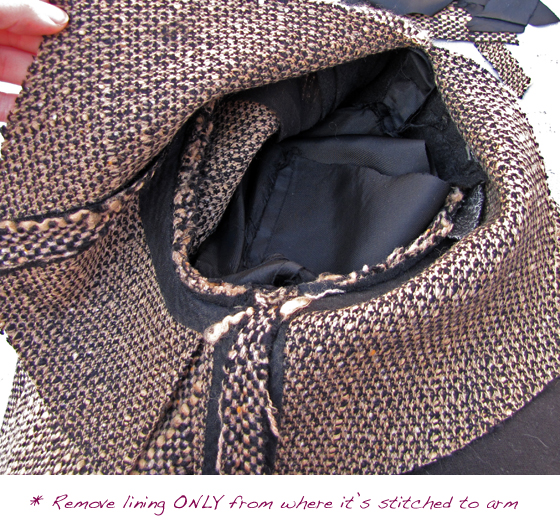
~ Sleeveless Wool Coat DIY ~
Michael Kors Sleeveless Wool Coat


Nearly every time I have stepped foot in a thrift store -throughout my life- I have spotted a vintage camel hair coat yet I have now been to every thrift shop {within reason} and I cannot seem to find one -anywhere. It is killing me. {okay, I actually found a couple vintage cashmere ones for $95 but I was not about to spend that on a coat I was going to hack up}
What's funny -er, ironic, is last time {around July} I was in my favorite Goodwill, I spotted two of them, one that may have been perfect, but I passed it up thinking I had my Burberry trench and didn't need it. And here I am now endlessly searching for one. I even found one on ebay, seemingly perfect, nicely priced, and at the last minute some b*tch outbid me. kill.
So, I'm making due. I've found some other great coats that this DIY was just perfect for and really, I'll probably get more wear out of these colors than I would have the camel one ...although if I find one now, I'm totally snatching it up. I'm going to do the black wool blazer as well. I can't wait to wear it with a billowy sleeved blouse that usually is too cold to wear in the winter ...but now = a fabulous solution.
I am in love with this ...and have been wanting to do it for a while now, I just hadn't found the perfect coat to alter. ..blah blah.
I made a flower pin out of the extra sleeve.
This may look harder than it actually is. I'm not a master seamstress, really. BUT, you could totally take a coat {with photos} to someone and have them do it for you.
{you could do a wrap/tie belt with the extra material as well}
Have fun!
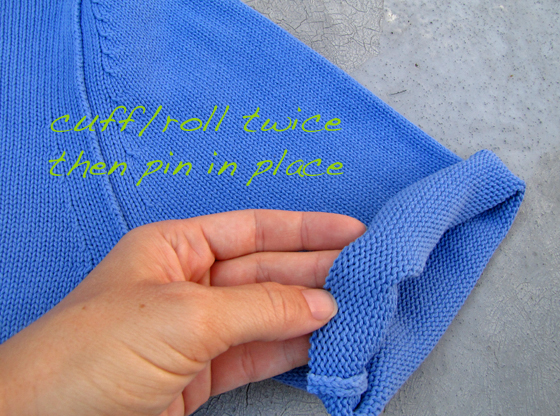
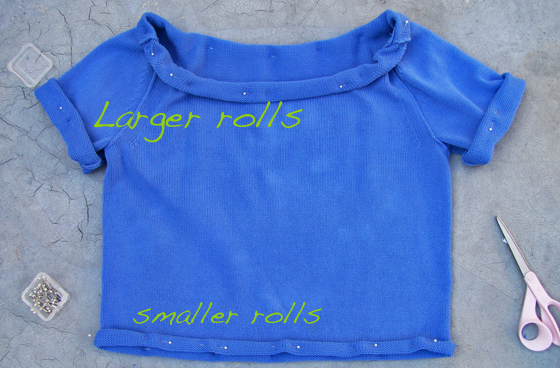
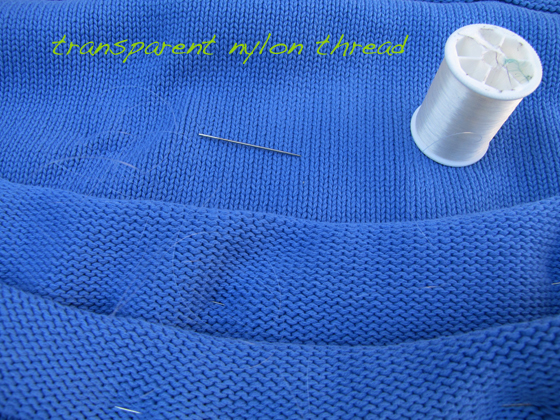
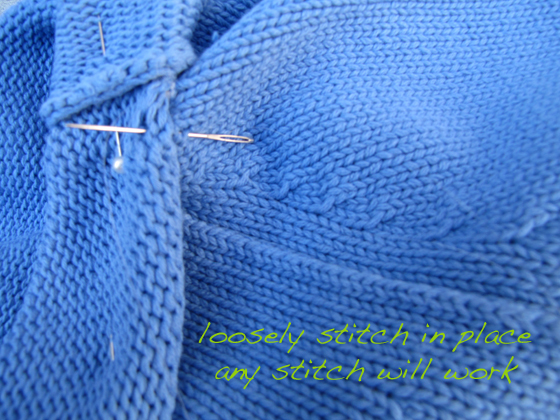
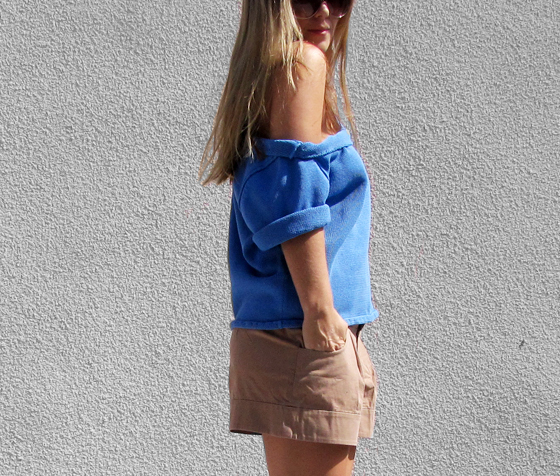
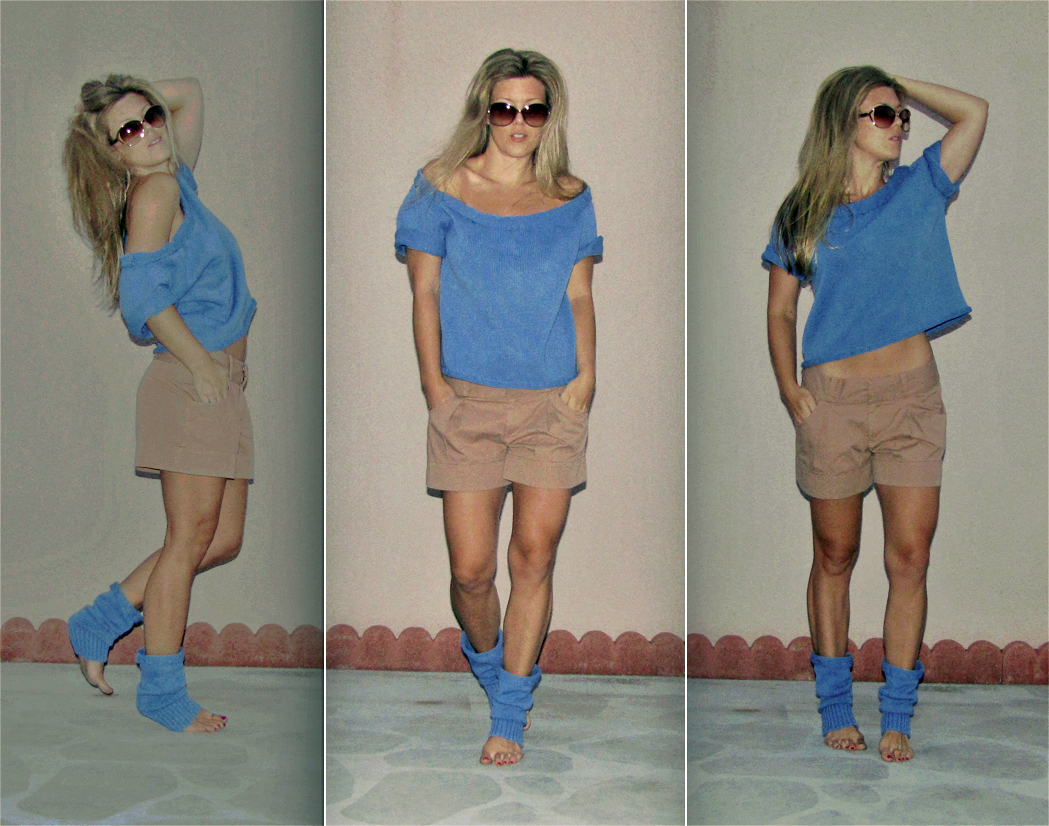
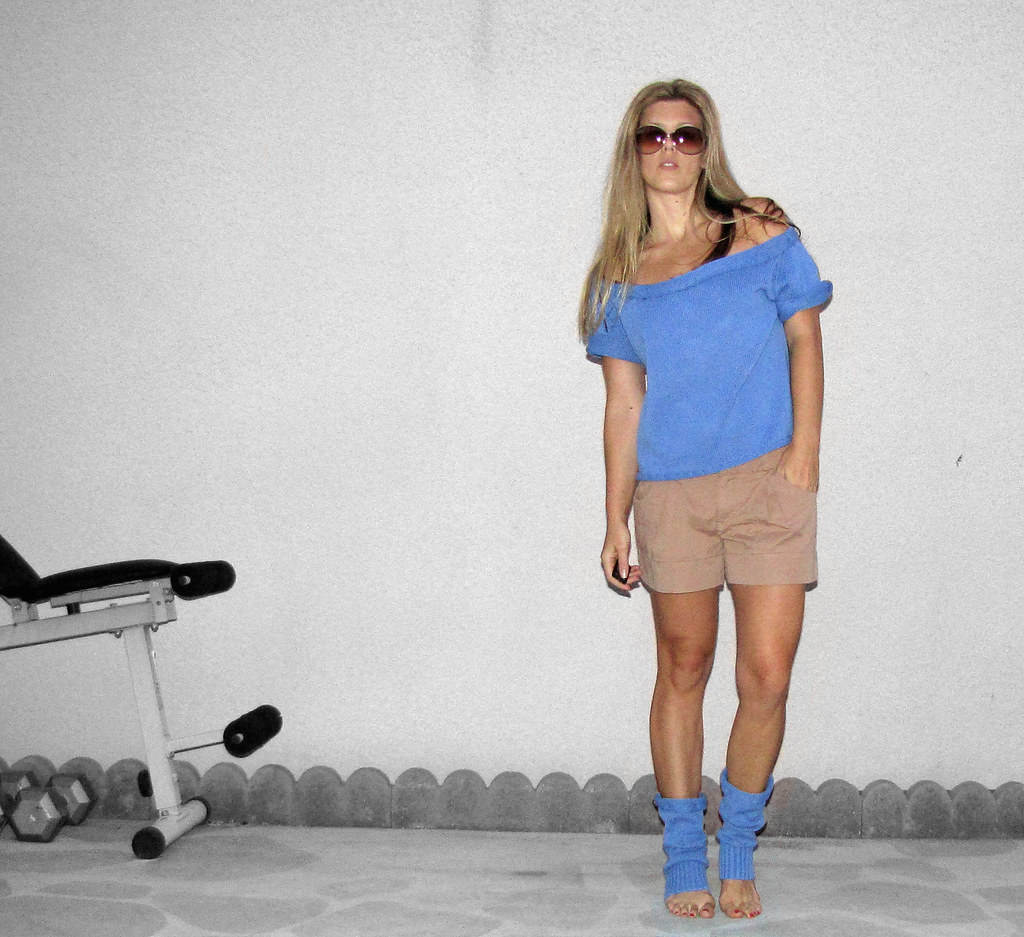
Recycle your clothes DIY
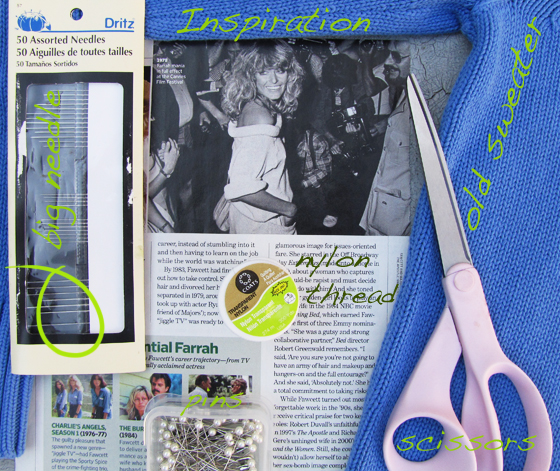
Inspiration: Farrah's Sweater 1978
Voila!
...to be honest, I wish the roll on top was larger. I may actually do this again once I find the perfect sweater ...because I LOVE IT!
...I rolled/stitched the tops of the cut-off arms & made leg warmers. I. hate. waste. & I. love. leg warmers.
* The shorts are from Victoria's Secret ...but it doesn't look like they have them any more :(
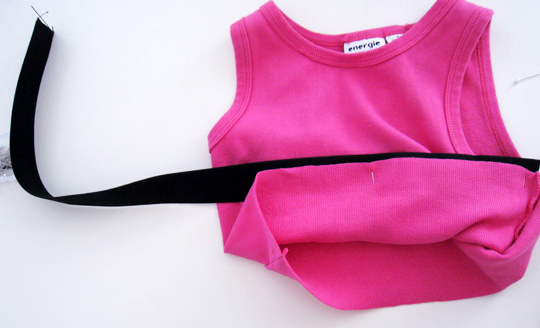
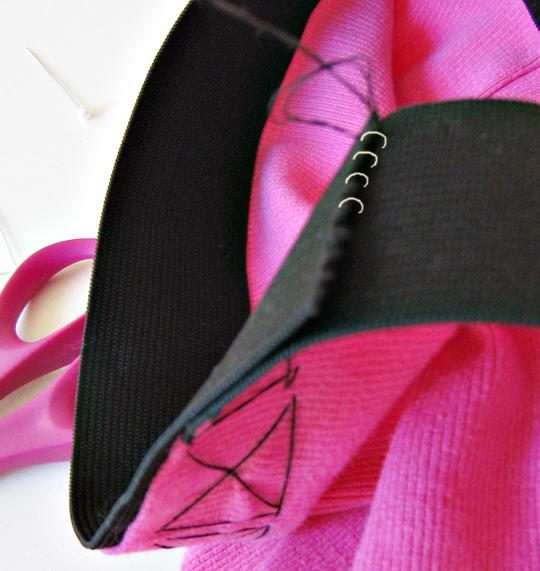
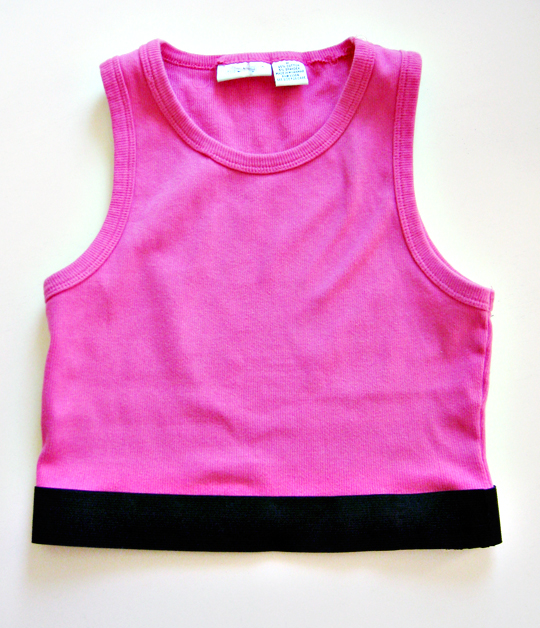
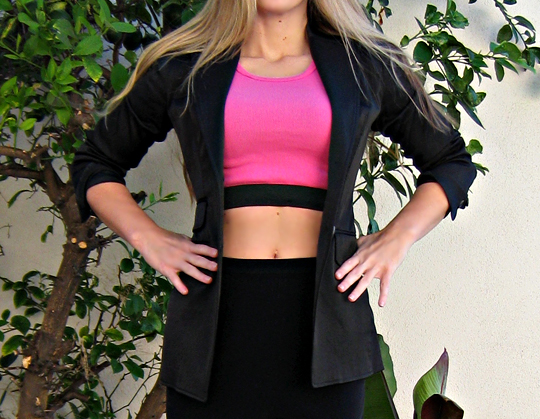
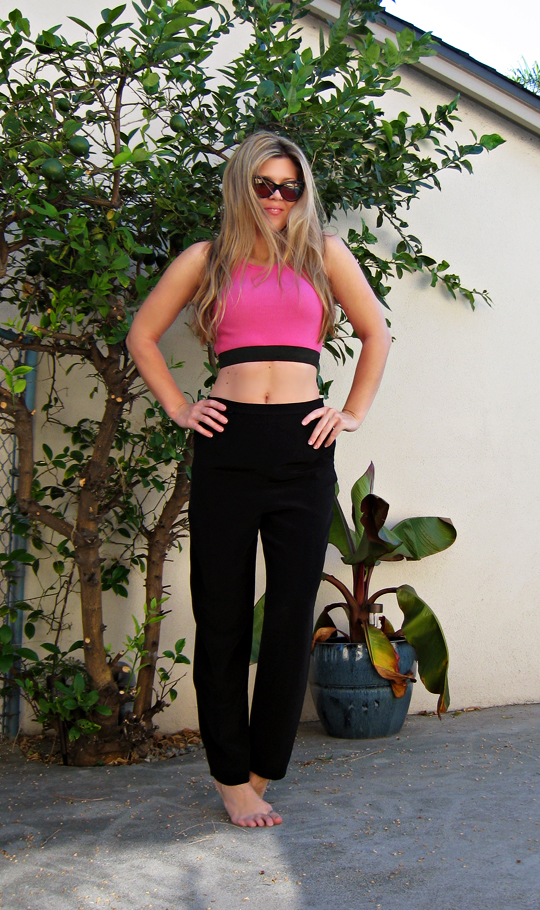
Alexander Wang Inspired Bra Top DIY
Rihanna image source ...T by Alexander Wang bra top
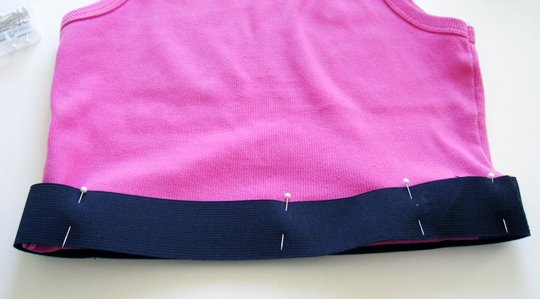
* Old wife beater or tank top
* Elastic {I used 1-1/2" wide}
* Scissors, pins, needle, thread
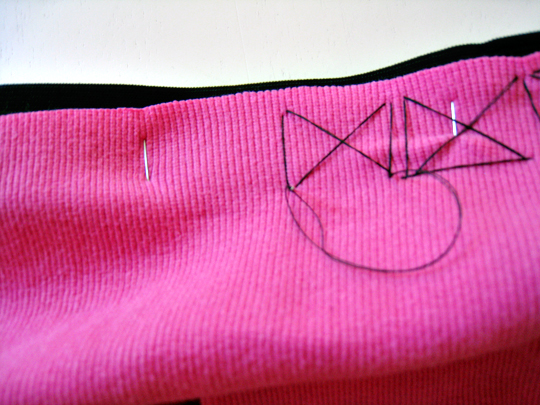
* With the bra you're going to be wearing with it, try on your tank & decide how short/long you want it. You'll want to stitch the bottom 1-1/4" of the tank to the elastic so lay your elastic over it and mark it.
* Lay tank flat and cut {I had to cut twice ;)}
* Pin the end of the elastic to the side seam of your tank & try it on again. Measure elastic around the edge of the tank. Cut the elastic about 1" to 1-1/2" SHORTER than measurement so it will fit like elastic is supposed to {but not too tight}
* Remove and pin the rest of the elastic to your tank
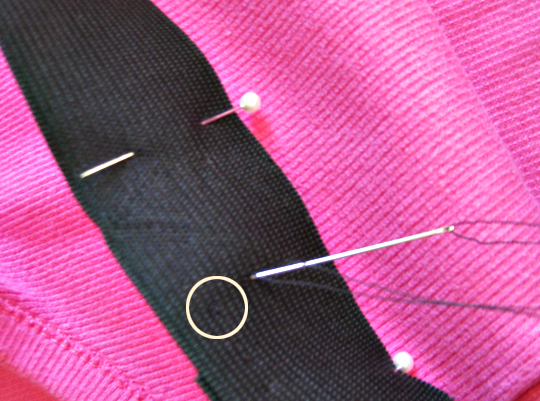
* Using a wide & loose criss-cross stitch, hand-stitch elastic to tank. {If you've got a serger/overlock machine
* Make sure your stitches on the elastic side are very small so they are near invisible.
* Finish the elastic off by stitching the end & side together.
I originally chose the pink tank because I thought it would stand out best for this tutorial but I kind of love how it turned out. I actually had a few of these tops in the 90's by Calvin Klein and wore them under my school uniform oxford button downs. I wish I still had them ;)
Have Fun!
Maeg-it Yourself ...a tutorial
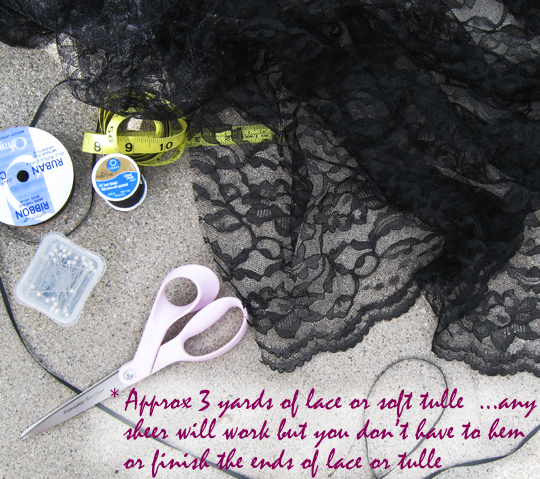
Romantic Lace Ballet Skirt with Raw Edges
* 1 yard of lace fabric ...unless you want it longer, then measure appropriately {I had an almost square piece of vintage ivory lace}
* Matching thread
* Ribbon {color & size & texture of your choice}
* Scissors, pins, tape measure
* This is a simple drawstring style skirt.
* Cut edges off lace, and into a circle of sorts. I left the longer sides flat because cutting a full circle would have made the skirt shorter. If you want more of a mini skirt, a perfect circle would be more appropriate.
* Lay out your lace and find the center. Pull up and snip with your scissors.
* Continue cutting a perfect circle. This will be your waist
* Try on your skirt. Since I wanted the option to wear it at my waist OR my hips, I made it about 4 inches larger than my hips at their largest point. {since it will be gathered, it's okay if it's a fairly large circle/waist}
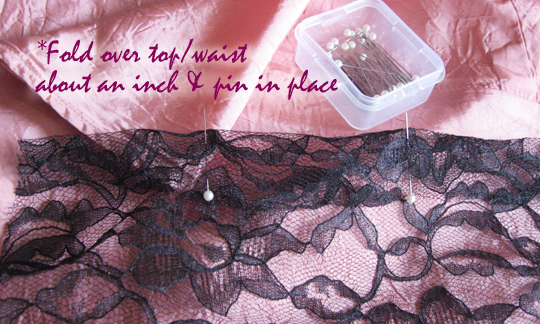
* Using your ribbon to determine the size of your waist band {drawstring tunnel}, fold your center circle fabric over it and pin in place.
* To continue creating your drawstring tunnel, you'll have to notch the fabric. Tip: whenever your fabric won't lay flat, snip it with your scissors until it does, then pin that section in place.
* This is the inside of your skirt
* Hand stitch your drawstring tunnel flat in place. If you have perfectly matching thread, you can use any stitch that will work because you won't see it at all.
* Flip your skirt right side out and try it on. Decide where you want the front to be and cut a slit in the center of your tunnel ...pull your ribbon through {by using a safety pin if needed} and tie a bow. At this point, if you don't like the length or the way some of the edges are falling, just cut them into the shape you like. You will leave the edges raw. They won't fray ...but if they do a little, it just ads to the romance of the style. Tip: I scalloped the edges a bit by cutting around the floral/lace pattern at the edges.
wearing: black leggings, old black lace printed tank, black blazer, Tiffany lock pendant/chain, Boutique 9 lace up pumps
Have Fun!
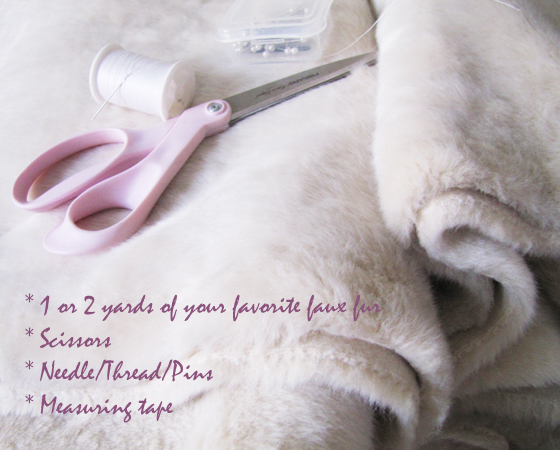
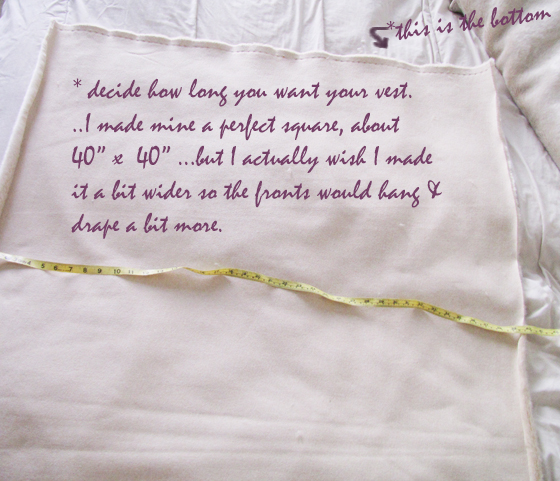
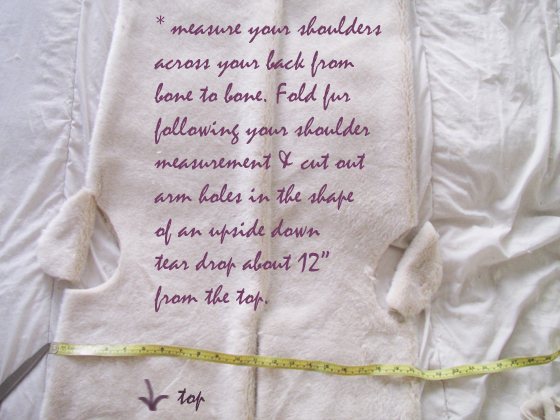
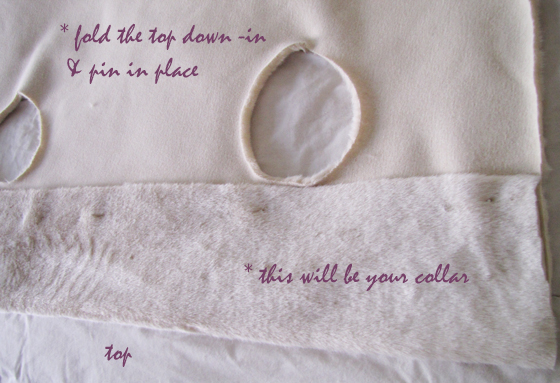
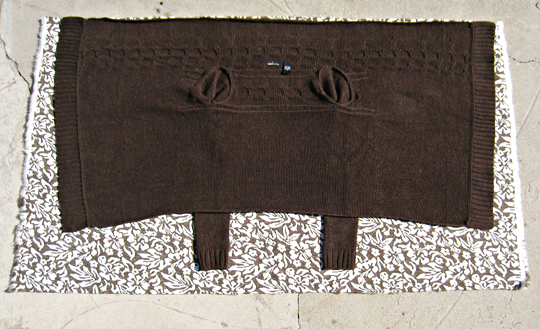
Asymmetrical Faux Fur Vest DIY
Victoria's Secret asymmetrical knit vest & Michael Kors navy fur vest
* About one yard {36" x 65"} of Faux Fur or any other material will do for this {if you knit, you could knit it up easily!}
* Measuring tape or ruler
* Pen/Something to mark with
* Scissors
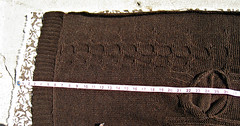
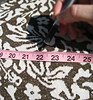
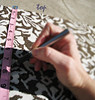
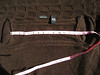
* Using my sweater as a pattern {29-1/2" x 56" remember knit has stretch} - but keeping the width of the faux fur, I measured from the end/side to the arm hole {22"} ...from the top of the fur to the top of the armhole {7-1/2"} ...from armhole to armhole {13-1/2"} ...and marked each measurement on the inside/backside of the faux fur/fabric
* I then measured the circumference of the armhole {15"} ...and with measurement marks, I sketched a circle ...and cut it out. Using my original measurements and the circle I just cut out, I drew the other armhole on and cut it out as well.
* If you're not a perfectionist like me, you can really just eyeball these armholes, fold the fabric and cut as I did in my last faux fur vest DIY. But to assure your asymmetrical style, keep the width longer than the length.
As a lover of the asymmetrical sweater {I have 3}, I finally held it up and looked at the construction. Realizing it's just a long rectangle with arms, I thought it'd be a perfectly easy DIY {sans arms} to do with any fabric {silk, felt, crepe, really anything that has a nice drape to it}. I'm using this faux fur, only because I had it, but since there's no sewing involved, I may also make a shorter version out of the extra black leather I have left over from the leather wrap belts I made. I love the idea of the vest because you can pair it with a pretty printed blouse underneath and show off the sleeves. If you have your own favorite asymmetrical sweater and like the way it fits, I'd use that as a pattern when cutting yours out. {click here to see LeRoy helping ...as usual ;}
Have Fun!
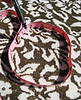
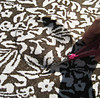
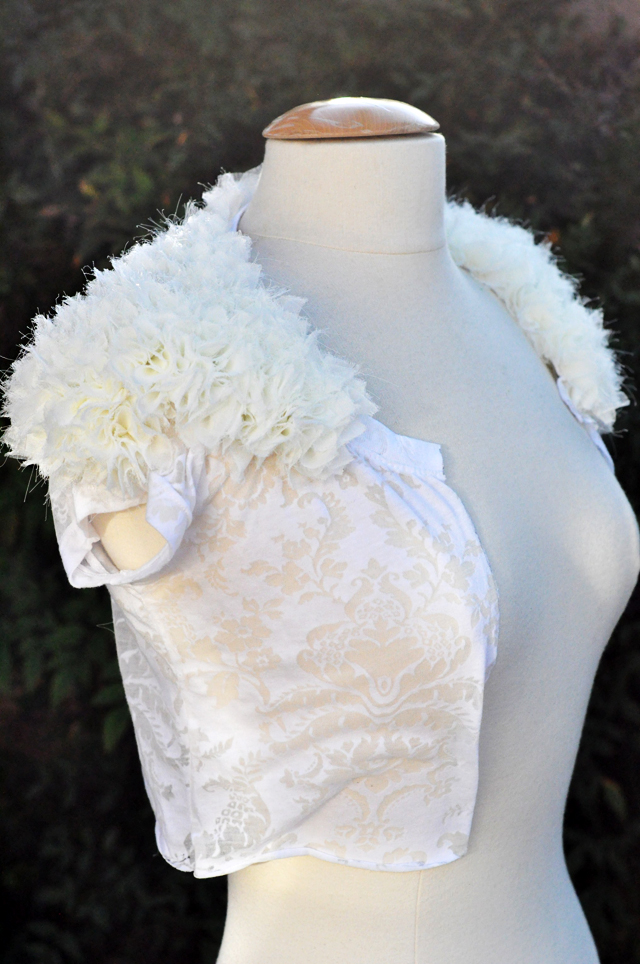
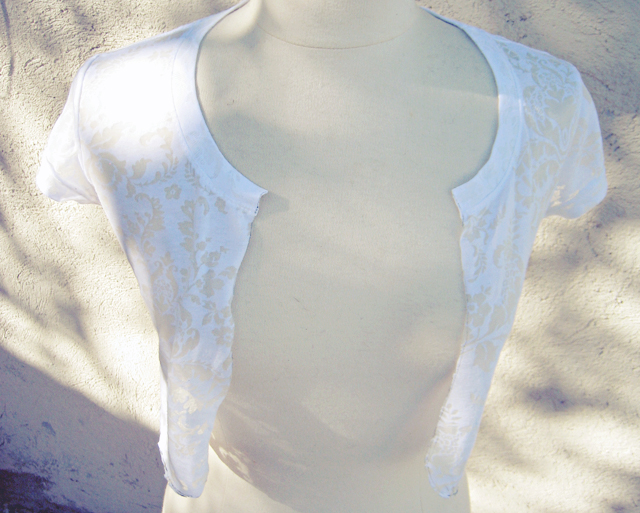
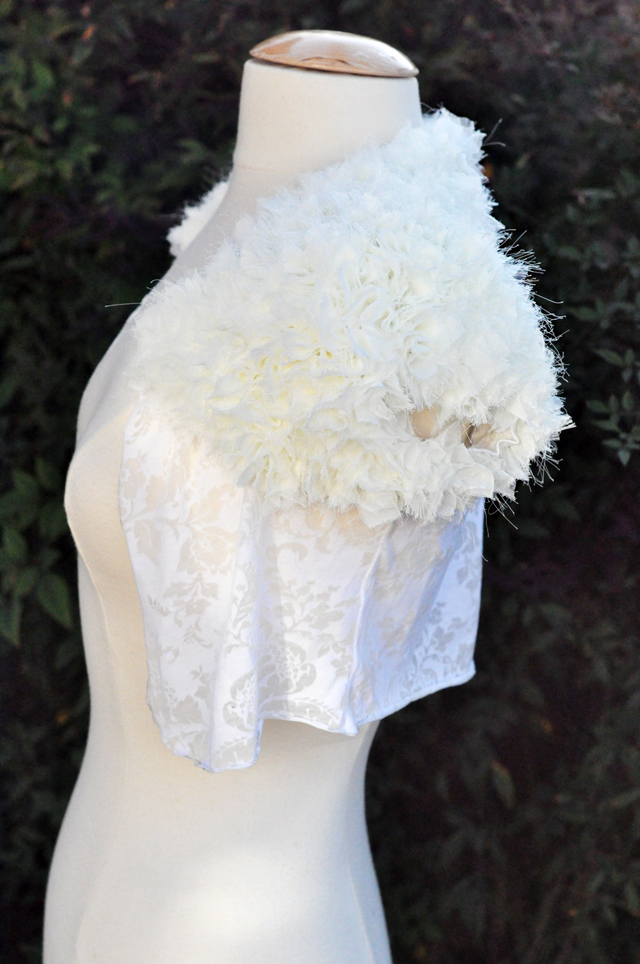
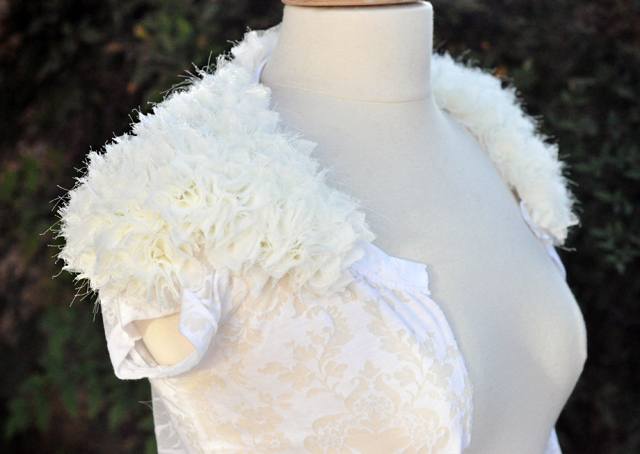
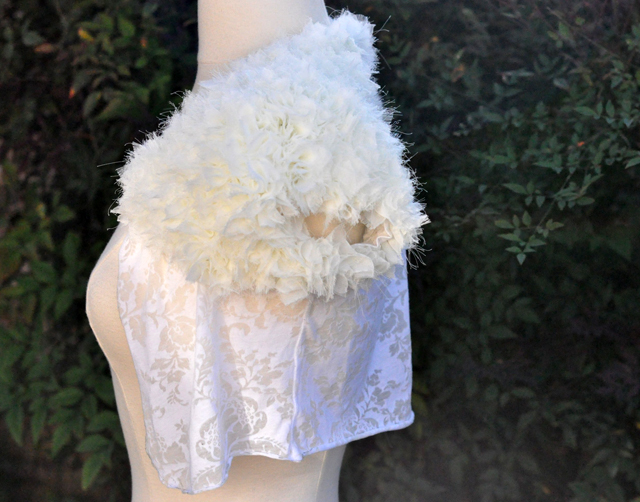
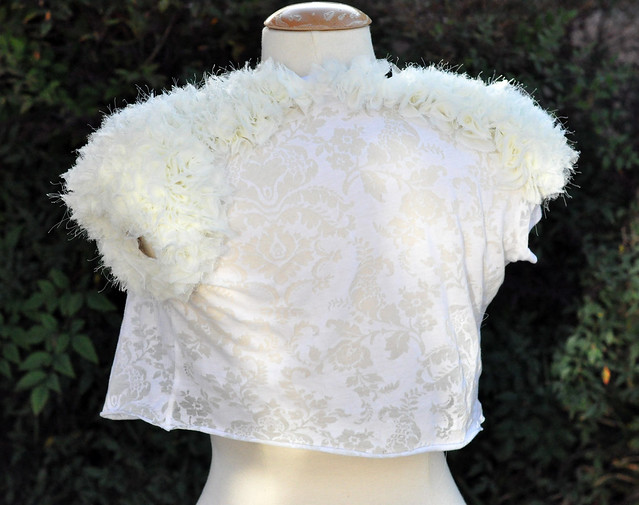
Wedding Shrug DIY for Brides or Maids ...progression {it's not finished}
I began this project at the end of September 2010 ...got a shoulder done and realized just how time consuming it actually was. I worked on it Sundays during football through the end of October but then the Holidays hit and I haven't had a second to revisit the project since {especially knowing there was no end in sight}. I truly am in love with it however and will finish it ...eventually. I thought it would be a perfect DIY if you're getting married next Fall or Winter ...begin now and you'll be done by then!
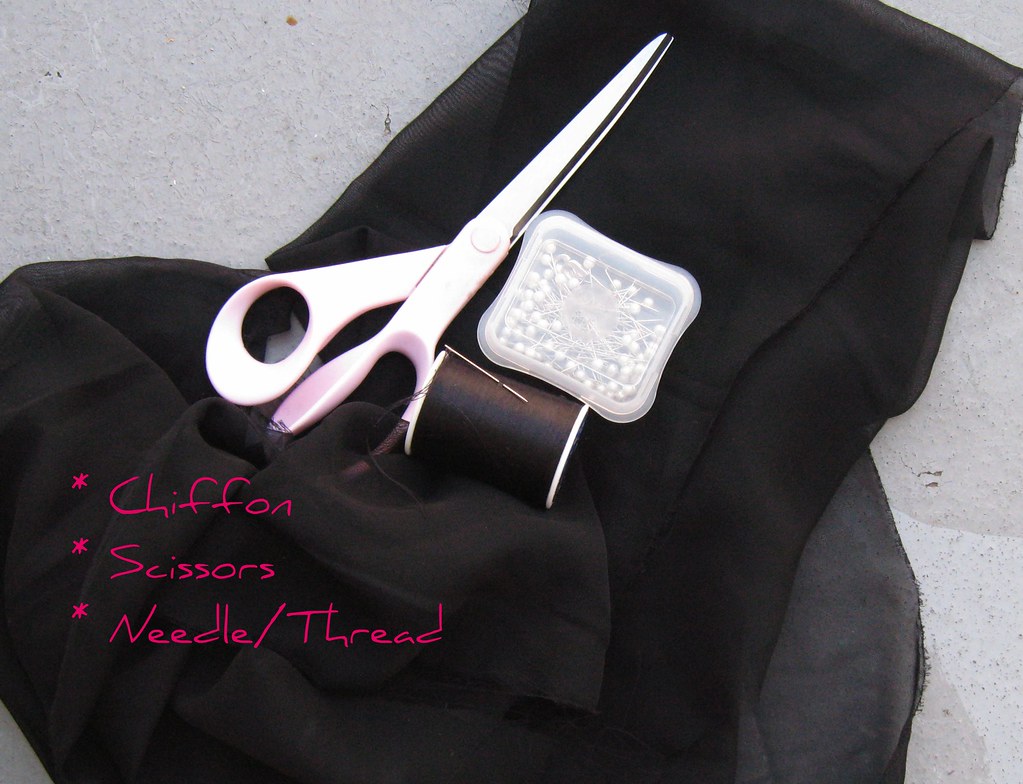
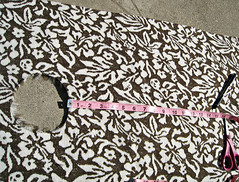
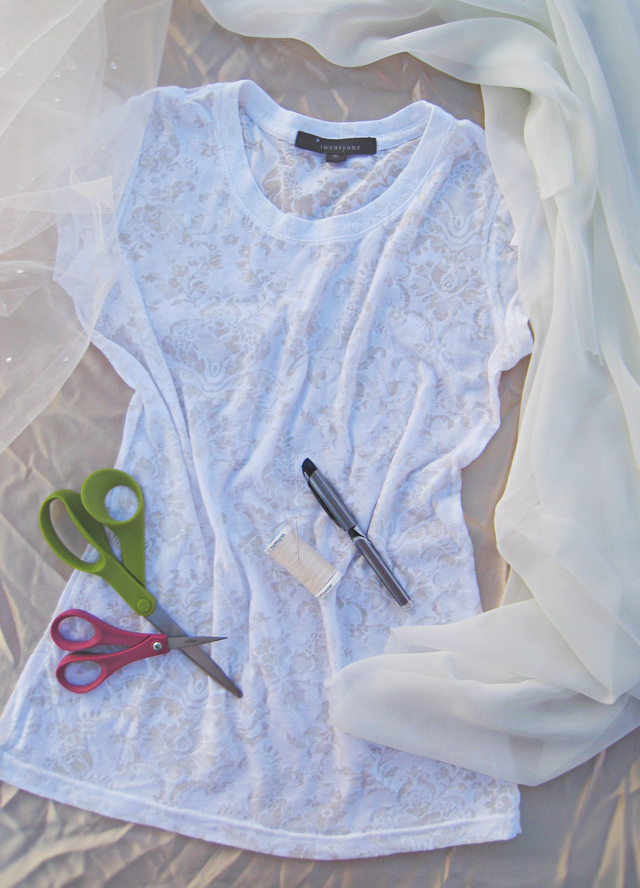
* A fitted white or ivory T-shirt ...preferably with cap sleeves. You may also choose to use a jacket or shrug you already have and/or sew one up yourself if you've got the skills. However, the T-shirt works quite well. I used the burnout one because it's the only one I had.
* 4-10 yards of sheer fabric - I've gone through about 2 yards so far, depending on how close you're stitching your fabric pieces together, you'll need more or less than 8 yards. I may need 10yards at the rate I'm going. I'm using a sheer polyester in ivory
* Pen/Scissors/Matching Thread and needle
{This would also be adorable for all your bridesmaids in a similar or lighter hue to the dresses they're wearing, especially if they're strapless}
* This is the same technique as my Baby Couture Ruffled Onesie & my Pouf Sleeve Top
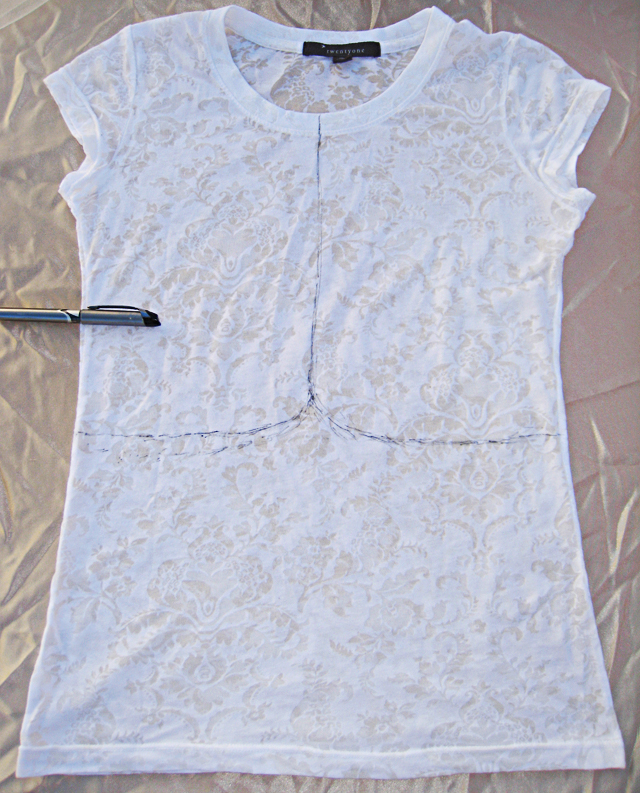
* Sketch an outline of your shrug on your T ...try it on first and mark just below your bust as where you'll draw the length out. It will shorten a bit but it's always better to start out long and trim away than do all the work and have it be too short or too small. Draw a straight line down the center ...and a corresponding line across the back as well. NOTE: If you have a shrug or jacket already, skip this step, obviously.
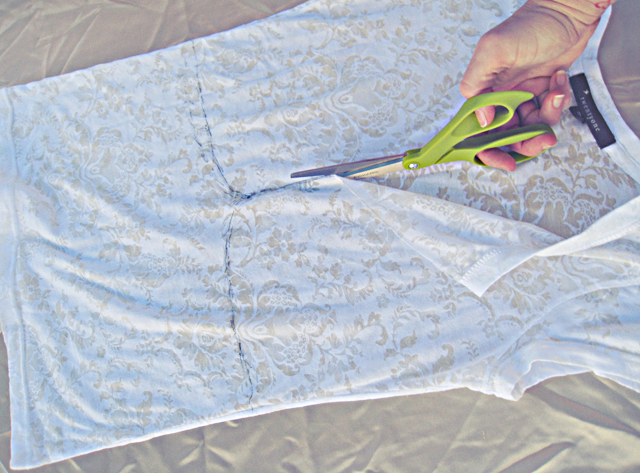
* Cut along your pattern.
* This is how it should look
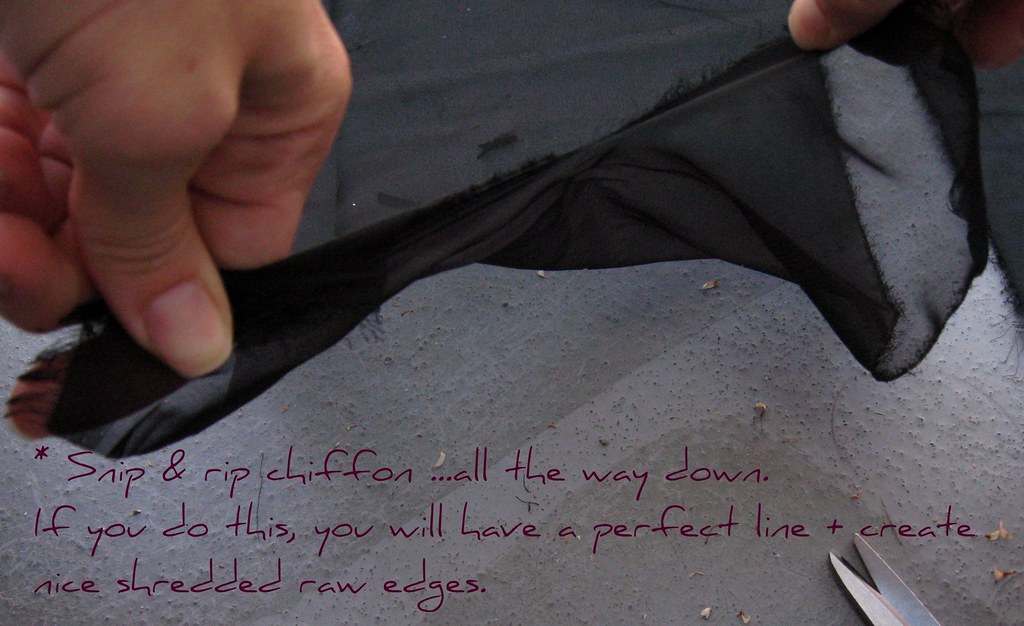
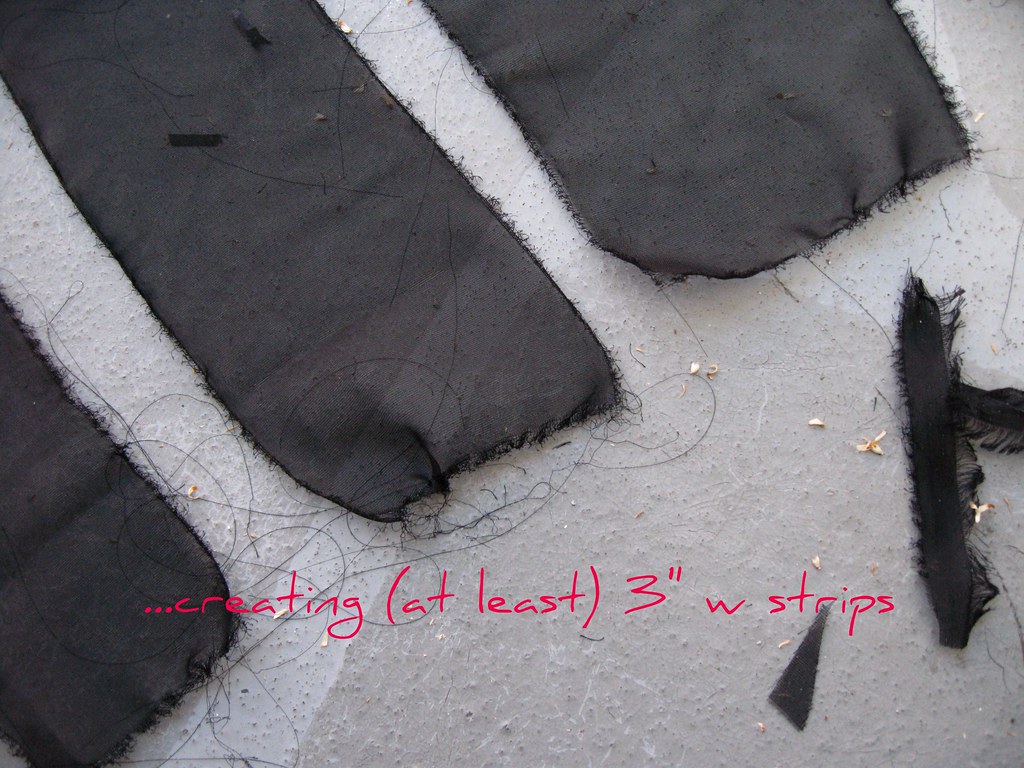
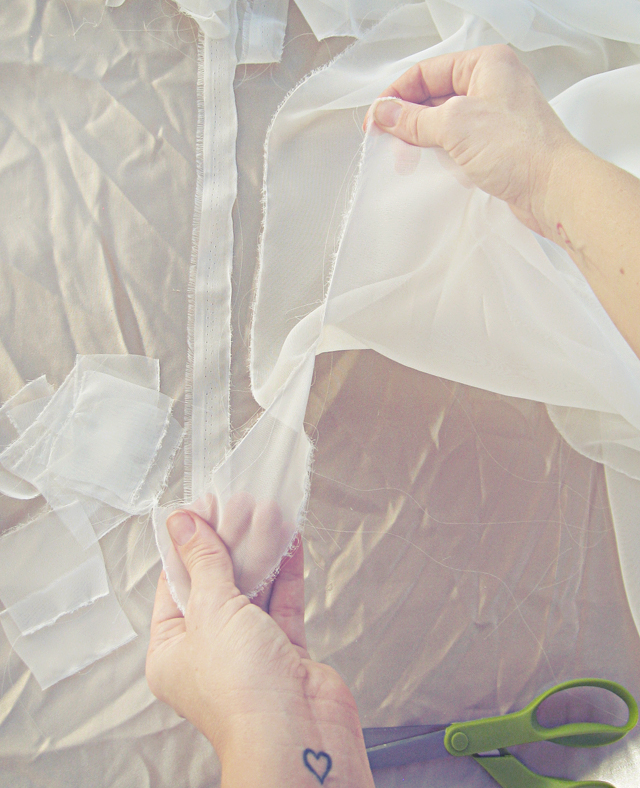
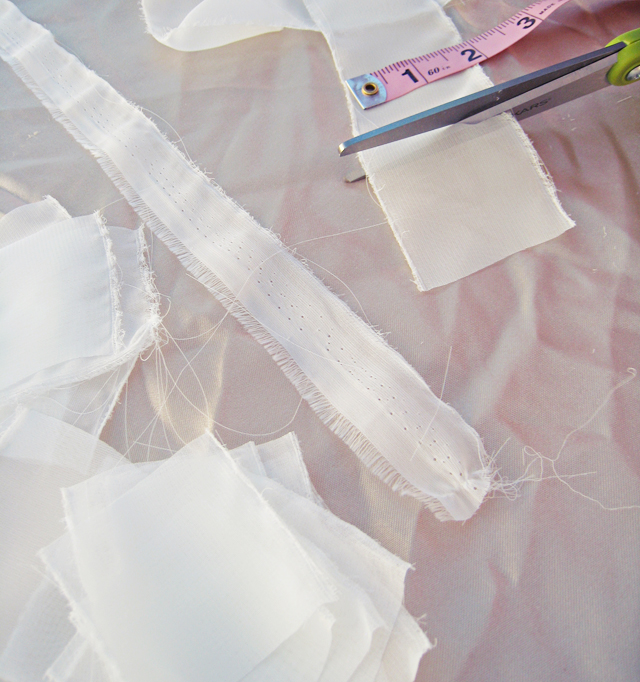
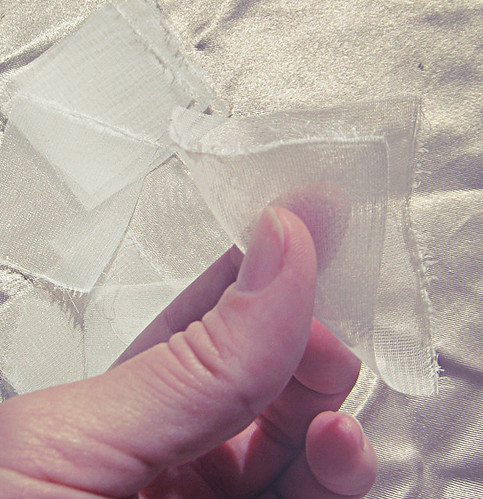
* Snip and Rip your sheer fabric, beginning by removing the selvage. You want the frayed edges. Don't worry about they fraying too much. This is what gives it that romantic/vintage look. Make your strips about 2 inches wide.
* Create approximately 2x2inch squares by cutting down your strips.
* Begin stitching at the top of your shoulders and work down and out. Your squares should be close enough together that no part of the t-shirt is visible through. AND you're going to do THE ENTIRE T-SHIRT. No t-shirt will be showing when it's complete.
* Remove the tag with a seam ripper :)
* The underside will look a little like brains. Make sure while you're stitching that you're not pulling or gathering the t-shirt. Once you have enough done, the shirt will feel thicker and sort of morph into molded creation ...if that makes any sense. {also, if you've got skills, you can line it and hide all of this}
. . . though I'm nowhere near finished!Yes, this project will take you forever - that's a lot of shirt to cover ...so start now!
Have Fun!
Louboutin "Petal" Bag DIY
Christian Louboutin Satin "Petal" Bag
I used a 9" x 5" true vintage lace/satin snap clutch I found at Goodwill for 3.99
{if you're going for an exact look ...use a purse like this or this}
...I think I like mine better ;)
Fancy Shoulder Pads
~ DIY ~


I am definitely not the first or the second or probably even the 5th person to do DIY shoulder pads ...but it doesn't mean I didn't want to DIY my own version. And while they are a bit daring, I am kind of in love with them. I haven't found a great and removable way to attach them aside from just pinning them on but if I were to wear them out, I would most likely hand stitch them to whatever I wanted to wear them with ..but loose enough to remove them at the end of the night without ruining the garment.
* You can purchase shoulder pads at your local fabric store ...or, rip them out of an old jacket like I did.
* I started {as I always do} with the idea of using many different materials/notions {fringe, beads, rope, studs, pearls, chains, leather pieces} but never really have an exact plan. In this case, I made the first one to my liking then duplicated it. I have so many ideas for these I may just have to make more. Have fun!
Пока все!!! :(
Комментариев нет:
Отправить комментарий