Mar 31


To create a version of your own, reach for a durable kitchen drawn liner, heavy duty, colorful tapes (Duck, Gorilla, and Gaffers are my favorites), Velcro and scissors. Measure (by wrapping your ipad around), and cut to size. Fold bottom half up, and tape all around to seal and secure. Continue to tape and smooth away any lumps and air bubbles. Stick pieces of velcro as the clasp and your clutch is complete! Get creative with your patterns and colors. Yell it from your pipes: I love STRIPES!
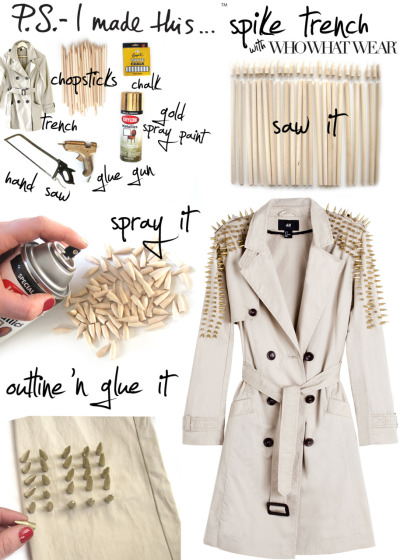
Get inspired by Burberry, and create your own version. Reach for lots of chopsticks (use anywhere from 50-100 pairs or more if you crave more spike-age). Using a handsaw (carefully) and cut down chopsticks tops. If you don’t feel comfortable with a saw, try heavy duty clippers. In a well-ventilated area, spray paint the spikes, gold. Wait till dry, flip over- and spray to cover. Use chalk to outline where the spikes will go. Use droplets of hot glue on the bottoms of the spikes, place down- and hold for a few seconds till they set. Remove any straggly glue hair strands, let dry- and rock it
Mar 15
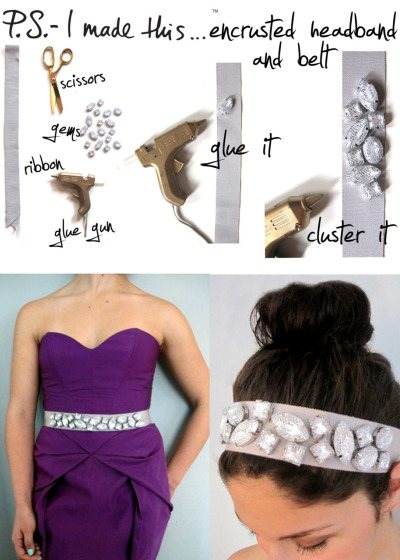
Creating a convertible accessory will take just minutes! Reach for a piece of ribbon. Measure to your size. I suggest a double-faced ribbon or a grosgrain ribbon option. Next, choose from a wide variety of gems. Scour eBay or flea markets for vintage options or try M&J Trimming for oodles of options to oogle over. Find the center point of your ribbon and use your glue gun to secure down. Lay flat to dry and you’re ready for any Spring fling! PS- Get creative with color combos and try your hand at making shorter version for cuff bracelets
Mar 02
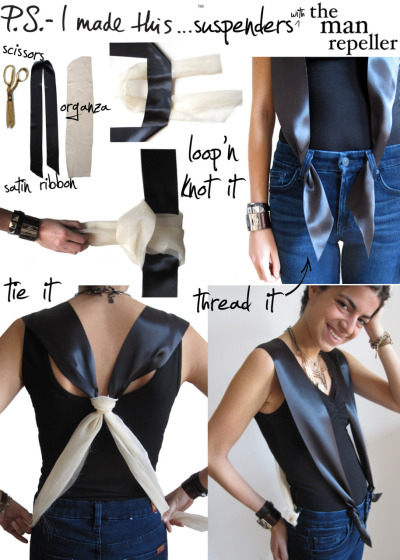
Measure and cut two pieces of ribbon and/or material. The “front” material should be longer than the “back X”. We chose a wide satin ribbon and delicate organza combo. Find the center point of each, and slightly overlap, creating a “U” shape. Loop it. Slip it. Knot it. Throw over your shoulders, keeping the “X” in the back and secure by tying knots to the belt loops on your pants. Get creative with materials and widths and don’t be afraid to indulge your inner MAN REPELLER

To create your tassel belt, measure your waist and cut fabric to wrap all the way around, leaving approx. a 4-6 inch gap. Leathers and suede are great options as well. Slice two slits on both sides, large enough to thread through. Gather and thread your cord/ropes through, knotting tassels on the ends. Make sure you have enough cord to go all the way around and to tie off in the front. A monochromatic color scheme is always chic choice, however get creative with colors, textures, and tassels- mix and match ‘em! Have fun getting waisted (no age requirements here)
Jan 31

To create a waterfall of wonderful chain inspired by Uncle Karl’s, connect jump rings to long pieces of cut chain using small pliers. Create two long clusters of chain, attaching them together by threading fishing line through a ribbon clamp. This will create a full chain with lots of movement. Triple knot and snip off ends of fishing line. Use a strong adhesive glue to attach earring posts onto the back of the ribbon clamp. Hold in place for a few seconds, and let dry completely before moving. To achieve a bottom of black ombre, lay earrings on flat covered surface and lightly spray from middle down, using matte spray paint. Let dry- flip, and spray another light layer (PS- spray outside!) When earrings are dry, you’re ready to rock em
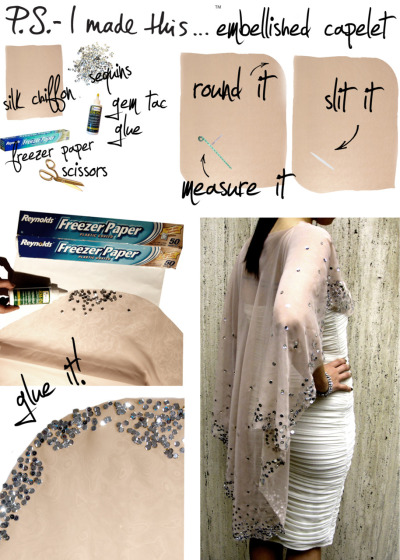
To create your own version of the caplet, use one yard of sheer silk chiffon, rhinestones or sequins, Gem Tac glue, and a sharp pair of fabric scissors. Round off 2 opposing corners to achieve a lovely draping. Measure the length in between your shoulders and mark on the fabric for cutting. Use scissors to create a slit for the neckline. Before gluing your choice of sparkle, line the underneath surface with waxed freezer paper to keep from gluing down to the surface. After sparkles are glued, wait until it’s completely dry to wear. Get creative with your embellishments! Style your caplet over any dress and PS- you will impress
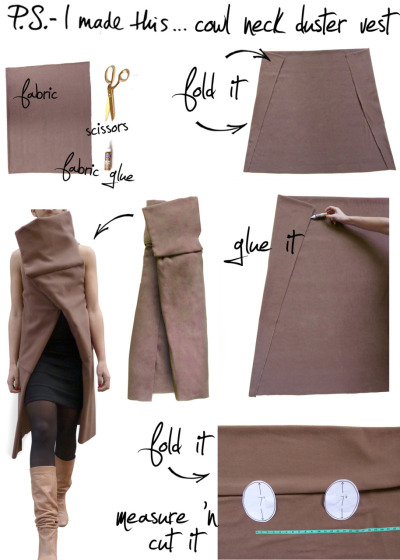
To make a VOWL duster, use approx 3 yards of fabric (P.S.- Mood Fabrics has the best selection), and fold in half. Fold and glue down angled corners, which will create an A-line silohoutte. P.S.- Make sure you’re folding/gluing on the inside of the piece. Create an exaggerated fold at the top for the cowl collar (approx. 10 inches), and glue underneath the fold. More experienced DIY’ers can opt to stitch. Measure your shoulder width, and cut arm holes just under the collar. Use a Large pin to close, or wear open for a more free-flowing option
Jan 05

To create a pair of earrings that reflect these unique and rich cultures, reach for rhinestone or mirrored buttons and pipe cleaners. Slip and twist as you go, and join together with a final tight twist, then loop for your earring wires. Don’t tell me, “Sari, I’m not crafty”, because anyone can do this DIY
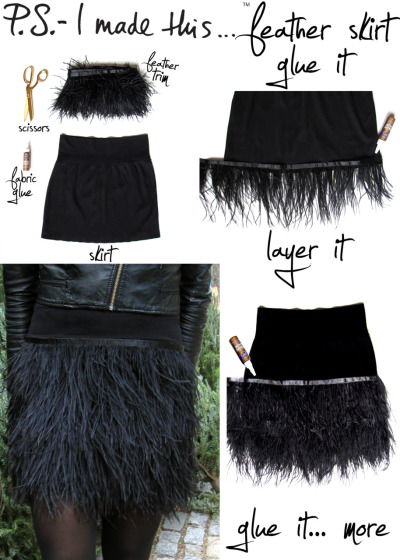
Choose your favorite feather trim and a skirt of the same color. With just a pair of scissors and fabric glue, you will be in business and ready to fly away with your newest DIY fashion. Glue and wrap the entire way up, starting at the bottom, leaving approx. 2-3 inches. P.S.- Check the weather report: Feather weather is in full effect
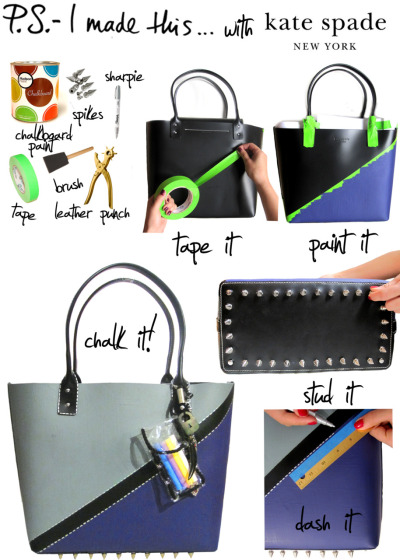
P.S.- My bag was painted with Hudson Chalk board paint (yes! you can draw and erase on the surface), studded on the bottom with edgy silver spikes from M&J, faux stitched with Sharpies, and finished off with a bag charm (chalk not included)! Take a page from Kate Spade’s world of style and remember to have fun, and have courage- don’t be shy with your DIY
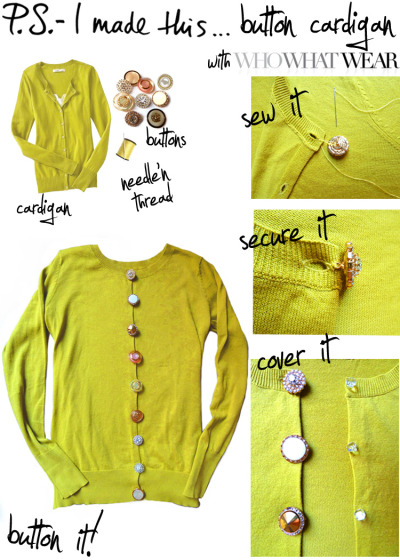
Get swept up in the sweater storm and update an existing cardigan with uber chic, sparkly, and ornate buttons… AND WEAR IT BACKWARDS! Old Navy has great cardigans or you can re-purpose one from your closet. Use vintage buttons or purchase some- my gems are from M&J Trim. Make sure to sew buttons on the side where the button holes are, and the original buttons will still go through the existing button hole. P.S.-DO NOT COVER THE BUTTON HOLES! The decorative buttons, will cover the existing ones when buttoned up. Note: Be a style warrior and wear your buttons on the back -if you want to be a front-runner in fashion!
Oct 21

Right now, grab a bag… embrace this cozy and cute trend, get inspired and get crafty. I opted for this cute FOREVER 21 bag paired with gray POM POMS. Use your trusty glue gun and dot a dab of glue on each pom and place on the bag. Make sure you don’t leave too much space between each pom, they should completely cover your surface. Feel free to get creative with your colors and infuse the pom on practically anything and everything!
P.S.- October is Breast Cancer awareness month- try and infuse the color and cause into your life! Sharpie is spreading the word, which benefits The City of Hope! Get involved
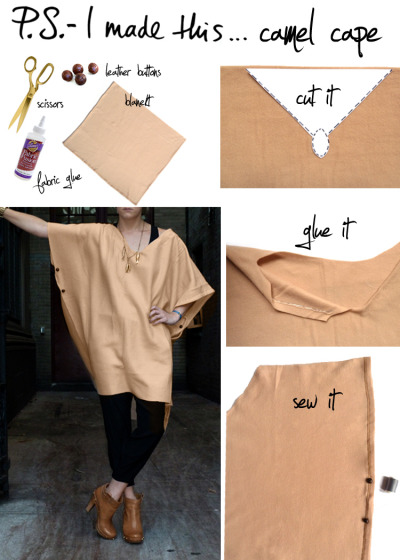
Falling for this seasons top 2 trends are inevitable. The color of CAMEL and the essential CAPE have captivated our hearts. Anyone and everyone knows this sophisticated hue is the preferred palate that will complement your Autumnal look. I’m loving them all… Chloe, McQueen, and Stella McCartney each have a fab version. And don’t forget essentials available at Shopbop and H&M. The curse of Camel is something that we all wish to be cast with.
To create a camel cape of your own, simply find a camel blanket or even a large piece of fabric, in the perfect shade. You can use any type of material… soft cottons, heavy fleeces, or nubby knits. Make a pattern, follow the lines, and cut your neck opening. Glue back the edges, creating a clean, finished, hem. Sew 2 buttons on both sides. This will be your arm hole opening and also a nice detail to add a bit of shape and help it drape.
P.S.- Be a caped crusader… and cruise through the season in camel!

Lucky Charms are magically delicious and so is JEWELRY! One of my favorite jewelry designers, Dana Lorenz of Fenton/Fallon continues to wow us season after season with her over-the-top statement pieces, terrific textures, and sparkling situations. Dana recently invited me and a few other fab friends over and let us loose in her shop. She graciously gifted charms and broken pieces of past collections for a special P.S. project! I loved the idea of blinging out my fall bag with a bag charm using her fun elements.
To create a chic bag charm, re-purpose broken or old jewlez, charms, pendants, pieces, basically anything fun you can get your hands on. Tie your bits and bobs onto string or cording and secure to a binder ring. Make sure you hang at different lengths to create a staggered effect. Clip onto your bag with a carabiner clip and you are one leading lucky charm lady
To create a camel cape of your own, simply find a camel blanket or even a large piece of fabric, in the perfect shade. You can use any type of material… soft cottons, heavy fleeces, or nubby knits. Make a pattern, follow the lines, and cut your neck opening. Glue back the edges, creating a clean, finished, hem. Sew 2 buttons on both sides. This will be your arm hole opening and also a nice detail to add a bit of shape and help it drape.
P.S.- Be a caped crusader… and cruise through the season in camel!
Sep 02
To create a chic bag charm, re-purpose broken or old jewlez, charms, pendants, pieces, basically anything fun you can get your hands on. Tie your bits and bobs onto string or cording and secure to a binder ring. Make sure you hang at different lengths to create a staggered effect. Clip onto your bag with a carabiner clip and you are one leading lucky charm lady
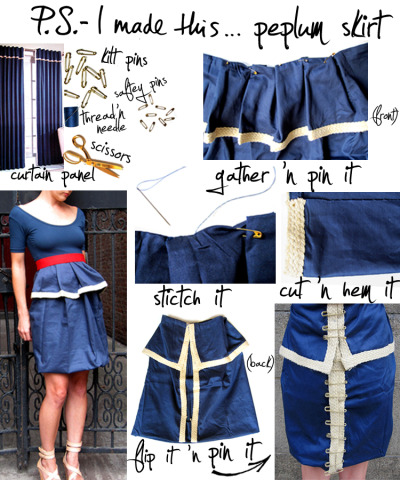
Put a little PEP in your step and a WOW in your wardrobe with a refined, sophisticated, and slightly sultry peplum skirt! These classic styles that were once on hiatus are premiering on the runways and back on television. AMC’s Mad Men is in one word J’AMAZING! Take style notes from Joan Holloway who proves that pencil (skirts) and pen (necklaces) are a must. Banana Republic is having a Casting Call for Mad Men… I wonder if Don Draper is judging?
To create a retro-inspired skirt, reach for a curtain panel (use a panel with a skirted top). Gather, and pin top (front) to create a slight pleat every few inches. Sew and reinforce with stitching where pins are holding material in place. Flip material to the backside. Cut to desired length and hem by stitching. To finish off the back, use kilt pins to connected material. Cinch and style with a bold belt and you’ve got a perfect peplum!
P.S.- Click here to submit your best Mad Men style and enter for a walk-on role on the show. I think my friend Jessica from What I Wore is spot on!
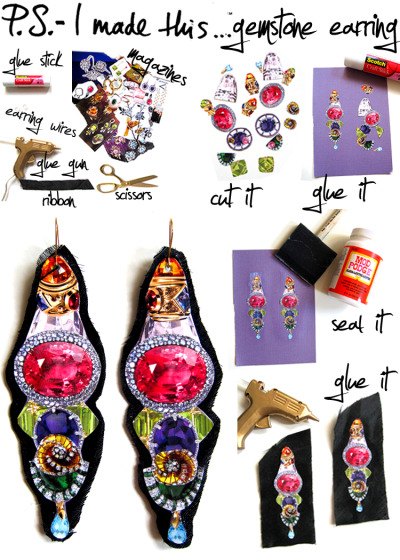
Diamonds may be a girls best friend, however I’ve always hankered to dazzle and drip in colorful precious stones. Were you born into a blah birthstone? Teter between Aquamarine to Amethyst? No matter what stone you want to own, consider your wish granted! I’m currently crushing on these gems: Mary Katrantzou’s Fall 2010 Collection of Kaleidoscope graphic gem dresses, McQueen’s Gold Angel heels, I’m fallin’ for Fallon, and hot for Harry Winston! Bling is IN. Achieve this look by recycling your fashion magazines into gemstone earrings fit for a queen (or you)!
Cut out colorful gem ads and editorial rocks and secure onto card stock using a glue stick. Paint a layer of Mod Podge. Once dry, cut out around the outside silhouette of your earring. Use a glue gun and adhere onto a wide ribbon, trimming around the edge and leave a slight border. Punch a little hole and slide in your earring wires.
P.S.- Gems are truly truly truly outrageous! (obvious 80’s Jem reference for the younger set)
To create a retro-inspired skirt, reach for a curtain panel (use a panel with a skirted top). Gather, and pin top (front) to create a slight pleat every few inches. Sew and reinforce with stitching where pins are holding material in place. Flip material to the backside. Cut to desired length and hem by stitching. To finish off the back, use kilt pins to connected material. Cinch and style with a bold belt and you’ve got a perfect peplum!
P.S.- Click here to submit your best Mad Men style and enter for a walk-on role on the show. I think my friend Jessica from What I Wore is spot on!
Jul 20
Cut out colorful gem ads and editorial rocks and secure onto card stock using a glue stick. Paint a layer of Mod Podge. Once dry, cut out around the outside silhouette of your earring. Use a glue gun and adhere onto a wide ribbon, trimming around the edge and leave a slight border. Punch a little hole and slide in your earring wires.
P.S.- Gems are truly truly truly outrageous! (obvious 80’s Jem reference for the younger set)
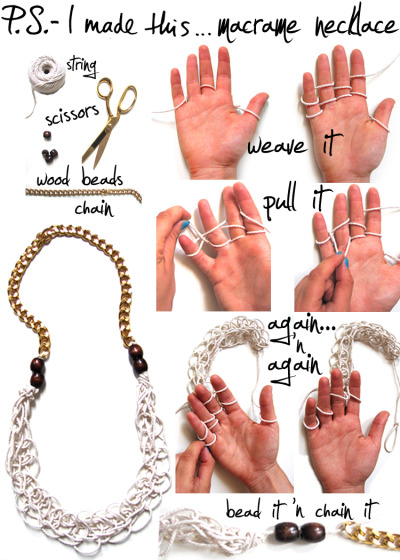
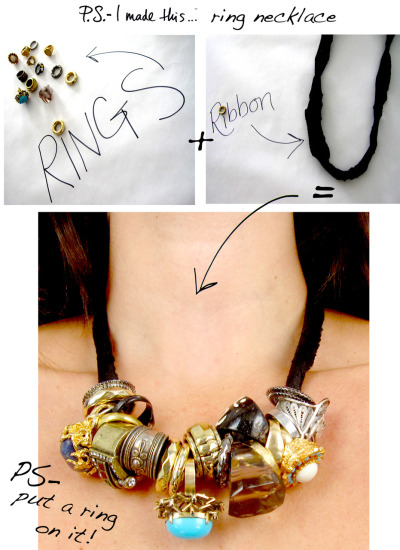
To create you own version of this macrame-style rope necklace, grab a spool of rope and loop around your thumb. Weave over and under your fingers, back and forth until you create 2 rows of rope of each finger. Remove the bottom string over the top on each finger, until you leave just one row left. Continue to weave over and under, always creating 2 rows of rope and pulling the bottom rope over the top. After you’ve created your woven design, remove from the fingers, loop the strand through all the finger holes, add beads and chain- and you’re ready to roll

Celebrate Independence Day the right way and pay homage to amERICA the beautiful’s birthday with a barbecue! Think twice this year before you discard the dishes and cutlery. Round up and recycle plastic forks, napkins, a coaster, buttons and shells and declare a DIY with the help of a trusty glue gun. Secure finished embellished brooch to dresses, bags, and tops with a safety pin to sass up your style. Check out Design*Sponge for the FULL Step-by-Step tutorial
P.S.- God Bless America, and the BBQ Brooch
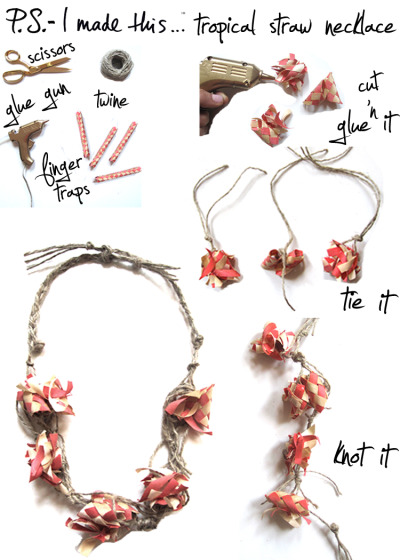
Pollinate your Summer style with Polynesian-inspired accessories. Fashion’s tropical thunder is striking from the shores to the city streets with this exotic trend. The sounds of South Pacific and Gilligan’s Island’s Ginger are classic Tropical treasures I’ve always bowed down to, but my current crush stems from Richard Nicoll’s SS10 collection which is alive with sprinkles of hula-happiness! Whether you’re on vacation or on your way to a summer soiree, no tiki torch can hold a candle to this straw-sational statement necklace.
Pick up Straw Finger Traps, reach for scissors and a glue gun and you’re in business. Cut and glue pieces of the straw finger traps together to create rustic, lush flowers, then simply tie and knot them together with twine to create your accessory. P.S.- Get creative and make brooches, headbands, and belts
To make your beachy boho headpiece, get some rawhide material, colorful beads, feathers, and neon tape. Braid approx 1.5 yards together, leaving some strands at the end to add beads and feathers. Secure feathers on with Duct or Gaffers tape.
**P.S. - For all of you West Coasters, we will be on-hand making these headpieces with ROXY at PacSun’s Summer Solstice Beach Ballyhoo on the Santa Monica Pier. See ya there
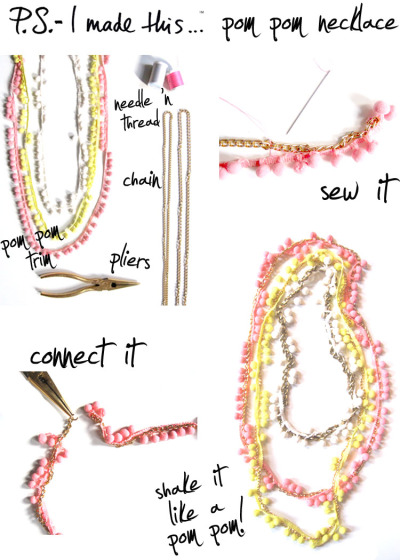
Dip your spoon into a bowl of sorbet of accessories and infuse any other design crushes you may fancy. Hit up your ribbon/trim shops for fun size and color combos of Poms. Sew onto different texture and lengths of chain and connect with pliers. Remember to indulge just as you would with other succulent treats like Sorbets and sweet Macaroons! Speaking of which, just bought this j’amazing book on Macaroons- P.S.- Get it and Make it!
Apr 01
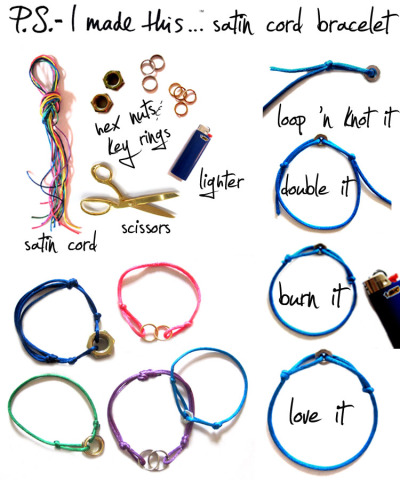
What’s not to love about Cartier’s Charity Love bracelets? In 2006, Cartier partnered with 24 high-profile and big-hearted Celebs including the likes of Eva Mendes, Scarlett Johansson, Salma Hayek, and more! Each satin cord signature bracelet has a dedicated Charity partner in a corresponding color, where the proceeds will benefit.
My version of the delicate bracelet inspired by this wonderfully chic and charitable initiative just so happens to be in Sarah Jessica Parker’s hue in blue which has partnered with UNICEF. Hit up your local hardware store for small key rings and hex nuts for your version. Be sure to singe the satin cord knots with a very quick burn using a lighter- but be careful! Safety first!
P.S.-Click here to download the PDF that shows you each Cartier Charity partner for the Love bracelets! http://www.love.cartier.com/cartier_love_charity.pdf


I’ve been riding horses since I was 10. Everything inspired by the Four-legged beauties makes me giddy, especially the get-ups!
Classic country clubbers sport Ralph Lauren’s designs. Edgy and elegant show horses gush for D&G over-sized ribbon pins. Anyway you sway, there’s a designer that is sure to tailor this sensible and seemingly chic genre for you.
Make you own first prize equestrian pin by using a few dazzling gems, buttons, or even broken bits you may have laying around. Glue onto a cupcake paper and add some wide ribbon for the final touch! Pin to handbags, blazers, anywhere!
PS- Stallion not included
My version of the delicate bracelet inspired by this wonderfully chic and charitable initiative just so happens to be in Sarah Jessica Parker’s hue in blue which has partnered with UNICEF. Hit up your local hardware store for small key rings and hex nuts for your version. Be sure to singe the satin cord knots with a very quick burn using a lighter- but be careful! Safety first!
P.S.-Click here to download the PDF that shows you each Cartier Charity partner for the Love bracelets! http://www.love.cartier.com/cartier_love_charity.pdf
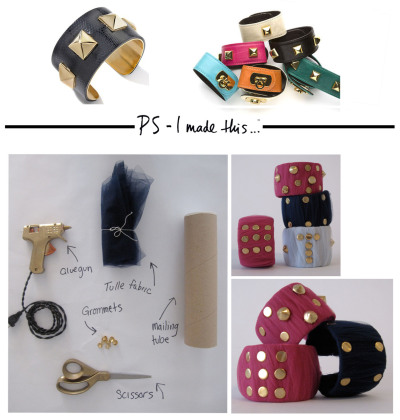
Safety is the name of the game when it comes to all things Fashion and Designer DIY. Right now delicate metallic safety pins are all I can think about. They are truly a marriage of fashion and function for all. Versace’s Verses, Vena Cava, Moschino, Marc Jacobs and Tom Binns all look to the safety pin to adorn apparel, accessories, and jewelry with an incredible embellishment.
I picked up some gold-tone safety pins at my local hardware store. Dollar Stores and Art stores carry as well. Slip several pins together, creating clusters. Pin all over the collar and attached clusters to create a bold effect around your neck. Get creative with colored safety pins and adorn other apparel and accessories!
P.S.- Pin it to win it!
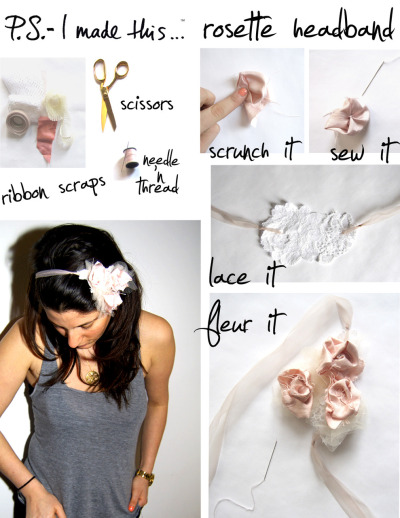
Confession: I’ve recently fallen madly in love. Who’s my new lover you ask? Ohhhh, It’s Chanel’s Spring Couture collection. My eyes were locked on these delicate tulle and lace frocks that were topped off with sweet and chic headpieces that made my heart go pitter-patter! Between Uncle Karl’s new collection, Victor & Rolf, and Marchesa’s delicate drama, massive amounts of tulle and rosette details make me do pirouettes and pas de bourrée like a Prima Ballerina!
This Valentine’s Day, fall in love a little harder with a headpiece. All you need for this whimsy accessory is some scrap fabric, ribbon and a needle ‘n thread.
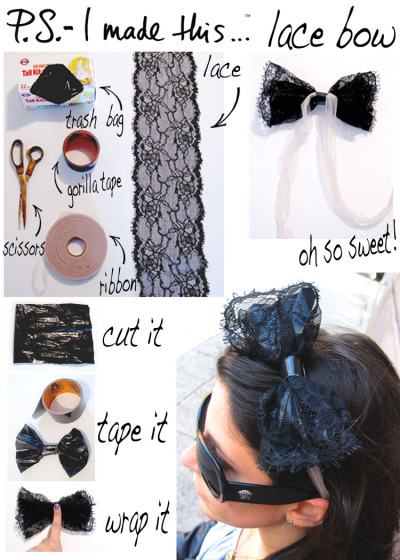
Every little girl at one point in her life went through the BIG bow phase, me included! If you’ve taken notice of the catwalks or scanned the fashion magazines you will see that bows are back in a BIG way! Our style stars have been spotted adorning all sorts of delicate and whimsical, over-sized head wear all over the place. From the Louis Vuitton bunny/bow ears to Marc Jacobs, Milly, and Sportmax runways, this trend is full on and taking over- you should too!
To make your beautiful bow, cut a trash bag (4”x6” approx.), gather it, tape it, wrap it in pretty french lace (or another fabric of your choice), add a ribbon and tape again. I love Gorilla Tape- its super strong and its shiny black finish looks just like leather- Trust! Available at most hardware stores.
Take a bow… you made a BIG bow
I picked up some gold-tone safety pins at my local hardware store. Dollar Stores and Art stores carry as well. Slip several pins together, creating clusters. Pin all over the collar and attached clusters to create a bold effect around your neck. Get creative with colored safety pins and adorn other apparel and accessories!
P.S.- Pin it to win it!
This Valentine’s Day, fall in love a little harder with a headpiece. All you need for this whimsy accessory is some scrap fabric, ribbon and a needle ‘n thread.
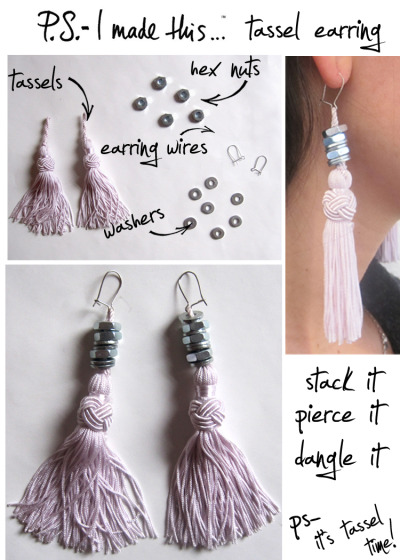
Fringe benefits for all! The wispy and free-flowing details are frequently favored, seen on apparel and accessories as well as luxe interiors. Made from tightly bunched strands of string, tassels are most commonly used to add decorative touches. The eye pleasing and finger feel-good fringe, is available at your local trimming, interior store.
I picked up a lovely pair of light lavender (the go-to color at this years Golden Globe awards), and popped by the hardware store for some mini hex nuts and washers. Stack a few onto the tassels, topping it off with an edge. Slip on your earring wires and you have a a little drama to dangle on…
Follow your heart and fall into fringe!
To make your beautiful bow, cut a trash bag (4”x6” approx.), gather it, tape it, wrap it in pretty french lace (or another fabric of your choice), add a ribbon and tape again. I love Gorilla Tape- its super strong and its shiny black finish looks just like leather- Trust! Available at most hardware stores.
Take a bow… you made a BIG bow
Classic country clubbers sport Ralph Lauren’s designs. Edgy and elegant show horses gush for D&G over-sized ribbon pins. Anyway you sway, there’s a designer that is sure to tailor this sensible and seemingly chic genre for you.
Make you own first prize equestrian pin by using a few dazzling gems, buttons, or even broken bits you may have laying around. Glue onto a cupcake paper and add some wide ribbon for the final touch! Pin to handbags, blazers, anywhere!
PS- Stallion not included
   |
| Oct 08 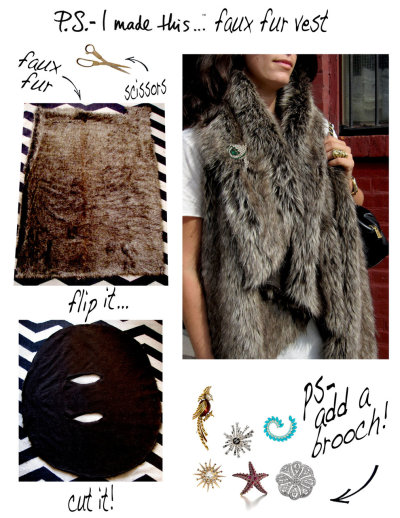 Fur-get about authentic pelts! Fakes are Faux-real! Everyone should have a furry luxe vest in their wardrobe, no ifs ands or buts about it. With a trip to your local fabric store and your trusty scissors, you will have chic traffic-stopping outerwear in minutes!
Get approx 1-2 yards of faux fur fabric, lay out on a flat surface. Cut a large circle. Measure the width of your shoulders and make two narrow openings in the center.
Brooch it! Belt it! Bear it!
  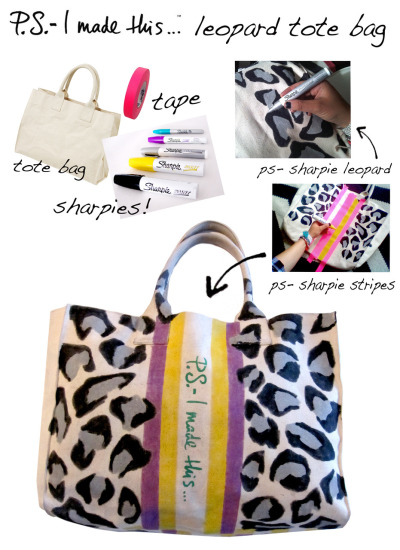 Lions and Tigers and Leopards… Oh MY! This Fall, Leopard has proven to be one of the hottest trends were following from runway to reality. With no time to spare and a desperate need for a fabulous tote bag, I rushed to Muji (one of the greatest Japanese stores) for an inexpensive bag, snagged some fun colored Sharpie paint pens, and tape. This chic design and Sharpie paint pens transformed my canvas bag into a chic personalized bag in minutes. I of course looked to Louis Vuitton and Goyard for the racing stripe inspiration!
PS- PETA would totally approve of this leopard bag!
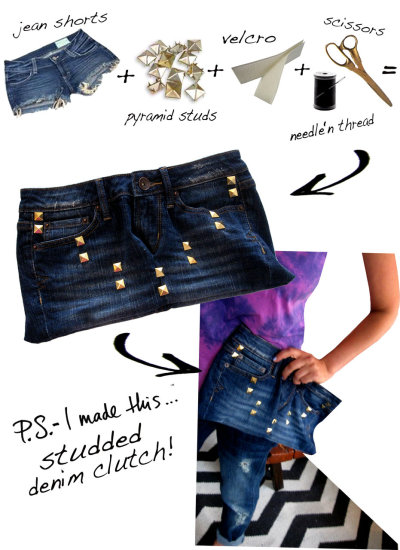 Q: Still clinching onto summer short shorts?
A: Clutch ‘em!
Turn your denim daisy dukes into a super cute clutch. Cut the bottoms off. Flip inside out. Stitch the bottom. Turn right-side up. Stick velcro along the wasit band for closure. Stud the top with metal grommets to give it an edge. Use for an evening bag, make-up case, or a chic tool bag ;)
its a denim DO for Fall!
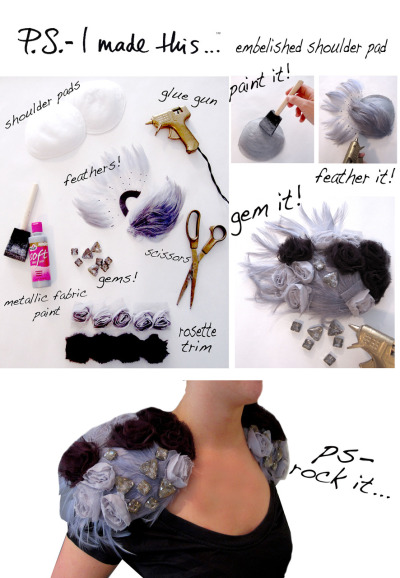
  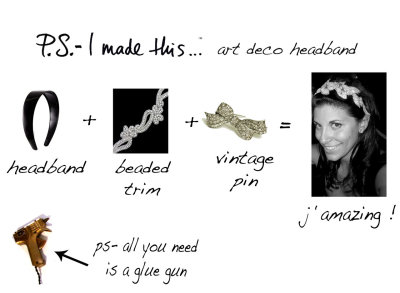 Right now I’m really into anything and everything Art Deco! Crystals, beaded accents, and silver touches with clean lines… anything goes! Here’s a fun take on a 1920’s headpiece I made for an uber fancy party I attended in NYC.
All you need is a headband, glue, some festive beaded trim (www.mjtrim.com is my go to) and a vintage or art deco inspired pin. Tadaaa!
xx
Erica
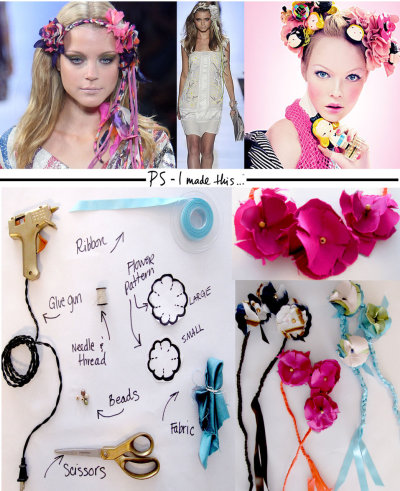 I’m borderline obsessed with these j’amazing bohemian floral headpieces. I can’t get enough of this delicious look spotted on DVF’s Spring 09 runway.
Round up some fun colored fabric, cut into Large and Small flowers (*see pattern & be sure to cut 1/2 inch slits for flowers to flutter), braid 3 pieces of satin ribbon (approx. 1 yd each), find a bead or button for the flowers center. Use tools listed above, and with a few stitches, dabs of glue, you have the essential Spring accessory!
Click here to watch me make a Floral Headpiece
http://www.teen.com/channels/fashion/index.vm?vid=rCA4796tC4_KGI2nBU30fli8XNGooJQO
Peace
 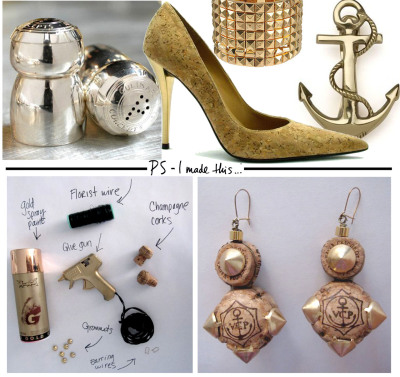 Who said you need a specific reason to celebrate? I’m all for popping a bottle of champagne, utilizing the bubbly for the function and the cork for the fashion.
I fell in love with these anchor stamped champagne corks which were left after my good friends chic baby shower. I was lucky to wind up with these nautical knobs which inspired the above pyramid stud and cork baubles.
They are light, lovely, and lil’ bit rocker….
Pop it. Drink it. Make it.
 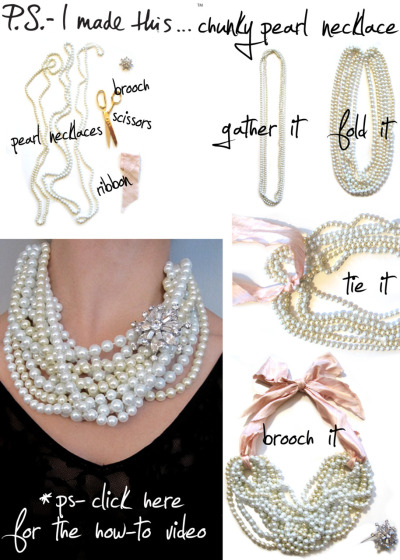 P.S.- LOVE IS IN THE AIR! Whether you heart St.Valentine’s Day or simply steer clear of it, we should always remember to love ourselves day in and day out, (Hallmark holiday aside). I will trade a box ‘o chocolates for jewelry any day of the week, and I’m sure most of you would too! Here is my DIY love life advice: Don’t wait around for your crush to come through with bijoux…. P.S.- MAKE IT YOURSELF! Follow in the footsteps of leading sweethearts Audrey Hepburn and Carrie Bradshaw, who always seemed to be doused in layers of pearls, while looking for their leading man.
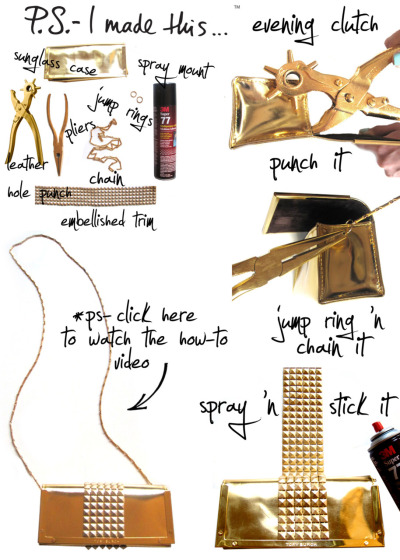
To create a stand out, chunky, pearl statement necklace just reach for 3 strands of long pearl or beaded necklaces (experiment with different colored options), wide ribbon, and a decorative brooch. CLICK HERE TO WATCH THE HOW-TO VIDEO with Fashionista.com and get ready to fall head over heels in love with this lovely neck candy! xoxo
И на последок пару слов о её новой книге

| P.S.- I made this... is a movement. It's a call to action to reimagine, reuse & reinvent. I see it. I like it. I make it.   |


Комментариев нет:
Отправить комментарий