Thanks for all your lovely feedback on my DIY side split dress. This is the tutorial a lot of you have been asking for - the side split dress with wrapped bodice. It's so incredibly easy.
The first thing to do is to make a maxi skirt using the tutorial I gave here. Create the split by only sewing the top 30cm (or so) of the long seam together. To make the bodice you will need around 2m of fabric - preferably silk, with a width of between 50cm and 1m. In this tutorial I have a crop top on (admittedly not very sexy at all) but when you make yours you won't be wearing a top of any sort underneath.
Here goes!


 It may take you a few tries to get the wrapping and gathering exactly as you like it - but just play around with it until it suits your style and your frame. Make sure you cover the top of the waistband of the skirt with the wrapped fabric for a more streamlined look - you can stitch these together if you want but I didn't bother. You can even throw a belt or sash around the waist too. How nice is the side view and the back with the twisted fabric?


 For those of you concerned about busting out of the dress, if you wrap tightly enough and stitch down properly you should be able to do a whole night of dancing without any trouble. Women in South East Asia have been wearing saris for thousands of years using techniques like this so I promise you'll be fine. Be sure to have a pair of scissors on your bedside table for when you get home - and cut the stitched thread and not the fabric.
I've made another one for the wedding I am going to but I still can't decide which to wear. I'll be adding a few little extra details on the day which I can't wait to show you. Do you know what the best thing is about this dress? Once you've finished wearing it you can unwrap the fabric and use it for something else. You can even unpick the maxi skirt and use that too! That's what I'll be doing once I have worn these dresses... Talk about recession chic.
 As I mentioned before I went away to Rome, I was recently inspired to make myself a Markus Lupfer corset style top. I have loved these tops for a while but I have been unable to part with the hundred odd quid they cost, particularly when they seemed so DIYable. Here's one of the real thing:
 What you need:
Leather (I used one leg left over from a pair of leather trousers that I had cut into shorts), some fabric to make the template of the corset from, a shirt or knit (I used an oversized grey knit that was collecting dust at home), some glue, some scalloped lace trim and a needle and thread.
Here's how to do it:
1. First I made the template for the corset from a scrap of white fabric, as I didn't want to start cutting into the leather unless I was sure about the shape of the corset. It took a few tries to sketch out the corset, holding it in front of a mirror and making sure the fit was right. It wasn't easy to get the dimensions right. I then cut the template out and double checked it on my body, making slight adjustments here and there.
2. I then laid the template over the leather and traced around it onto the leather. I made sure to line up the leg seam on the leather so that it would sit properly when the leather was cut out. The seam actually created a nice detail on the leather.
3. I cut the leather corset out.
4. I then glued the leather corset onto the knit, checking first and marking with chalk the right placement of the corset on the knit. I would recommend sewing the leather on if you have a sewing machine as that would create a more finished look.
5. After the glue had dried, I pinned and sewed the lace trim at along the bottom of the leather.
Done! Next time I will use a tee, and make the leather insert section a little bit smaller.


Recently I was inspired to attach two rows of pearls in the shape of a collar to a navy silk top I had bought in a thrift store. It worked out pretty well! Was a first try (and probably more of a prototype) and will be making a few more in the future. The collar isn't as wonky as it looks in the pics, I must have been wearing it funny!

 Wearing: DIY pearl collar top, black wool circle mini skirt from Rome, topshop flats, zara black leather satchel (its falling apart after only a few months... thanks zara!), ebay cat eye sunglasses.
This is how I made it:
You need - a silk top or tshirt, pearl beads, glue (and some ear buds and pencil/chalk).
1. Sketch the collar on the shirt using the chalk/pencil, I used a leather collar necklace I have made previously (see here for the DIY) to trace the collar pattern.
2. Once I had the collar pattern right (I tried it on a few times to see what it would look like), I glued the pearls on along the line of the sketched collar.
3. I used ear buds to put the glue on and then placed the pearls on top of the glue.
4. I went all the way around the outline of the collar, making sure they were straight and in line with the outline.
5. I did a second row of pearls inside the first row.
6. Finally I let the glue dry. Voila!
I think next time I will make the collar a little bit more petite.


3. Measure and cut the elastic to fit your waist.
4. Push the elastic through the waistband that has been made in the skirt, gathering and creating the pleat as you go. I attached the end of the elastic to a long bobby pin and used that to push it through.
5. Once all the fabric has been gathered onto the elastic, sew the elastic together to create the waistband. You can see I temporarily pinned the elastic with a safety pin before sewing it as that made it easier.
6. Sew the tube of fabric together down the short edge which will be sitting like a split all the way up the skirt.
7. Finally, hem the skirt.


(not sure which category this stone falls into. The lovely MJ of Dreaming Spires and Old Car Tyres has let me know that the stone I have is Muscovite) I dug around at the market near my house and found one that took my fancy, and then made a cool rough stone ring by gluing the rock to a silver ring base. Could.Not.Be.Easier. I used basic adhesive - I looked for some that would dry with a bit of give so there is less likelihood of it cracking and breaking. I have worn it for one day with no issue so hopefully the glue will hold.
How to:
1. Get your chosen rock, ring base and glue together.
2. Choose the flat side of the rock as the underside, and add some glue. Wait for it to dry a little so it becomes tacky.
3. Press the ring base onto the glue.
4. Add some more glue around and on top of the base of the ring so that it holds better.
5. Let it dry overnight or however long it says on the glue. Viola!
Pretty easy huh? And at the total cost of about $4 I am definitely not complaining. If you don't have a market near you, you can always buy the rocks/crystal online.


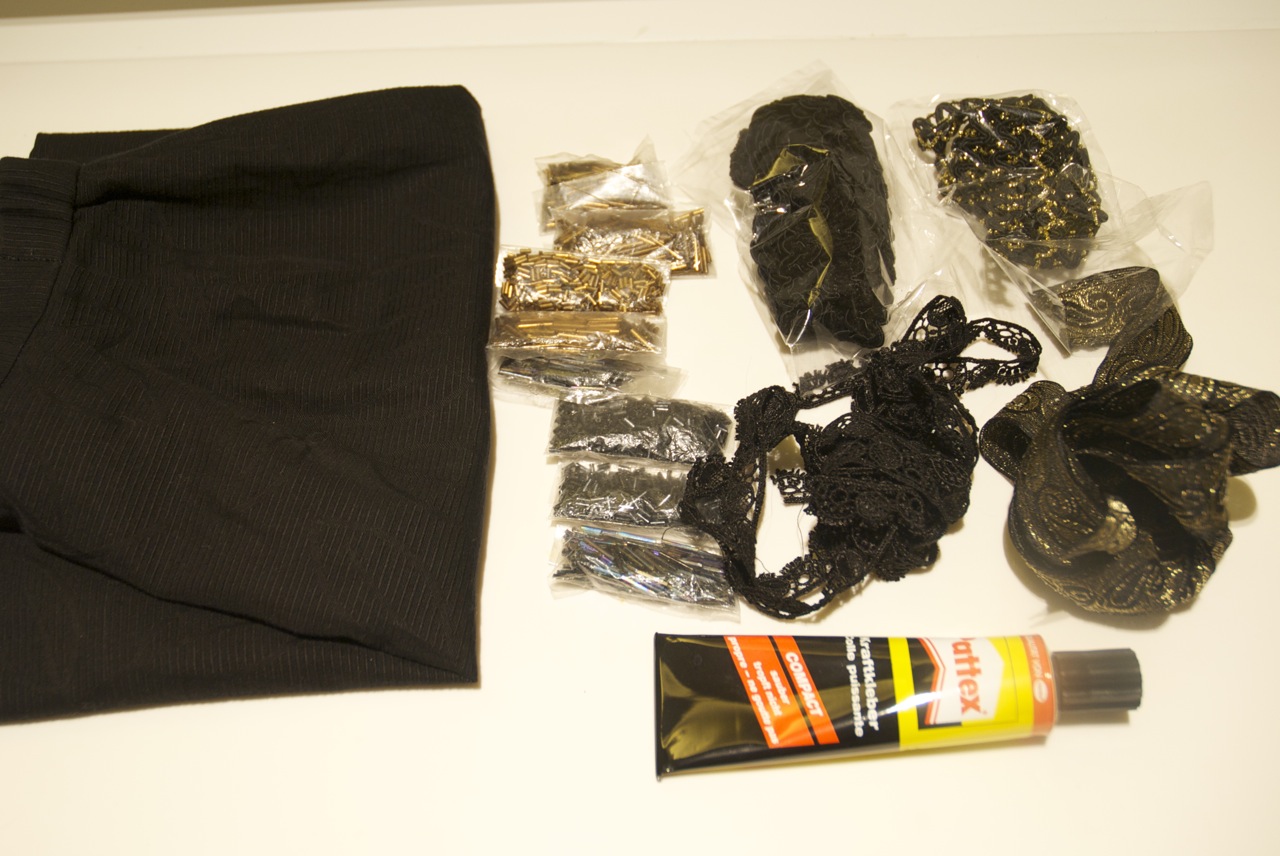
So it goes without saying that I was incredibly inspired throughout the fashion weeks to DIY just about everything I saw on the Runway. So, in collaboration with the Jenni from I Spy DIY and Erica and Lauren from Honestly...Wtf, we set about recreating our favourite AW11 looks. I completely fell in love with the shimmering horizontally textured fabrics in the Balmain AW11 collection. Who didn't? What I wouldn't do to own one of those dresses or statement jackets! Knowing that's completely out of the realms of possibility, as part of the 3 Designers 3 DIYs challenge I decided to make my own textured skirt using lace, ribbons, twisted fabric, beads and sequins.

 These skirts below were my inspiration from the Balmain Show AW11, as you can see mine turned out a bit a little bit more subtle than the Balmain version.
 The skirt was incredibly easy to make. This is how you do it:
You need: a black mini skirt (I bought a long skirt from a thrift shop and cut it off and sewed a hem), black lace, beads, ribbons, strips of black chiffon fabric, square sequins and anything else you want! The more random the better!
1. Sew or glue (I used a combination of both) the different ribbons etc onto the front of the skirt - keeping in horizontally parallel lines.
2. Sew twisted black chiffon fabric onto the front.
3. Randomly sew the sequins on the front - I put mine in the middle of the twisted fabric.
4. Do this to the back of the skirt, following the pattern on the front. Easy!
I actually did all the beading on the train on the way up and back from Shenzen, looked a bit odd I am sure but it worked out well.


The first thing to do is to make a maxi skirt using the tutorial I gave here. Create the split by only sewing the top 30cm (or so) of the long seam together. To make the bodice you will need around 2m of fabric - preferably silk, with a width of between 50cm and 1m. In this tutorial I have a crop top on (admittedly not very sexy at all) but when you make yours you won't be wearing a top of any sort underneath.
Here goes!
1. Place the strip of fabric over your shoulder.

2. Tuck one end of the fabric into the maxi skirt.

3.Twist and tighten the fabric over your shoulder, making sure to cover your breast properly.

4. Still twisting, bring the fabric around behind your back.

5. Bring the fabric across the front covering your other breast.

6. Bring the fabric around tightly behind your back again.

7. Keep wrapping tightly until you have run out of fabric. When this happens tuck the end into the wrapped fabric and stitch down.

You're done!

This is the dress without the crop top on - I have done it a bit tidier here too.


I've made another one for the wedding I am going to but I still can't decide which to wear. I'll be adding a few little extra details on the day which I can't wait to show you. Do you know what the best thing is about this dress? Once you've finished wearing it you can unwrap the fabric and use it for something else. You can even unpick the maxi skirt and use that too! That's what I'll be doing once I have worn these dresses... Talk about recession chic.
Thought I would share a little sneak peak of a DIY I did this week - a rounded leather collar necklace. Was so simple to do, I wore it last night and it was a success! Tutorial to come.


You might also like:
Monday, 1 November 2010
DIY Weekly - Markus Lupfer Inspired Leather Corset Top


Leather (I used one leg left over from a pair of leather trousers that I had cut into shorts), some fabric to make the template of the corset from, a shirt or knit (I used an oversized grey knit that was collecting dust at home), some glue, some scalloped lace trim and a needle and thread.
Here's how to do it:
1. First I made the template for the corset from a scrap of white fabric, as I didn't want to start cutting into the leather unless I was sure about the shape of the corset. It took a few tries to sketch out the corset, holding it in front of a mirror and making sure the fit was right. It wasn't easy to get the dimensions right. I then cut the template out and double checked it on my body, making slight adjustments here and there.
2. I then laid the template over the leather and traced around it onto the leather. I made sure to line up the leg seam on the leather so that it would sit properly when the leather was cut out. The seam actually created a nice detail on the leather.
3. I cut the leather corset out.
4. I then glued the leather corset onto the knit, checking first and marking with chalk the right placement of the corset on the knit. I would recommend sewing the leather on if you have a sewing machine as that would create a more finished look.
5. After the glue had dried, I pinned and sewed the lace trim at along the bottom of the leather.
Done! Next time I will use a tee, and make the leather insert section a little bit smaller.


Recently I was inspired to attach two rows of pearls in the shape of a collar to a navy silk top I had bought in a thrift store. It worked out pretty well! Was a first try (and probably more of a prototype) and will be making a few more in the future. The collar isn't as wonky as it looks in the pics, I must have been wearing it funny!


This is how I made it:
You need - a silk top or tshirt, pearl beads, glue (and some ear buds and pencil/chalk).
1. Sketch the collar on the shirt using the chalk/pencil, I used a leather collar necklace I have made previously (see here for the DIY) to trace the collar pattern.
2. Once I had the collar pattern right (I tried it on a few times to see what it would look like), I glued the pearls on along the line of the sketched collar.
3. I used ear buds to put the glue on and then placed the pearls on top of the glue.
4. I went all the way around the outline of the collar, making sure they were straight and in line with the outline.
5. I did a second row of pearls inside the first row.
6. Finally I let the glue dry. Voila!
I think next time I will make the collar a little bit more petite.


You might also like:
I recently did a second DIY using the simple maxi tutorial I used for the Jil Sander one here. I used a sheer black fabric to make this one and it turned out really nicely. You can't see how transparent it is in the photos below, but work it with a bodysuit (if you dare) or a bodycon mini skirt or lace trimmed mini shorts underneath. Alternately you can belt a slouchy knit over the top.


Here's how to make your own. You need 2m of sheer fabric, 2cm wide elastic and a needle and thread.
1. Iron and pin down the edge of one of the long sides, this is where the elastic waist band will go.
2. Sew along this edge about 3cm back from the fold (I hand sewed but you can def use a machine if you have one)3. Measure and cut the elastic to fit your waist.
4. Push the elastic through the waistband that has been made in the skirt, gathering and creating the pleat as you go. I attached the end of the elastic to a long bobby pin and used that to push it through.
5. Once all the fabric has been gathered onto the elastic, sew the elastic together to create the waistband. You can see I temporarily pinned the elastic with a safety pin before sewing it as that made it easier.
6. Sew the tube of fabric together down the short edge which will be sitting like a split all the way up the skirt.
7. Finally, hem the skirt.


You might also like:
Lately I have been attracted to rough rocks and crystals How to:
1. Get your chosen rock, ring base and glue together.
2. Choose the flat side of the rock as the underside, and add some glue. Wait for it to dry a little so it becomes tacky.
3. Press the ring base onto the glue.
4. Add some more glue around and on top of the base of the ring so that it holds better.
5. Let it dry overnight or however long it says on the glue. Viola!
Pretty easy huh? And at the total cost of about $4 I am definitely not complaining. If you don't have a market near you, you can always buy the rocks/crystal online.


So it goes without saying that I was incredibly inspired throughout the fashion weeks to DIY just about everything I saw on the Runway. So, in collaboration with the Jenni from I Spy DIY and Erica and Lauren from Honestly...Wtf, we set about recreating our favourite AW11 looks. I completely fell in love with the shimmering horizontally textured fabrics in the Balmain AW11 collection. Who didn't? What I wouldn't do to own one of those dresses or statement jackets! Knowing that's completely out of the realms of possibility, as part of the 3 Designers 3 DIYs challenge I decided to make my own textured skirt using lace, ribbons, twisted fabric, beads and sequins.


You need: a black mini skirt (I bought a long skirt from a thrift shop and cut it off and sewed a hem), black lace, beads, ribbons, strips of black chiffon fabric, square sequins and anything else you want! The more random the better!
1. Sew or glue (I used a combination of both) the different ribbons etc onto the front of the skirt - keeping in horizontally parallel lines.
2. Sew twisted black chiffon fabric onto the front.
3. Randomly sew the sequins on the front - I put mine in the middle of the twisted fabric.
4. Do this to the back of the skirt, following the pattern on the front. Easy!
I actually did all the beading on the train on the way up and back from Shenzen, looked a bit odd I am sure but it worked out well.


Комментариев нет:
Отправить комментарий