PS- It’s a heat wave, and nothing is hotter than Proenza Schouler. We look to Jack and Laz each season to get swept away in their chic world that’s full of oooooh’s and aaaaaah’s. The designing duo’s inaugural costume jewelry collection is Perfectly Stunning. In one word: J’amazing, actually. The whimsical mash-up of baroque and modern flair is a must have this season. I cannot dream up anything more magical, and my partners in crime, WHO WHAT WEAR agreed! PS- I’d be lost without PS!
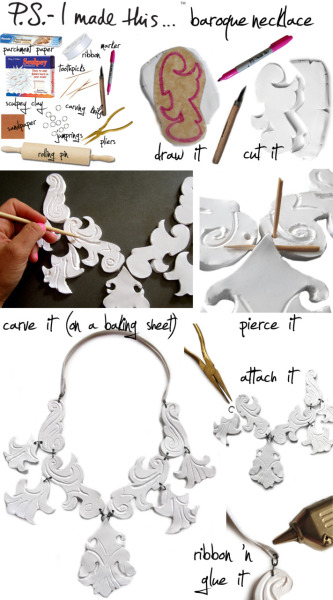
To create a baroque-styled necklace: Slice and roll out 9 pieces of clay. Each piece should be rolled out to approx. 1/4/ inches. Once rolled out, draw each pendant pattern onto parchment paper for each shape. Place pattern on top of clay, and use carving knife to trace around the pendant drawing and gently pierce through the paper, cutting the entire shape out of clay. After each piece is cut, carefully place onto a non-stick baking tray laying pieces just as the final version will look. PS- Be sure to match the pendants very close to one another in order for the jump rings to be able to connect. Use a toothpick and/or chopstick to carve detail ridges in pendants by gently pressing into the clay, making soft, curvy detailed lines. Using a toothpick, poke holes into pendants. Be sure all holes line up perfectly before baking and make sure they are big enough for the jump rings to fit through. Bake in oven at 275 degrees for 15-20 minutes. Bake time may vary depending on oven. Let cool for an hour. Use a lightweight sandpaper to smooth out outside edges, and achieve a clean, soft look on top. Use pliers and connect each pendant together with jump rings. To finish off, loop ribbon through the end jump rings and glue to finish off.
To create a baroque-styled necklace: Slice and roll out 9 pieces of clay. Each piece should be rolled out to approx. 1/4/ inches. Once rolled out, draw each pendant pattern onto parchment paper for each shape. Place pattern on top of clay, and use carving knife to trace around the pendant drawing and gently pierce through the paper, cutting the entire shape out of clay. After each piece is cut, carefully place onto a non-stick baking tray laying pieces just as the final version will look. PS- Be sure to match the pendants very close to one another in order for the jump rings to be able to connect. Use a toothpick and/or chopstick to carve detail ridges in pendants by gently pressing into the clay, making soft, curvy detailed lines. Using a toothpick, poke holes into pendants. Be sure all holes line up perfectly before baking and make sure they are big enough for the jump rings to fit through. Bake in oven at 275 degrees for 15-20 minutes. Bake time may vary depending on oven. Let cool for an hour. Use a lightweight sandpaper to smooth out outside edges, and achieve a clean, soft look on top. Use pliers and connect each pendant together with jump rings. To finish off, loop ribbon through the end jump rings and glue to finish off.
P.S.- Join the the mod squad. This season, my friends at WHO WHAT WEAR and I are massive Mondrian fans…craving classic grid patterns. YSL created iconic mod styles using the Mondrian grid, and this Fall Prada is taking note. Follow in the footsteps of Prada’s bold pattern, seen on the FW11 runways, and get inspired to create a version of your own.
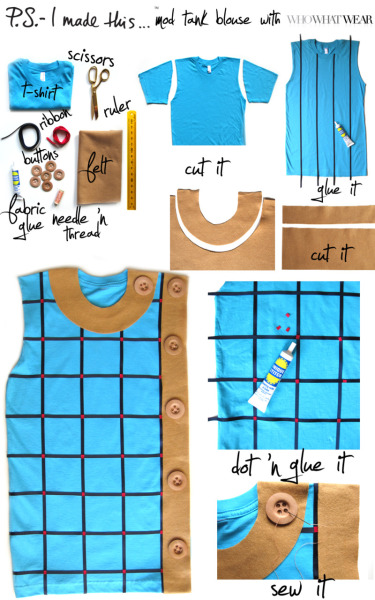
Here’s how: Cut the sleeves off of a t-shirt , at the seams (or use a tank if you already have). Measure and cut strips of navy ribbon. The length of ribbon should be one inch longer than the shirt on each side. Leaving extra ribbon is always best, you can always trim the excess. Use a ruler to measure equal distance between each “line” (will vary depending on your size shirt). Apply small amount of fabric glue to the back of the ribbon and place vertically, dabbing with your fingers to set. Cut shorter strips to cross horizontally, again making sure the ribbon is evenly spaced to create your grid pattern. Cut small squares of raspberry red colored ribbon. *P.S.- DIY tip! Use clear nail polish to keep the ends from fraying! Glue squares on the intersections of the navy ribbon grid.
For the collar and button detail, first create a paper collar template. Measure with a ruler and create a collar that is about 2 inches wide (depending on size of your shirt). Use the guide you made to cut out the felt. Cut a straight strip the same width as the collar and the same length as your shirt - to create the side panel. Glue both collar and strip of felt onto shirt using a moderate amount of glue, setting with your hands, and letting dry for approx. 10-15 minutes before sewing on buttons. Sew buttons onto collar and along the felt strip. Lastly, trim any long pieces of ribbon and/or felt that are hanging off the edges- and you are ready to join the Prada parade!
Комментариев нет:
Отправить комментарий