 Featured: Salvatore Ferragamo
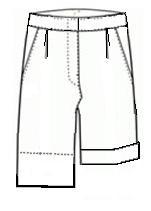
All the spring/summer collections had them on the runway: Tommy Hilfiger, Marc Jacobs, Victoria’s Secret, Diane Von Furstenberg, Chloe, Salvatore Ferragamo,D & G. All showed cuffed shorts in a variety of colours and patterns, lengths, and silhouettes. Design a pair for yourself with this easy pattern-draft.
You with need:
- 1 pant zipper, 6” [15 cm] long
- 2 sets of pant hook & bar, ¾” [20mm] dia.
- approx. 1 ½ yds. [1.4 m] of bottom-weight fashion fabric, 45”[114 cm] wide *
- ½ yd. [0.5 m] of pocketing fabric, 45”[114 cm] wide
- ¼ yd. [0.3 m] of fusible interfacing, 45” [114 cm] wide
- coordinating thread
- kraft paper
* yardage required is dependent upon finished length.
MEASUREMENTS
Waist – measure around narrowest part of torso, just above the navel.
Hip – measure around fullest part of seat, about 8” [20 cm] below waistline.
Rise – measure vertically from waistline to top of chair while seated
Outseam – measure vertically from waist to finished hemline.
For example, on the featured model by Salvatore Ferragamo, the rise = 10″ and the outseam = 14″.
PATTERN
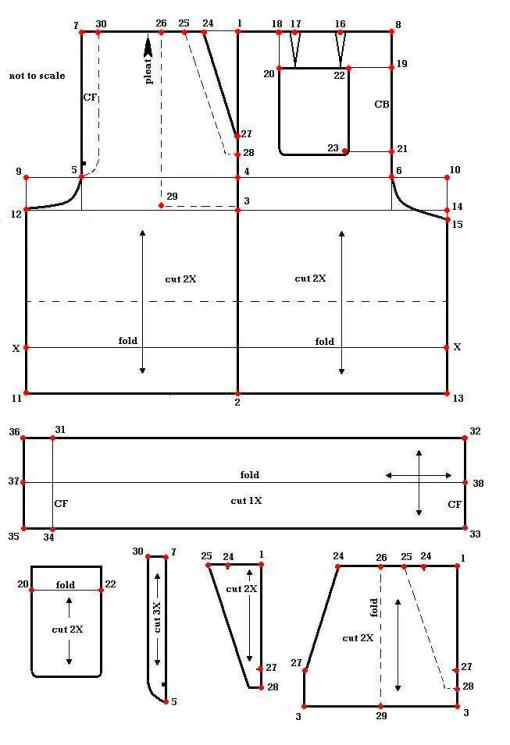
Draw a straight line across top of kraft paper. Label point 1 as shown.
2 from 1 = outseam + 7” [180 mm] less waistband (- 3″/75 mm).
3 from 1 = rise measurement minus 3” [75 mm].
4 from 1 = 5” [127 mm].
Square out across paper from all points.
5 from 4 = quarter of the hip measurement + 1″ [25 mm].
6 from 4 = quarter of the hip measurement + 1″ 25 mm].
Square up from 5 and 6 to locate 7 and 8 at the intersection of lines.
9 from 5 = 3 ½” [90 mm].
10 from 6 = 5” [125 mm].
Square down from 9 to locate 11 and 12 at the intersection of lines.
Draw a deep curve connecting 5 to 12, as shown.
Square down from 10 to locate 13 and 14 at the intersection of lines.
15 from 14 = ¾” [20 mm].
Draw a gentle curve from 6 to 15, as shown.
Divide the distance between 1 and 8 into 3 equal parts. Label points 16 and 17.
Draw waist darts at 16 and 17; make each dart = 1” wide X 4” long [25 mm X 11 mm].
18 from 1 = 2 ⅜” [60 mm].
19 from 8 = 2 ⅜” [60 mm].
Square down from 18 and square across from 19 to locate 20.
21 from 19 = 5” [127 mm].
22 from 20 = 5” [127 mm].
Square down from 20 and 22 to locate 23 at the intersection.
Draw a patch pocket and curve the bottom corners (23).
24 from 1 = 2″ [50mm].
25 from 24 = 1” [25 mm].
26 from 25 = 2 ⅜” [60mm].
27 from 1 = 5 ½” [140 mm].
28 from 27 = 1” [25 mm].
Draw a straight line parallel to line 24-27 from 25 to 28.
Square down from 26 to locate 29 just above the crotchline (3).
30 from 7 = 2” [50 mm].
X is located 4” [100 mm] from 11 and 13.
The grainline is parallel to line 1-2.
Waistband
Draw a straight line.
32 from 31 = waist measurement.
33 from 32 = 6” [152 mm].
Squaring 34 from 31 = 6” [152 mm].
35 from 34 = 2” [50 mm].
36 from 31 = 2” [50 mm].
37 = ½ of line 35-36.
38 = ½ of line 32-33.
Join 37 and 38 with a straight line (foldline).
Grainline can be width or length-wise in direction.
Pocket Bag
Trace off from front leg points 1-27-28-3-29-26-25-24-1 onto additional paper.
Trace off from front leg points 24-27-28-3-29-25-24 onto additional paper.
Flip one of the tracings and glue to the other along line 26-29.
Grainline is parallel to line 26-29 (foldline).
Pocket Facing
Trace off from front leg points 1-27-28-25-24-1.
Grainline is parallel to line 1-28.
Patch Pocket
Trace off pocket from back leg.
Add a 1” [25 mm] turning above line 20-22 for opening.
Grainline is parallel to line 22-23.
Fly & Fly Facing
Trace off CF seam of front leg points 5-7-30.
Draw a parallel line 2” [50 mm] to the CF line from point 30.
Shape the bottom to taper the facing, as shown.
Grainline is parallel to CF line (5-7).
* Add seam allowance to all pattern pieces.
CUTTING
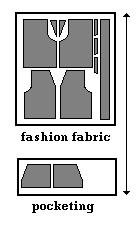 Front – cut 2X self
Back – cut 2X self
Patch Pocket – cut 2X self
Waistband – cut 1X self
Pocket Facing – cut 2X self
Pocket Bag – cut 2X pocketing
Fly & Fly Facing – cut 3X self
Waistband Interfacing – cut 1X fusible
ASSEMBLY
1. Iron fusible interfacing onto back (wrong side) of waistband piece following manufacturer’s directions. Fuse a narrow strip (1”) of interfacing across top of each patch pocket. Set aside.
3. Lay the pocket bag piece FACE DOWN and place the pocket facing FACE UP in the upper square corner. Sew the pocket facing in place with a narrow zig-zag stitch. Repeat for opposite pocket.
4. Align and match slanted edge of pocket bag to front leg of shorts with RIGHT SIDES facing together. Sew slanted edge. Clip along seam allowance and turn pocketing to WRONG SIDE. Press seam and topstitch. Repeat for opposite front leg.
 5. Stitch a French seam along bottom edge of pocket bag. Begin by folding bottom of pocket bag in half with WRONG SIDES facing together. Stitch half the width of the seam allowance. Trim seam allowance close to stitching line. Turn bag RIGHT SIDE OUT and press seam. Stitch remainder of seam allowance. Baste side of pocket bag to side seam of shorts. Repeat on other pocket bag.
6. With RST, sew curved edge of fly facing. Grade seam allowance and turn RIGHT SIDE OUT. Press seam and topstitch. With the fly facing FACE UP and the curved edge to your left, stitch the zipper FACE UP to the straight edge of the fly facing. Set aside.
 7. With RST, sew fly to right front leg. Grade seam allowance and press seam to one side. Under-stitch fly.
8. With RST, align and match front pieces along CF line and crotch. Stitch from bottom of fly to within 2” of the inseam.
9. With the fronts FACE UP, sew the fly facing FACE DOWN to the left front leg. (A) This will encase the zipper into the CF seam. Flip the zipper FACE UP and edge-stitch along the zipper teeth.
10. Lay the front of the shorts FACE UP. Align the CF line and smooth out the fly opening. Baste the fly opening shut. Once completed, fold the fronts in half with the left front leg on top. Pin back the fly facing to reveal the zipper FACE DOWN on the fly. Stitch the zipper tape to the fly. (B) Baste curved edge of fly to left front. Set aside.
11. On back section, sew up waist shaping darts.
12. Turn under 1” [25mm] of top edge of patch pockets and stitch down in place. Turn under and press seam allowance on perimeter of pockets.
13. Place patch pockets FACE UP on center of back pieces and align over darting 2” [50mm] from the top edge. Topstitch in place.
14. With RST, align and match back and front at the side seams. Baste/pin raw edges together along the outseam. Sew sides, ensuring to catch pocket bag in the seaming.Grade seam allowance and press seam towards the back section. With garment FACE UP, edge-stitch along the sideseam on the back section.
15. With RST, align and match back and front at the inseam. Baste/pin raw edges together along the inseam of each leg. Sew inseams and press seam open.
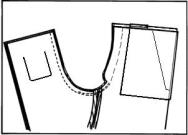 16. Pull one leg RIGHT SIDE OUT and drop down into other leg. Align and match up inner leg seam andCB seam. Baste/pin crotch seam. Sew seam from bottom of fly to top edge of back section (in a U-shape). Turn garment RIGHT SIDE OUT and set aside.
17. Turn under seam allowance on one long edge of waistband and press flat. Fold waistband in half , with RST and stitch up short ends, allowing for seam allowance. Trim corners and grade. Turn waistband RIGHT SIDE OUT.
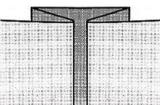 18. Pin raw edge of waistband FACE UP to inside edge of garment’s waistline, allowing for 2” [50mm] extension on left-hand side of waistband. Ease in waistline onto waistband. Fold a decorative pleat on front legs approximately 2” [50mm] from pocket opening to take up excess fabric in the shorts. (For an easier fit, allow 1 – 2inches of ease in total on the body of the shorts.) Baste across top of pocket bag and pleat. Stitch waistband to waistline, ensuring to catch top of front pocket in the seaming. Grade seam allowance and turn up into waistband. Align and match folded edge of waistband to machine-stitching on FACE SIDE of garment. Edge-stitch the waistband to the garment.
 19. With garment FACE UP, sew a J-stitch to secure the fly. Begin with a bar-tack at the bottom of the fly opening and topstitch the J-stitch following the basting thread markings up to the top, stitching through the waistband.
20. On each cuff bottom, turn up a 4” [100 mm] hem. Stitch down in place.
21. Fold up 3” [75mm] to create a cuff. Align the cuff at the inseam and outseam; and secure the cuff by the “stitch-in-the-ditch” method.
22. Hand-stitch sets of hooks and bars onto the waistband, in tandem just above the zipper.
Design Tip: Add belt loops to waistband to allow for your favourite belt.
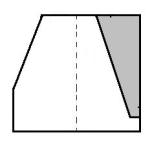 2. Finish seams on all cut pieces with
Комментариев нет:
Отправить комментарий