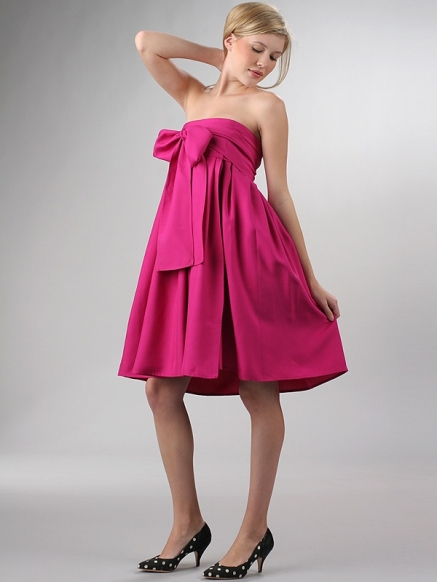
 Here’s a clever little idea…convertible clothing. This dress works double duty as a skirt. It’s ideal for weekend wear or travel wear. It’s functional and versatile at the same time.
Basically the concept is a wrap-around garment so it is adaptable to many shapes and sizes. The body proportion that needs to be considered is no more than a 7-8 inchdifference between bust and waist measurements. Other than that ratio, it is quite flexible for most body shapes. The look is versatile as well. Through different fabrications it can be anything from a casual wrap by the pool to a sophisticated little black dress for a cocktail reception.
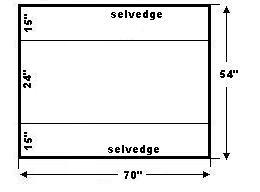
No pattern is needed to construct it. It is a simple block layout. You need a solid colour woven fabric width of 54-60″ wide. (see cutting diagram). Small to medium sizes = 2 yds. in length and medium to large sizes = 2 ½ yds. in length. The grainline is crossgrain so this cut is not ideal for prints unless they are railroaded or abstract in direction.
- Cut 2 panels along each selvedge edge 15″ wide for wrap ties
- Remaining fabric panel is wrap skirt portion.

Assembly:
On the large skirt portion, fold in a ½” turn on each short edge to the wrong side of the fabric.
Then turn each folded edge in ½” again. Press.Topstitch to finish.
Along one of the long edges, create a rolled hem by turning ½”, then 1″. Slipstitch or machine stitch in place. Lightly steam the foldline of the hem.
Next, fold the skirt portion in half and align and match the finished edges. Mark the fold on the long raw edge. This is the center of the garment.
From the finished edges along the long raw edge, measure 6″ and mark this location point. Set aside.
Now, take the two tie portions and align them, right sides together, along one short edge. Pin and baste along seam using a ½” seam allowance.
Measure and chalk 1 ½” from each end of the seam. Then measure and chalk 4″ from each of the chalk marks. This will be an open slit when completed.
Machine stitch the seam, leaving the 4″ distances unsewn. Remove basting. Press seam open flat.
Divide the bust measurement by 4. (eg. for size 10 = 34″ divided by 4 is 8 ½”).
From the seam (wrong side face up), measure and chalk ¼ the bust mmt. to the left of the seam and ¾ the bust mmt. to the right of the seam.
Fold the tie portion, matching up the 2 chalk marks and mark the foldline. This is the center of the garment.
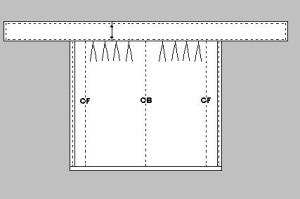
Now, with right sides together, align and match the center marks of the tie and skirt portions. Pin together. Align each 6″ chalk point of the skirt portion to the bust mmt. chalk mark on each end of the tie portion. Pin together.
To control the excess fabric on the skirt portion, make 4 pleats equally spaced on both sides of center and pin and baste to tie portion. You will have 8 pleats in total. Ideally all pleats should fold towards center.
Machine stitch seam using ½’ seam allowance. Remove basting. Press seam open then press all seam allowances upward to tie.
Fold tie portion, with right side together, in half width-wise. Align and match raw edges on each tie end. From finished front edges, pin and baste long ties and short ends. Machine stitch using ½” seam allowances. Remove basting. Press seam open. Gradecorners.
Turn tie ends right side out and turn in remaining raw edge by ½”. Place folded edge on top of pleating aligning to machine stitching. Pin and baste to encase raw edges. Press a sharp knife edge along the perimeter.
Edge-stitch by machine along the tie portion edge to finished. Align small 4″ opening and slipstitch together to complete garment.
To wear: Wrap garment around bust or waist, slipping the tie end closest to body through the 4″ opening. Continue to wrap tie end around the body and tie together with a bow to the other tie end.


Комментариев нет:
Отправить комментарий