Featured: Layered 3-tier skirt by ASOS
A three tiered/layered skirt that is flirty and so sexy.
You will need:
- 2 yds of Fashion fabric, 45″ wide
- 1/4 yds. of Fusible interfacing, 45″ wide
- 1 closed skirt zipper, 5″ long
- 2 sets of hook & eyes, size 0
- Coordinating thread
- Kraft paper
- String
- Push pin
- Tracing wheel
- Tape measure
PATTERN
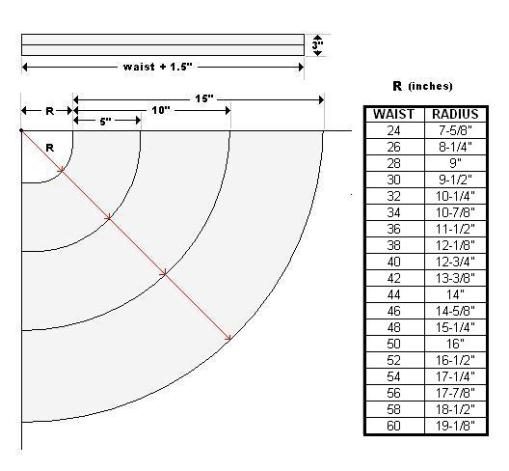
Measure your waist and use R from chart to draw an arc from intersecting right angle. (90°)
For each tier, add 5 inch intervals to R. eg. R + 5″; R + 10″; R + 15″
To create the arc, use string and pencil as a compass and measure the string length equal to the tier lengths above. Attach string to push pin anchored at intersection (●). Holding string taut, draw arc from horizontal line to vertical line. Repeat with new lengths for each tier.
Trace off each layer separately on paper and add ½” hem and seam allowances.
For waistband, measure a line equal to your waist plus 1 ½”. Draw a parallel line 3″ next to it and join the ends of both lines. Add ½” seam allowance to perimeter.
Grainlines are parallel to horizontal lines of draft on all pieces.
CUTTING
Cut each tier 2x self in fashion fabric. *
Cut waistband 1X self in fashion fabric.
Cut waist interfacing 1X fusible in Pellon®
ASSEMBLY
- Iron fusible interfacing to wrong side of waistband piece, following manufacturer’s directions.
- Turn under ½” along one long edge and press.
- Stay-stitch waistline on each tier piece from side seam to center. Neaten raw edges of side seams with a seam finish.
- Layer tiers in pairs with right sides together. Pin/baste side seams, leaving 5 ½” open at waist on left-hand side. Sew seams and press open.
- On each tier, hem bottom with a ¼” double rolled hem. Press.
- Layer tiers one on top of one another (right sides out) and match up waistline and side seams. Baste together.
- Apply zipper on left-hand side, from waistline to bottom of top tier, using center slot application.
- With right side of waistband to wrong side of skirt, pin waistband piece to skirt’s waistline, extending waistband 1 ½” beyond zipper on back portion. Also allow for ½” seam allowance on each end of waistband piece. Baste waistband in place following stay-stitching. Sew waist seam.
- Press under seam allowances on each end of waistband and fold waistband in half, aligning pressed edge with machine stitching. Pin/baste. Edge-stitch around perimeter of waistband.
- Handstitch hook and eye sets to extension of waistband.
* If you wish a crinoline for this skirt (like that one featured on the model), use the third layer pattern piece and cut it 1-inch longer. Cut 2X in netting. Join side seams using a French seam technique and leave 5″ slit opening on left-hand side at waist. Overcast or bind waistline of crinoline. Sew a narrow “india” tape to the waist and leave 12-15 inches “loose” ties on either side of the slit opening.


Комментариев нет:
Отправить комментарий