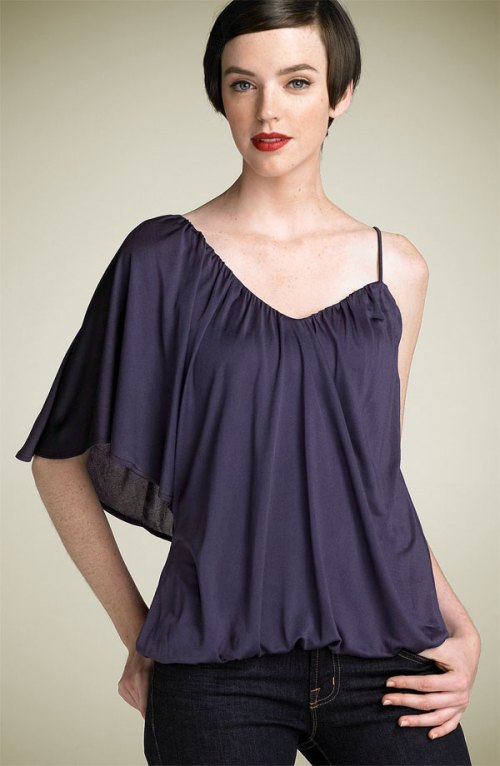
 Featured: Ella Moss Red Label ‘Simone’ Top
Here’s an easy-to-draft casual fun style with a spirited “young in attitude” feel by Ella Moss. A silky knit blouson top designed with a fitted under-layer, topped with a second draped layer, featuring a single flutter sleeve offset by a thin spaghetti strap.
You will need:
- Approx. 2 yds. of jersey knit, 54″ wide **
- Approx. 1 yd. of 2-way stretch spandex, 45″ wide
- Coordinating thread
- Approx. 1 yd. of cable cord, 1/8″ thickness
- Kraft paper
MEASUREMENTS
Bust – measure just under arms around fullest part of chest.
Back waist length – measure from nape of neck to waist.
Bust height – measure from top of shoulder to apex of breast.
Apex Distance – measure distance between apexes of breasts.
Armscye Depth – measure from top of shoulder to underarm level.
Elbow Length – measure arm from neck, along shoulder to elbow.
PATTERN
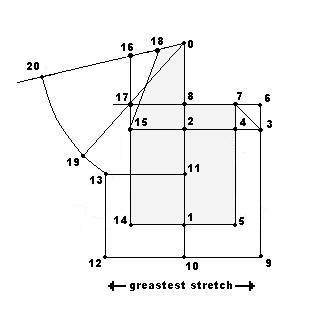
Draw a straight line along the foldline of the paper.
Plot a point and label, 0.
0-1 = back waist length + 1″; square across
0-2 = bust height + 1″; square across
2-3 = ¼ of bust measurement
2-4 = ½ of apex distance + ½”; square down to locate 5on line 1.
3-6 = 3-4; square across to locate 7 and 8.
Join 3 and 7 with a straight line.
3-9 = distance from 4 to 5 plus 4″; square across to locate 10.
11 is located midway between 1 and 2; square across.
10-12 = 9-10; square up to locate 13 at intersection of line from 11.
1-14 = 1-5
2-15 = 2-4; square up.
15-16 = armhole depth + 1″. Draw a tangent line from 0 through point 16.
17 is located at intersection of 8 and 15. Draw a tangent line from 0 through point 17.
18 is located midway between 0 and 16.
Join 15 to 18 with a straight line.
The fitted under-layer consists of 0-8-7-5-14-15-18-0. Trace.
0-19 = elbow length
0-20 = elbow length
Join 20 to 13 passing through 19 with a smooth curve.
The draped overlay consists of 0-8-6-9-12-13-20-0. Trace.
NOTE: Add ¼” seam allowances to perimeter of all pattern pieces.
** Please be aware that all stretch fabrics have different elasticity and will affect the design ease in the pattern draft based upon whatever you chose.
CUTTING
Cut all pattern pieces with greatest amount of stretch across the width of each piece.
Overlay – cut 2X in jersey knit fabric.
Underlay – cut 2X in spandex tricot fabric.
An 18″ strip of jersey fabric ½” wide for spaghetti strap.
ASSEMBLY
- Find mid-point of cable cord and place it on fabric strip with right side face up.
- Stitch across mid-point to attach cording to strip end.
- Wrap fabric strip around the cording with right sides together (RST). Using a zipper foot, stitch long edge of fabric close to the cording. Trim the seam allowance.
- Pull the fabric tubing down over the uncovered end of the cable cord, easing gently as it slips over the cording. You will have 18″ of thin spaghetti strapping. Cut off excess cable cord.
- With RST, layer the underlay pieces and match up seams. Pin/baste the side seams from 4 to 5 and from 14 to 15. Stitch seams.
- Match up shoulder seam and pin/baste from 0 to 18. Stitch seam.
- Sew a narrow double-rolled edge to finish the armhole. Set aside.
- With RST, layer the overlay pieces and match up seams. Pin/ baste the shoulder and sleeve together. Stitch seam and press open.
- With RST, match up the side seams and pin/baste from 3 to 9 and 12 to 13. Stitch seams and press open.
- With RST, match neckline of underlay to overlay. Match up points 7, 8, and 0. Stitch neckline. Clip seam allowance at 8 to release stress.
- Attach one end of spaghetti strap at point 7 between the two layers on the front.
- Pin/baste 3 to 4 and 7 to 7. Stitch left armhole seam.
- At hemlines of each layer, divide into 4 equal portions. With RST, match up each point and pin together. On overlay, gather hem edge to the under-layer between the pins. Pin/baste layers together. Stitch seam while slightly stretching the fabric to ease. Turn right side out through right sleeve opening.
- Put on top by slipping it on over the head. Place spaghetti strap over shoulder and align end with point 7 on back. Tack in place neatly.
- Stitch a narrow double-rolled hem edge on opening of flutter sleeve.
Addendum (as of August 2010)
It has come to my attention that the ease is too little for the drape of this garment. I am certain that you know that the pattern pieces are cut twice with the greatest amount of stretch going in the direction of the girth (ie. across the fabric rather than up & down with its length) as the cutting direction have clearly been given.
Please be aware that all stretch fabrics have different elasticity and will affect the design ease in the pattern draft based upon whatever you chose. It is very well possible that the elasticity of your fabric is not the same as the sample given. Therefore I will try to explain the concept of ease as it pertains to knits and stretch fabrics. I hope this will help you to get a better fit to your pattern draft.
DESIGNER EASE
Very easy-fitting garments can be cut from simple basic patterndraft when a designer wants to create styles that are loosely fitted or even oversized. This can be done by adding ease to create volume in the styling rather than grading up to the next size. Note that when dealing with basic body measurements, substantial extra ease must be added for movement and comfortable fit. The sizing remains the same, since the neckline and wrists have not changed in dimensions.
EASE CHART
Use this chart to determine the amount for additional ease for movement and styling.
| Total Body Ease | Quarter Body Increase | Shoulder Increase | Underarm Increase |
| 1” | ¼” | ⅛” | ⅛” |
| 2” | ½” | ¼” | ¼” |
| 3” | ¾” | ⅜” | ⅜” |
| 4” | 1” | ½” | ½” |
| 5” | 1 ¼” | ⅝” | ⅝” |
| 6” | 1 ½” | ¾” | ¾” |
| 7” | 1 ¾” | ⅞” | ⅞” |
| 8” | 2” | 1” | 1” |
| 9” | 2 ¼” | 1 ⅛” | 1 ⅛” |
| 10” | 2 ½” | 1 ¼” | 1 ¼” |
| 11” | 2 ¾” | 1 ⅜” | 1 ⅜” |
| 12” | 3” | 1 ½” | 1 ½” |
| 13” | 3 ¼” | 1 ⅝” | 1 ⅝” |
| 14” | 3 ½” | 1 ¾” | 1 ¾” |
For styling purposes, a designer may require garments to be loose-fitting, or much larger than regular styled garments. Understand that your garments may be created as large as you wish but the sizing does not change, because the styling is worn simply larger, looser, and baggier. To create additional volume without changing the fit, add designer ease instead of grading the pattern.
ADDING EASE INTO A PATTERNDRAFT (Blouson Top)
Use a straight waist (no dart suppression) on your chosen pattern as it does not make sense to make a loose-fitting “fitted” waistline on the garment.
- Draw a vertical line through the shoulder area to the hem and then the underarm area to the hem, dividing the quartered body ease equally.
- Next, draw a line horizontally through the armhole, the same amount that the shoulder is increased. Slash and spread the pattern to increase the fit. Blend the new lines together.
- Slash and spread the sleeve pattern to correspond to the body pattern. Only the widths of the body and sleeve have changed, not the garment size; the neckline and wrists remain the same.
Remember to keep the spread parallel with the centerline and the waistline (90° angle) to stay on straight grain with the grainline of your pattern.
Example of a pattern with 6 inches of additional ease.


Комментариев нет:
Отправить комментарий