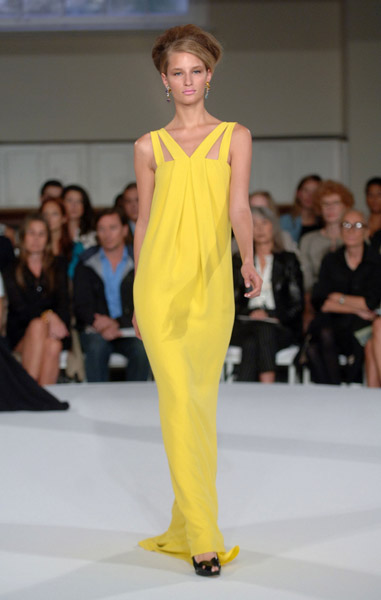
 Featured: Column evening gown by Oscar de la Renta
Effortlessness and the flow of luxurious fabrics were cited as the most important elements of this autumn/winter 2008-9 shows. The theme continuing on the shoulders and defining the silhouette at the hips, while the simple eveningwear dresses were long, figure-hugging and draped sensually over the body.
Simple textures and technically brilliant structures, like the gown by Oscar de la Renta,make this a simple and yes, “patternless” couture project.
COLUMN GOWN
You will need:
- approx. 2 yds. of fashion fabric, 45″ to 54″ wide
- approx. ½ yd. of fusible interfacing, 22″ wide
- Coordinating thread
- 1 closed dress zipper, 18″ long
- ¼ yd. of elastic, ½” wide
- 1 – Hook & eye set
MEASUREMENTS
Finished Length – Measure from under arm to floor.
Gown Width – Measure the fullest part of your body – eg. bustline or hipline.
PATTERN
CUTTING
Cut 4 strips of fabric 2 inches wide.
Cut 4 strips of fabric 3 inches wide tapering to 2 inches wide.
Cut 1 rectangle of fabric 8 inches wide by circumference of tube once pleated.
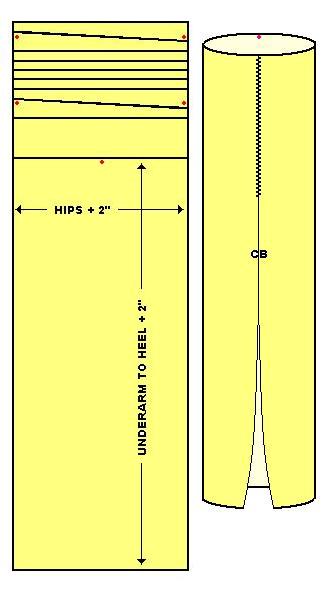
Cut 1 rectangle of fabric equal to the finished length plus 2 inches by the gown width plus 3 inches.
ASSEMBLY
- Set the fabric strips in pairs. For each pair, interface 1 strip following the manufacturer’s direction for fusing.
- With right sides together (RST), pin/baste the long edges of each pair together. Stitch.
- Turn right side out and press flat. Edge-stitch along the finished seams. Set aside.
- Fold the large rectangle in half lengthwise with RST. From the top, leave 18 ½” open for the zipper. From the bottom, leave 19″ open for a slit. Pin/baste the remain edges together and stitch using ½” seam allowance. Press the entire seam open.
- Align the zipper along the top opening and insert using the center slot method.
- For the open slit, fold under ¼” of the seam allowance and topstitch or slipstitchthe slit opening.
 Turn the “column” right side out and try gown on. Take the excess fabric above the bustline and pleat 2 box pleats, one on either side of the centerfront (red dot). Pin/baste pleats down. (see diagram)
- Remove gown and measure the finished circumference of the gown, beginning and ending at the zipper. Add 1″ for seam allowance. Record this measurement.
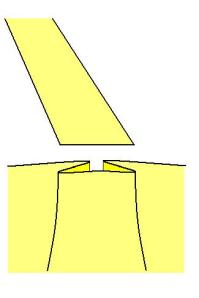
- Match the 2 tapered straps to the 2 pleats on the front of the gown (red dots) and align the raw edges. Pin/baste in position. Next, pin/baste the narrow straps 2″ away from the tapered straps. Align the raw edges and pin/baste in position.
- Try on gown. Drape straps over the shoulder and pin/baste other end of each strap to back of gown. Adjust the lengths of the straps and cut off excess. At top of shoulder, fell or tack the tapered strap to the narrow strap with handstitching so they are side-by-side.
- For the facing, use the smaller rectangle and adjust the width to equally the finished circumference dimension of the top of the gown plus 1″ for seam allowance.
- On the bottom of the rectangle, turn under ¼”, then turn under 5/8″. Press turning.
- Fold the short ends of the rectangle to its center. Mark the 2 foldlines with chalk. Open the rectangle flat, wrong side up.
- Pin the ends of the elastic to where the foldline marks are located. Stitch across the ends of the elastic.
- Stitch the 5/8 turning along the bottom to encase the elastic. (Stretch elastic as you sew).
- With RST, match up the raw edges of the facing piece (the side without the elastic casing) and the top of the gown, sandwiching the strap ends between the layers and allowing ½” seam allowance extended beyond the zipper for the facing piece. Pin/baste the top edge of the gown and machine-stitch. Grade seam and press seam allowance towards facing.
- Under-stitch facing inside of the finished seam.
- Turn under seam allowance on facing piece at centerback and slipstitch to back of zipper tape.
- Hand-sew hook and eye set above zipper opening to facing.
- At hemline, make a ½” double rolled hem.

Комментариев нет:
Отправить комментарий