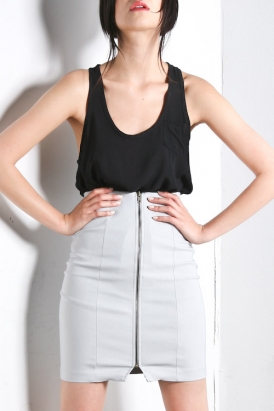
 Featured: Purple Label Zip Skirt
Everybody’s getting into the rocker-chic zipper skirts.
You will need:
- 2-way stretch fashion fabric, 45” wide (spandex blend)
- 1 separating zipper (equal to desired skirt length less 1 inch [25mm])
- India stay tape, ¼” [6mm] wide (approx. the waist measurement + 6” [15 cm])
- Matching polyester thread
- Schmetz Stretch Needle®
- Kraft paper
MEASUREMENTS
Waist – measure around narrowest part of torso, just above the navel.
Hip – measure around fullest part of seat, about 9” [23 cm] below waistline.
Finished Hem Length – measure vertically from waist to desired skirt length.
The featured skirt from Purple Label is 19 inches long [48.5 cm]
PATTERN DRAFT
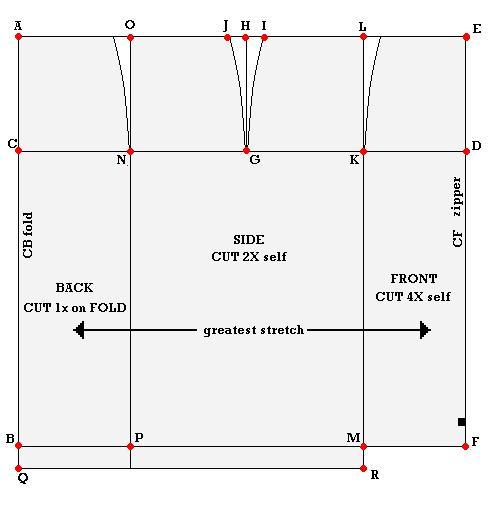
Draw 2 lines vertically and across on kraft paper at a 90° angle. Label point A.
A-B = skirt finished length
A-C = 9” [23 cm]
Square lines across all points.
C-D = ½ of hip measurement + ½ ” [6mm]
Square a line up and down from D to locate E and F.
C-G = ¼ of the hip measurement + 1” [25mm]
Square up to locate H.
I and J are 1” [25mm] on either side of H.
Join I and J to G to create a gently shaped dart, as shown.
K = midway G and D; square up and down to locate L and M.
C-N = D-K; square up and down to locate O and P.
B-Q = 1” [25mm]
M-R = 1” [25mm]
To shape waist, determine the difference between the hip and waist measurements.
Divide the difference by 4 and draw a gently shaped dart equal to this amount at L andO, with the dart facing the centerline.
NOTE: If the dart amount is greater than 1” [25mm], distribute the amount equally on either side of L and O.
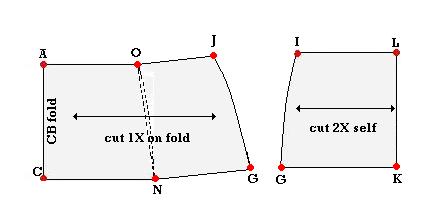 To draft the skirt facing, trace off A-O-J-G-N-C and I-L-K-G on additional paper down to the hipline.
Close dart on back piece by folding it out.
Trace out new shape and smooth a gentle curve at the chevrons.
Trace out I-L-K-G for the side front facing.
Add ½” [12mm] seam allowances to all pattern pieces except hemline.
Grainline is parallel to selvedges to allow for the greatest stretch to go around the girth.
CUTTING
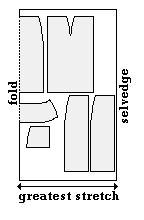 Determine the direction of greatest stretch of the fabric. It is usually the crosswise grain of the fabric eg. perpendicular to the selvedges.
Cut skirt front 4X self
Cut skirt side 2X self
Cut skirt back 1X on fold
Cut skirt back facing 1X on fold
Cut skirt side facing 2X self
ASSEMBLY
Sewing Tip: Use a stretch sewing machine needle for this project. Whenever sewing horizontal seams, find the “sweet spot” of the elasticity to allow for the stretch of the fabric.
1. Sew up side darts.
2. Insert separating zipper onto CF edges from top edge to ■.
Design Tip: For skirt hems below the knee, try a 2-way slider on the zipper for easy walking.
3. Sew one side panel to each skirt front.
4. Sew skirt back to side panels.
5. With skirt body FACE up, edge-stitch all vertical seams (have seam allowance directed toward the “side seam”)
For skirt facing:
6. Sew side front facings to each side of back facing.
7. Sew remaining 2 skirt fronts to each of the side front facings.
8. With skirt facing FACE up, edge-stitch all vertical seams (have seam allowance directed towards the centers).
Finishing the skirt:
9. With right side facing together, align and match top edge of skirt facing to skirt body.
10. 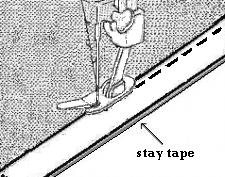 Cut the stay tape equal to the body measurement where you like to wear your skirts. (approximately 2″ [50mm] below waistline)
 Cut the stay tape equal to the body measurement where you like to wear your skirts. (approximately 2″ [50mm] below waistline)
11. Pin/baste stay tape in place and sew top edge of skirt along the stay tape.
12. Align and match front facing to skirt body along zipper edge. Sew CF seams and hemline. Turn skirt right side out. Pin/baste un-sewn facing edge to seam allowance of seam nearest to the CF zipper. Sew together. Separate zipper and topstitch CF along zipper.
13. Turn up hem 1” [25mm] and double top-stitch hem in place.
14. Secure the lower edge of the skirt facing to the skirt body by tacking together the seam allowances at the vertical seams only.
Комментариев нет:
Отправить комментарий