the inspiration

If you have been reading this blog for a while you may know that a draped skirt was on my to do list and today i come back to you with a tutorial.
i've done a simple skirt and then with a rectangular piece of fabric i've decorated its front.
What do you need:


 now sew the panel over the skirt at the waist line,the bow and the borders,cut the excess fabric (those bunny ears)


I warn you.Today Diy project is super easy with massive impact! And it involves the use of human hair!Wanna know more?
It concentrates all the fashion trends for spring:tassles,neon colours,orange,bright colored dyed hair.
What do you do if you like the bright colored hair trend but you're not so brave to dye your hair and hair extentions are too expensive?Simple,you can wear hair extension as unique tassle earrings!
The pictures are pretty self explainatory about the making,you have only to buy a wisp of colored hair,cut at the desired lenght,i made them very long like 22 cms,cut the paperclip and squeeze the hair in the closure,add hooks and you're done!
Now you own a pair of earrings that you can even style different ways according to your hair!
You can use your straightner and make them curly,wavy or whatever.
Do you like them?
If you do them totally send me a picture :D
Vi avverto il progetto fai da te di oggi è velocissimo ma di grande impatto e per realizzarlo avrete bisogno di capelli umani!
Ne volete sapere di più?
Beh,concentra tutti i fashion trend più cool della stagione primaverile:frangie,l'arancione,i capelli tinti in colori sgargianti,i colori neon!
Che fate se quei capelli tinti di arancione vi piacciono ma non avete il coraggio di tingere i vostri e le extension sono troppo costose?
Beh indossate ciocche di capelli come orecchini,si mischieranno ai vostri capelli per un look davvero unico.
Le immagini vi giudano nella realizzazione del progetto.Tutto quello che dovete fare è comprare una ciocca di capelli colorati,togliere il fermaglio che vi è cucito sopra,stringere i capelli in una piccola chiusura e tagliarli della lunghezza desiderata(io li ho fatti molto lunghi circa 22 cm)Aggiungete i gancetti ed è fatta.
Ora avete un paio di orecchini che potete addirittura mettere in piega come volete,usate la piastra per arricciarli o allisciarli,sperimentate.
Vi piacciono?
Se li realizzate mandatemi una foto! :D


 1.
1.

2.

3.

4.

:)

If you have been reading this blog for a while you may know that a draped skirt was on my to do list and today i come back to you with a tutorial.
i've done a simple skirt and then with a rectangular piece of fabric i've decorated its front.
What do you need:
- a skirt
- a rectangular piece of sheer or lightweighted fabric (i've used a 1,5x1 m piece)
- a mannequin or the help of a friend (go here to figure out how to make a mannequin with less than $20,i made my own,it's not pretty but it works fine)
 let your friend wear the skirt or put it on your dress form
- pin the rectangular piece of fabric on the skirt,the widest side goes around the waist,leave the same amount of fabric at each side


3. at the centre or the panel, with the hand squeeze the fabric up till the waist and pin it

4. the rectangular is now pinned at the centre
5. you have some excess fabric at the waist
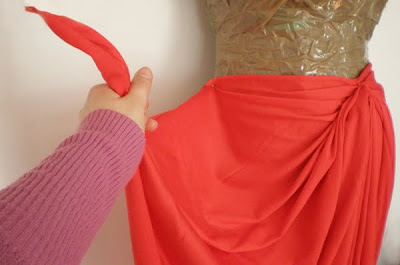
6. take the edge of the rectangular and pull it up,as you do it bigger ripples take form and the front edge becomes rounder;
you'll find in your hand a "bunny ear" shaped piece of fabric; to make the front edge rounder pull more fabric from the movable edge

4. the rectangular is now pinned at the centre
5. you have some excess fabric at the waist
6. take the edge of the rectangular and pull it up,as you do it bigger ripples take form and the front edge becomes rounder;
you'll find in your hand a "bunny ear" shaped piece of fabric; to make the front edge rounder pull more fabric from the movable edge


pin it to the back of the skirt (you can decide where if nearer to the front or all on the back)
repeat points 6 to 8 at the other side

if you see pointy edges at the end of the draping (this depends on the width of the rectangular piece of fabric)cut them and give to the hem a rounded shape
and you have your bow shaped draping
 now sew the panel over the skirt at the waist line,the bow and the borders,cut the excess fabric (those bunny ears)
Tassel Hair earrings DIY


I warn you.Today Diy project is super easy with massive impact! And it involves the use of human hair!Wanna know more?
It concentrates all the fashion trends for spring:tassles,neon colours,orange,bright colored dyed hair.
What do you do if you like the bright colored hair trend but you're not so brave to dye your hair and hair extentions are too expensive?Simple,you can wear hair extension as unique tassle earrings!
The pictures are pretty self explainatory about the making,you have only to buy a wisp of colored hair,cut at the desired lenght,i made them very long like 22 cms,cut the paperclip and squeeze the hair in the closure,add hooks and you're done!
Now you own a pair of earrings that you can even style different ways according to your hair!
You can use your straightner and make them curly,wavy or whatever.
Do you like them?
If you do them totally send me a picture :D
Vi avverto il progetto fai da te di oggi è velocissimo ma di grande impatto e per realizzarlo avrete bisogno di capelli umani!
Ne volete sapere di più?
Beh,concentra tutti i fashion trend più cool della stagione primaverile:frangie,l'arancione,i capelli tinti in colori sgargianti,i colori neon!
Che fate se quei capelli tinti di arancione vi piacciono ma non avete il coraggio di tingere i vostri e le extension sono troppo costose?
Beh indossate ciocche di capelli come orecchini,si mischieranno ai vostri capelli per un look davvero unico.
Le immagini vi giudano nella realizzazione del progetto.Tutto quello che dovete fare è comprare una ciocca di capelli colorati,togliere il fermaglio che vi è cucito sopra,stringere i capelli in una piccola chiusura e tagliarli della lunghezza desiderata(io li ho fatti molto lunghi circa 22 cm)Aggiungete i gancetti ed è fatta.
Ora avete un paio di orecchini che potete addirittura mettere in piega come volete,usate la piastra per arricciarli o allisciarli,sperimentate.
Vi piacciono?
Se li realizzate mandatemi una foto! :D


My DIY: Book friendly wallet clutch

At long last, my current version of a DIY book clutch.
This particular DIY is inspired by Kate Spade's book clutch, which is $325. Mine cost basically nothing, and, most importantly, no actual books were harmed in the making of this clutch.

This clutch allows you to make a fully customizable cover - your favorite obscure book without cutting up your favorite obscure book.
On the down side, it's a wallet clutch, which means it holds only wallet things - money, credit cards and papers. No room for lipstick.

The shell of the book is made from a DVD case.
You will replace the DVD title cover with your own custom "book cover." To do this, you will need a high resolution image of a vintage book cover that is at least 11 inches by 7 1/4 inches.
If you can't find one online, you can scan a favorite book or download the cover I used, which is available here. (I chose The Great Gatsby for its Long Island association.) Print it and trim to fit inside the clear sleeve of the DVD case.
Using a razor blade, cut out the ring that holds the DVD in place. You can also cut out any clips or tabs that you don't find attractive. (I kept some since I can clip papers to them.)

Trim some black velvet (or black felt) to fit inside the case.

Glue the fabric to the inside of the case.

Glue a 4 1/2 inch diameter mirror (such as from an old compact) into the depression where a DVD would normally go.
Glue a fancy button to the edge of the case as a faux purse latch.
As an option, you can sew or glue pockets and holders.

Look smart while carrying your coupons, gum, wads of cash and Metro Card. Make a different book for every outfit.

DIY : Playsuit
2.
3.
4.
:)
Raissa, Los Angeles
With the Holidays fast approaching, like hello! Thanksgiving is next week, I wanted to liven up my basics and turn them into Holiday ready pieces. With my hardware (chains, studs, spikes, etc.) in all-over-the-place mode, I chose the chain as my weapon of choice. The project was fun, easy and I must admit, the result has been my MOST FAVE D.I.M item so far!
Here’s the 4-Step program on how to get instantly GLAM for the Holiday season:
1. Choose a basic soft cotton top or dress that has a low scoop back. You’ll also need something to make a hole with (I used a teeny tiny screwdriver, even sharp tweezers would work), measuring tape, a small safety pin and a long, long chain without the clasp (mine was about 5 feet in length). This can all be purchased at Michael’s or most craft stores.


2. Make your first hole on one side and then pin the measuring tape to the dress to guide you as you poke in the rest of the holes. This way, the holes will be even on each side and you can choose how close or farther apart you want the chains to be. I measured 1 1/2 inches of space between each hole, creating 7 holes total on each side.


3. Now, just start lacing the chain through each hole and make sure the chains are even on both sides before you begin. When finished, use your safety pin to secure each end together, or if you have more time, you can easily sew it together.


4. DONE. Ten super fast minutes later and you have a brand new GOTTA WEAR IT Holiday dress! Bring on the eggnog!


With the Holidays fast approaching, like hello! Thanksgiving is next week, I wanted to liven up my basics and turn them into Holiday ready pieces. With my hardware (chains, studs, spikes, etc.) in all-over-the-place mode, I chose the chain as my weapon of choice. The project was fun, easy and I must admit, the result has been my MOST FAVE D.I.M item so far!
Here’s the 4-Step program on how to get instantly GLAM for the Holiday season:
1. Choose a basic soft cotton top or dress that has a low scoop back. You’ll also need something to make a hole with (I used a teeny tiny screwdriver, even sharp tweezers would work), measuring tape, a small safety pin and a long, long chain without the clasp (mine was about 5 feet in length). This can all be purchased at Michael’s or most craft stores.
2. Make your first hole on one side and then pin the measuring tape to the dress to guide you as you poke in the rest of the holes. This way, the holes will be even on each side and you can choose how close or farther apart you want the chains to be. I measured 1 1/2 inches of space between each hole, creating 7 holes total on each side.
3. Now, just start lacing the chain through each hole and make sure the chains are even on both sides before you begin. When finished, use your safety pin to secure each end together, or if you have more time, you can easily sew it together.
4. DONE. Ten super fast minutes later and you have a brand new GOTTA WEAR IT Holiday dress! Bring on the eggnog!
YoBit lets you to claim FREE CRYPTO-COINS from over 100 unique crypto-currencies, you complete a captcha once and claim as many as coins you need from the available offers.
ОтветитьУдалитьAfter you make about 20-30 claims, you complete the captcha and continue claiming.
You can click claim as much as 50 times per one captcha.
The coins will safe in your account, and you can convert them to Bitcoins or USD.